🔗 Trigger Links
Updated as of February 4, 2025
This Knowledge Base article explains Trigger Links and their role in automation, tracking, and engagement across multiple channels. These links redirect users while recording interactions and triggering workflow actions. Use cases include dynamic URL updates, workflow automation, unsubscribe management, and contact activity tracking. The guide covers setup, best practices, and advanced strategies like the Workflow “Wait” step for optimized automation.
Trigger links are a useful method to redirect a user to a specific page after they click on it within an SMS, Email, GMB, FB/IG DM's and WhatsApp. When a user clicks on the trigger link, the system will record it in the contact's activity timeline and trigger a pre-defined action within a workflow. Within the workflow build there are actions and triggers that you can fire off a trigger link click.
Please Note: Trigger links are supported in SMS, Email, GMB,and FB/IG/WhatsApp DMs ONLY.
Trigger Link Use Cases
Dynamic URL Updates in Email Campaigns:
Use trigger links to dynamically update URLs in your email campaigns. For instance, if you run monthly or quarterly promotions and want to use the same email template, you can set up a trigger link with a custom value that points to the current promotion URL. When a contact clicks on this link, it takes them to the latest promotion page. This way, you can reuse your email template without manually updating the links each time.
Workflow Automation Based on Trigger Link Clicks:
Set up workflows that respond to trigger link clicks. For example, you can create a workflow that sends appointment confirmations and reminders. When a contact clicks on a trigger link in an appointment reminder email, the system records the click and triggers the next step in the workflow, such as sending a survey or review request.
Unsubscribe Links for Different Communication Channels:
Implement unsubscribe trigger links for various communication channels, including SMS, Email, Google My Business (GMB), Facebook, and Instagram. A contact who clicks on these links will be unsubscribed from the respective channel. This ensures compliance with opt-out regulations and helps manage communication preferences effectively.
Tracking Contact Activity:
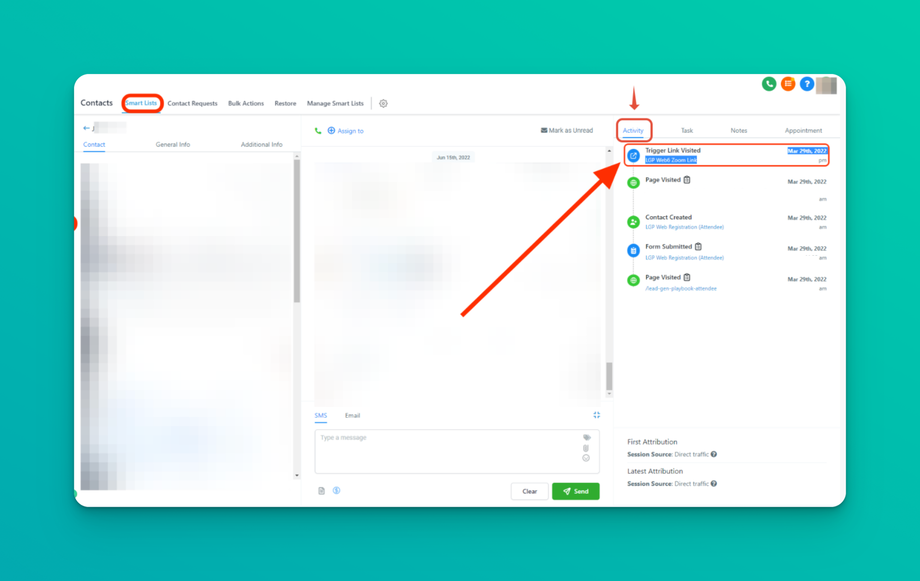
Use trigger links to track a contact's engagement and actions within your SMS and email campaigns. When a contact clicks on a trigger link, their activity is recorded in the contact's activity timeline. This information can be valuable for assessing their behavior and campaign effectiveness.
Educational Resources in Campaigns:
Embed trigger links within your email campaigns to provide educational resources. For instance, you can include links to tutorials, how-to videos, or articles related to your products or services. Clicking on these trigger links can trigger automated follow-up actions or track a contact's interest in specific topics.
Event Registration and Updates:
If you're organizing events, use trigger links in your email invitations. When recipients click on the trigger link to RSVP or get event updates, you can automate the process of confirming their attendance, sending event details, or collecting additional information.
Product Recommendations and Personalization:
In your email marketing, incorporate trigger links that lead contacts to personalized product recommendations based on their preferences and past interactions. Triggering this link can initiate automated processes to tailor future communications and product offerings.
Trigger links in Workflows
Trigger links are used in automations to trigger specific actions based on a user’s click within emails or SMS messages. This step-by-step guide shows how to set up and use trigger links in your workflows.
Step-by-Step Guide: Using Trigger Links in Workflows
Step 1: Understand Trigger Link Use Cases
Trigger links can only be used within emails and SMS messages. They cannot be used in funnels or websites. Typical use cases include tracking customer actions, like confirming appointments or purchases.
Step 2: Create a Workflow with Trigger Links
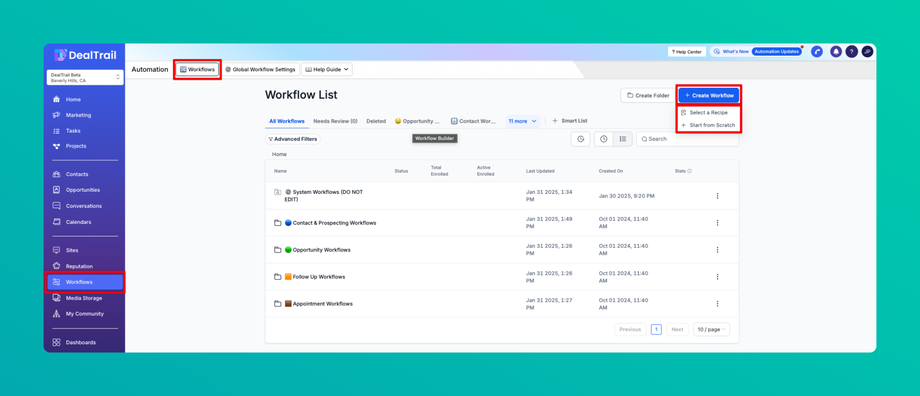
1. Navigate to Workflows:
• Go to the workflows section in your system where workflows are created.
• Select a pre-existing workflow or create a new one.
2. Set Up an Appointment Follow-Up (Example):
• Use an automation for appointment reminders.
• Add reminders that go out before and after the appointment.
• For instance, 24 hours before, send an SMS reminder, and 1 hour before, send a final reminder.
Step 3: Add a Trigger Link
1. Open the Workflow Editor:
• In your workflow, look for the step after the appointment (e.g., follow-up notification).
2. Insert a Trigger Link:
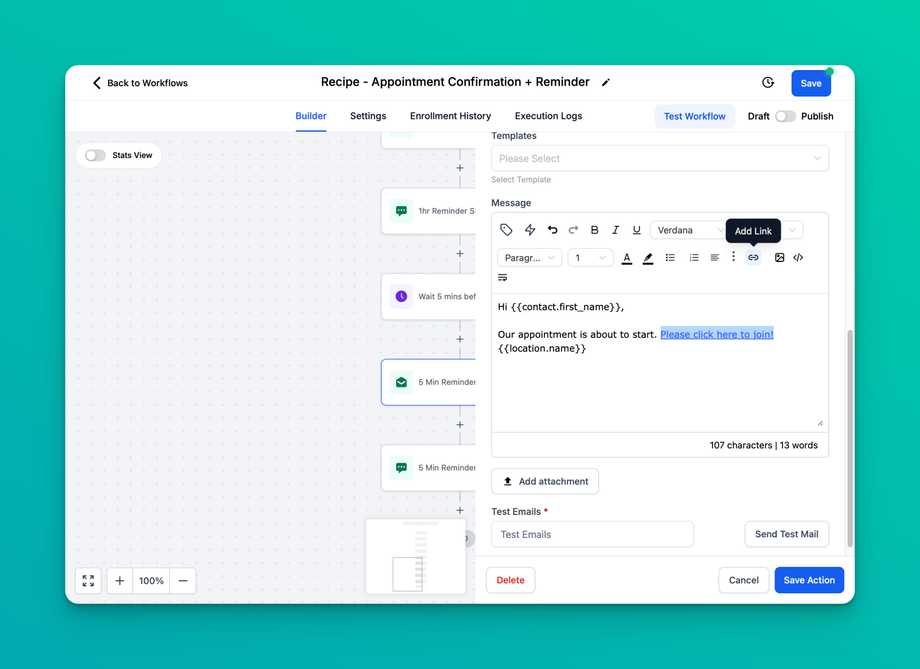
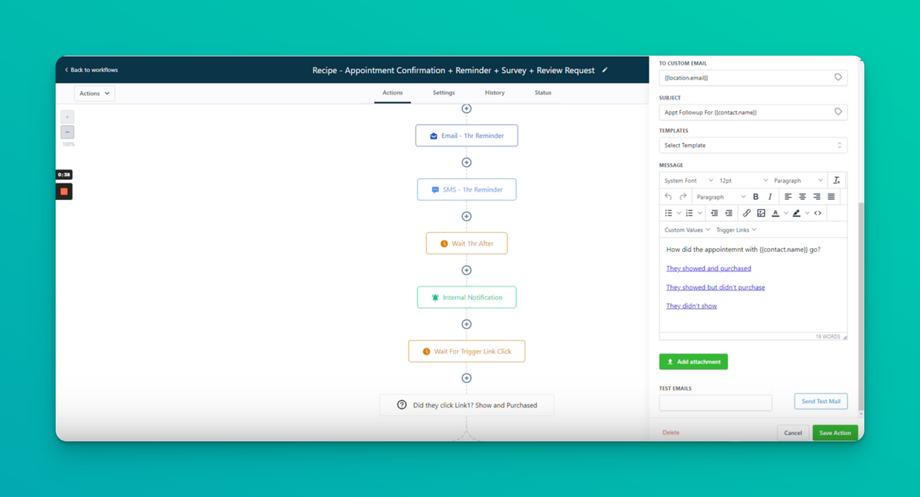
• In the step that sends an internal notification (email or SMS), add a trigger link.
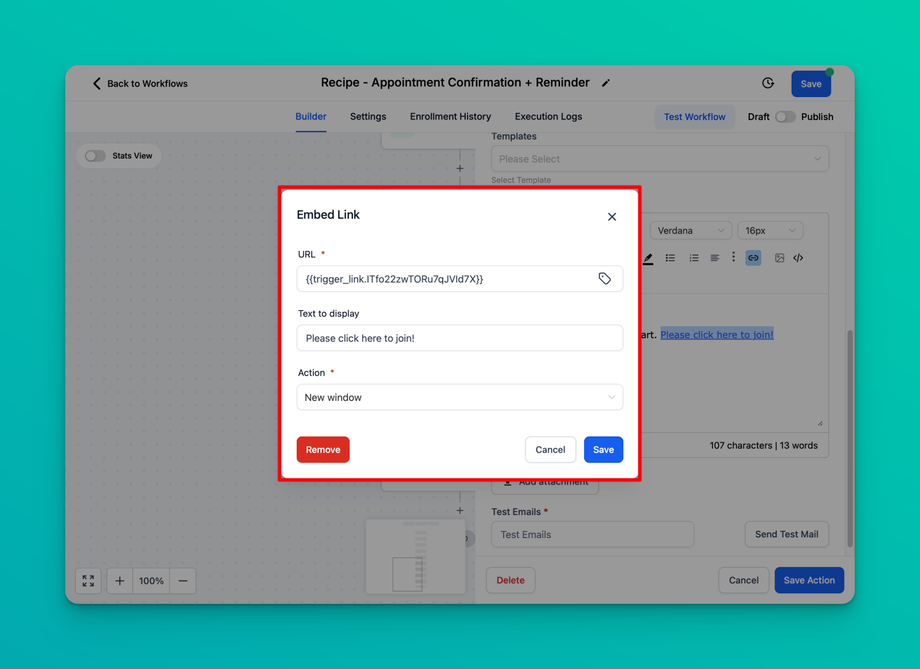
• Give the trigger link a name and enter the URL that corresponds to the action (e.g., a “no-show” or “purchase” link).
3. Example of Trigger Link Use:
• After the appointment, an internal notification might ask how the appointment went. The links could be:
• No-Show: Mark the customer as a no-show.
• Showed & Purchased: Update the opportunity in your sales pipeline.
• Showed but Not Ready: Add the customer to a follow-up campaign.
Step 4: Use Trigger Links in Emails and SMS
• Email: You can embed hyperlinks into the email. When the recipient clicks a trigger link, it automatically tracks the click and triggers the next step in the workflow.
• SMS: While hyperlinks aren’t supported in SMS, you can still include a clickable link as a plain URL that triggers the workflow upon click.
Step 5: Link Trigger to Actions
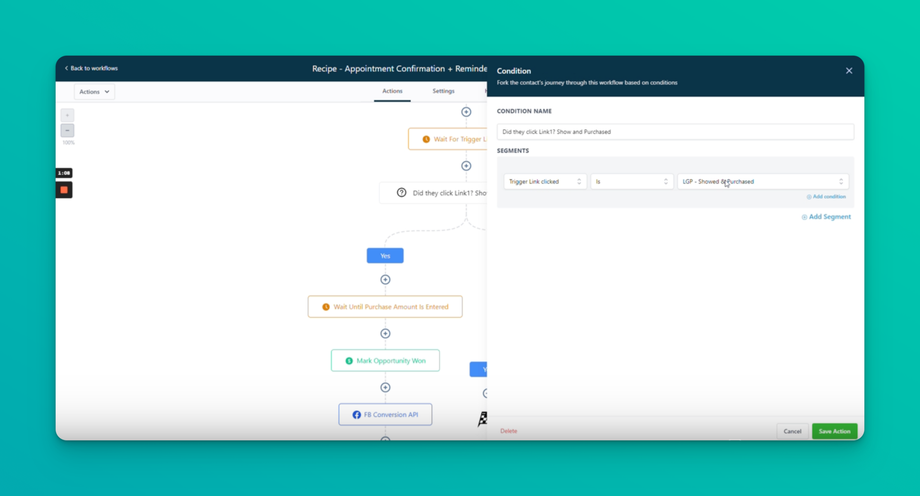
• Set up your workflow to react based on the trigger link clicked:
• If a customer clicks “no-show”, the system can automatically update their status.
• If they click “purchased”, the system might move them to a new stage in the sales process.
Step 6: Test and Activate Workflow
1. Test the Workflow:
• Ensure that all trigger links are properly linked to actions.
• Simulate a customer interaction by clicking the trigger links and confirming the workflow reacts appropriately.
2. Activate the Workflow:
• Once tested, activate the workflow so that it runs automatically with real customer interactions.
Summary
Trigger links in workflows allow for seamless automation based on user actions within emails or SMS. Follow these steps to set up trigger links, and ensure you’re tracking critical actions like appointment confirmations or purchases with ease.
Trigger links in Campaigns
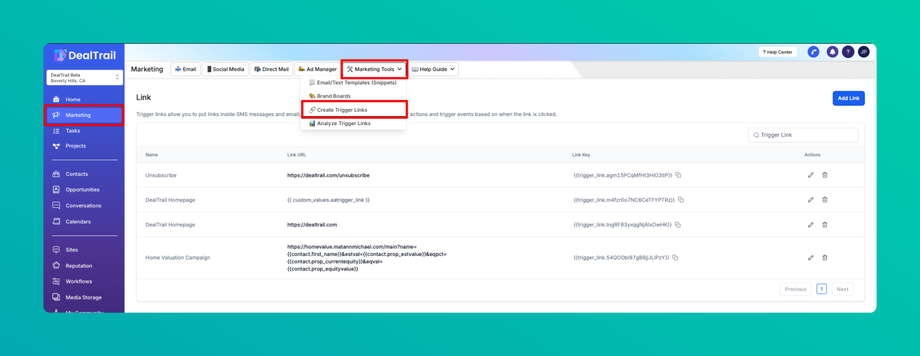
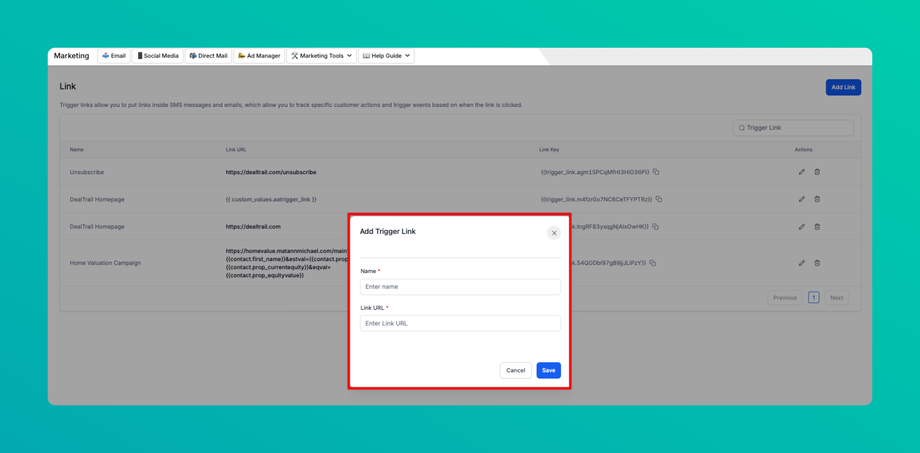
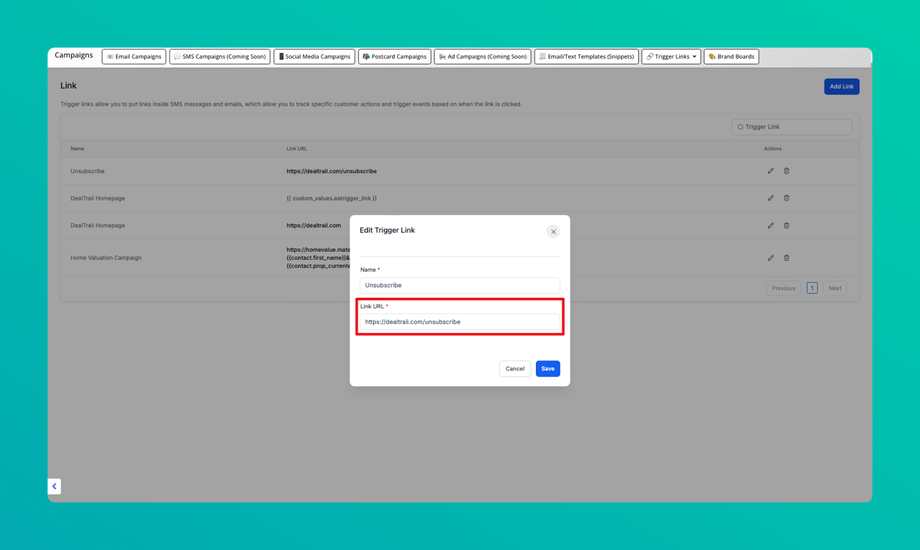
1. Go to Marketing > Marketing Tools > Create Trigger Links > Add Link
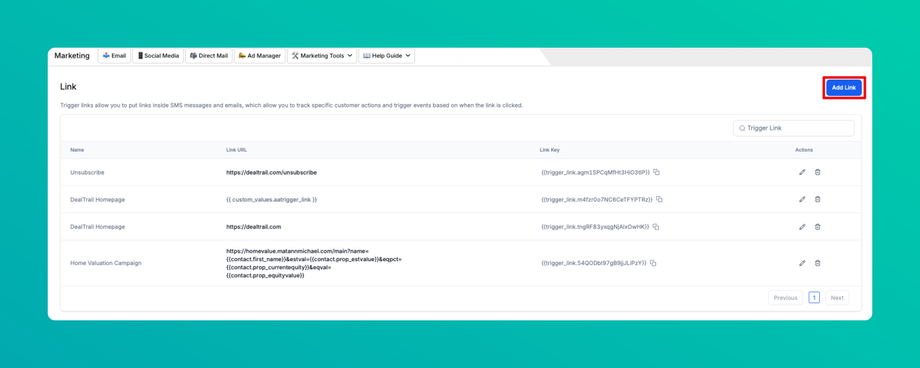
2. Input the Name of the Trigger link and the Link URL in which leads will be directed to then hit Save
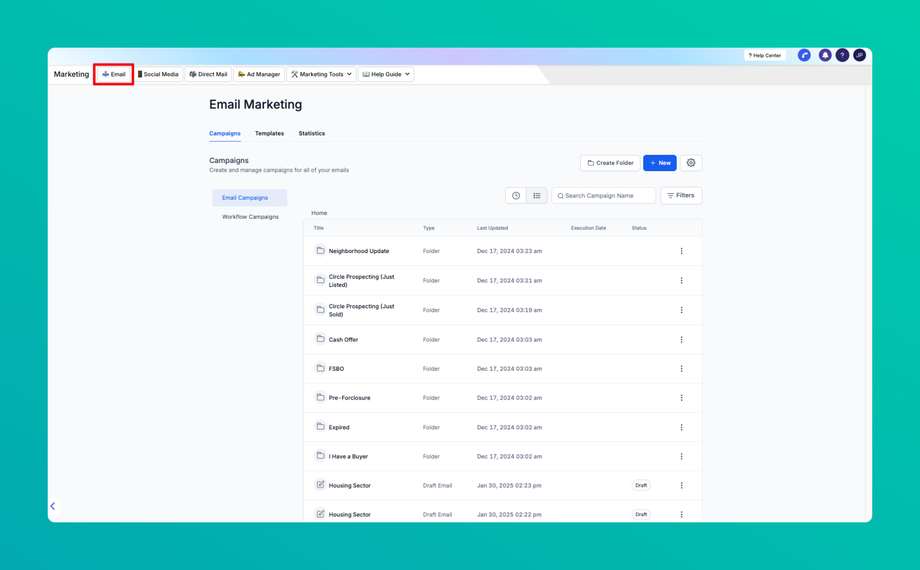
3. Go to Marketing > Email > New
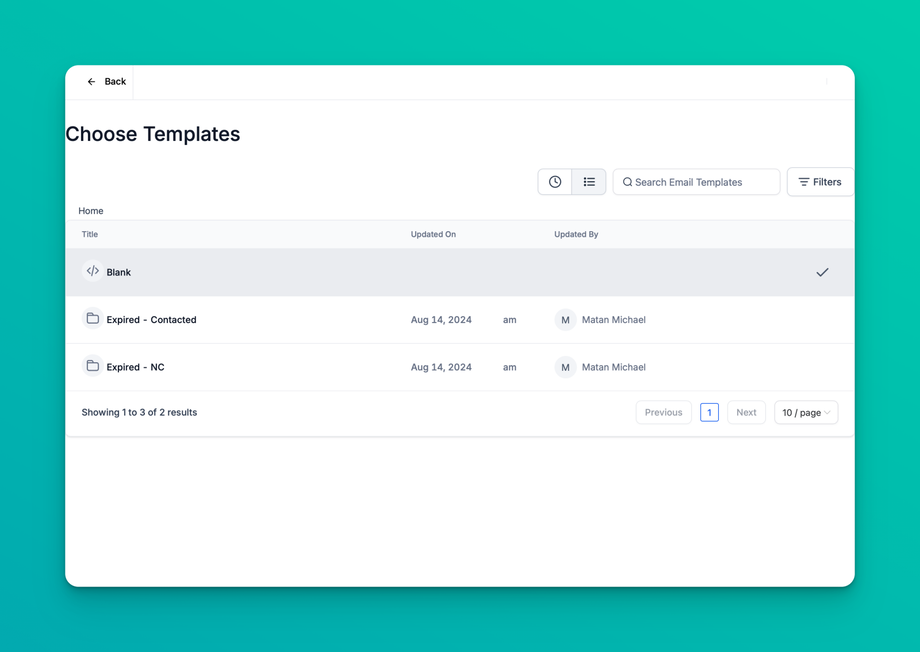
Choose a Template
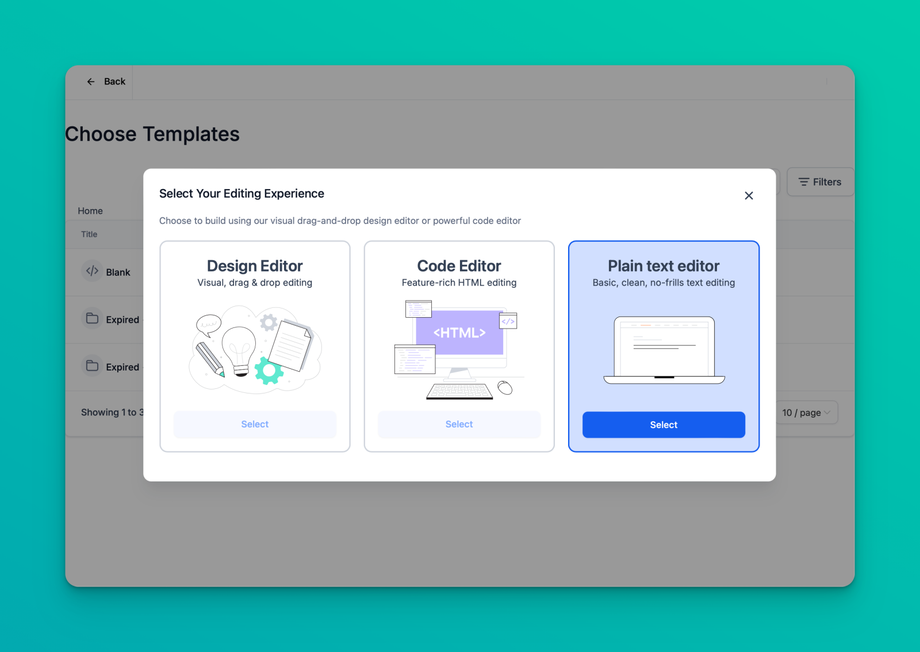
Select your Editing Experience
Name your Campaign and edit your message then add your Trigger Link.
Trigger Link How-to's
How to use Custom Values and trigger links to change your URL dynamically.
This is great if you're running promotions monthly or quarterly and want to use the same workflow. Update your custom value URL to point to your new "offer URL," and the system will dynamically update the trigger link.
Please Note:
- This will not retroactively affect any previous link URLs from past campaigns.
- When setting up your workflow please make sure to add the "trigger link" to your SMS or Email message body. Placing the "Custom Value" in the message body will not "fire" the trigger link when clicked.
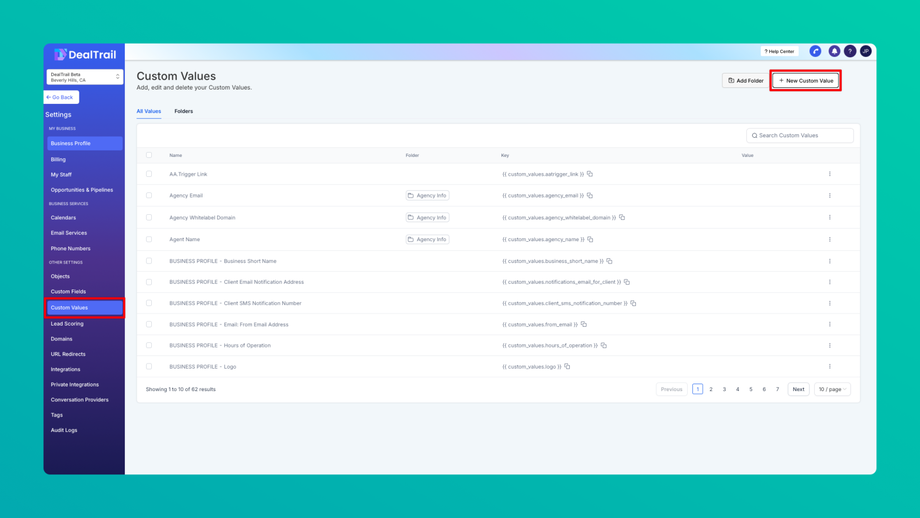
- Go to Settings > Custom Values > New Custom Value
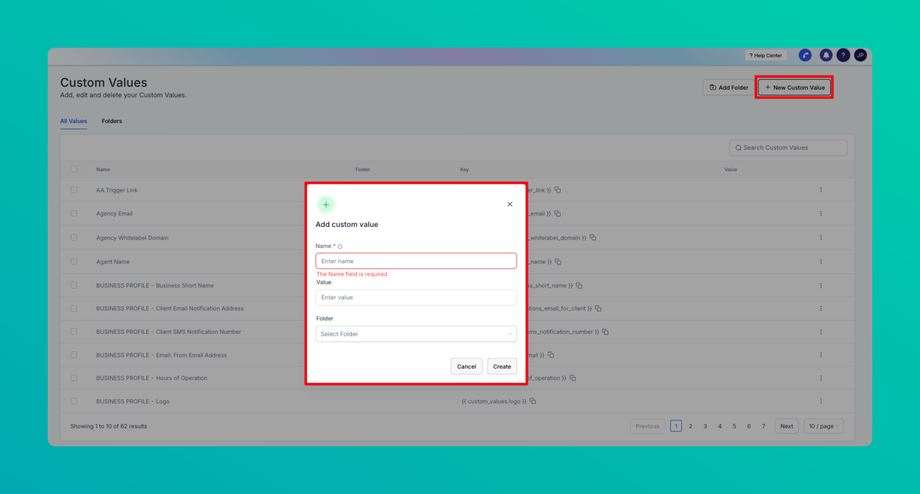
2. Input the Name and Value of the Custom Value and click Create
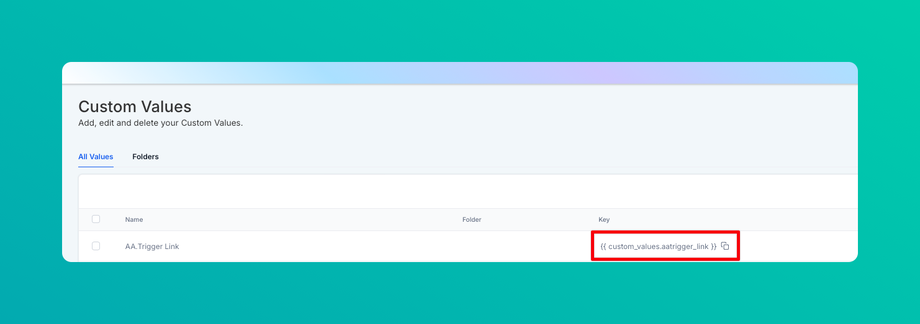
Copy the Key of the newly created Custom Value
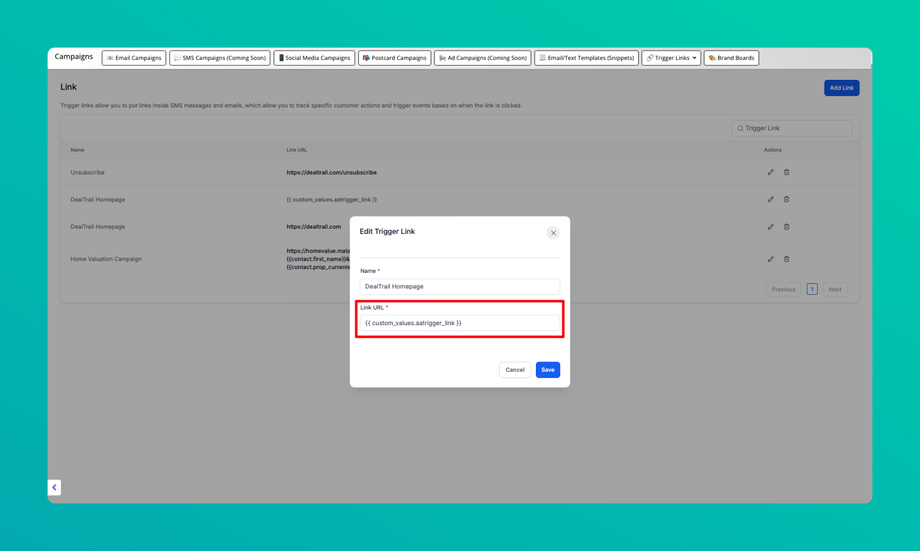
3. Go to Marketing > Marketing Tools > Create Trigger Links > Add Link then proceed to input the Name and the Custom Value URL that is created
How to use the Workflow Wait step for a Trigger link Click.
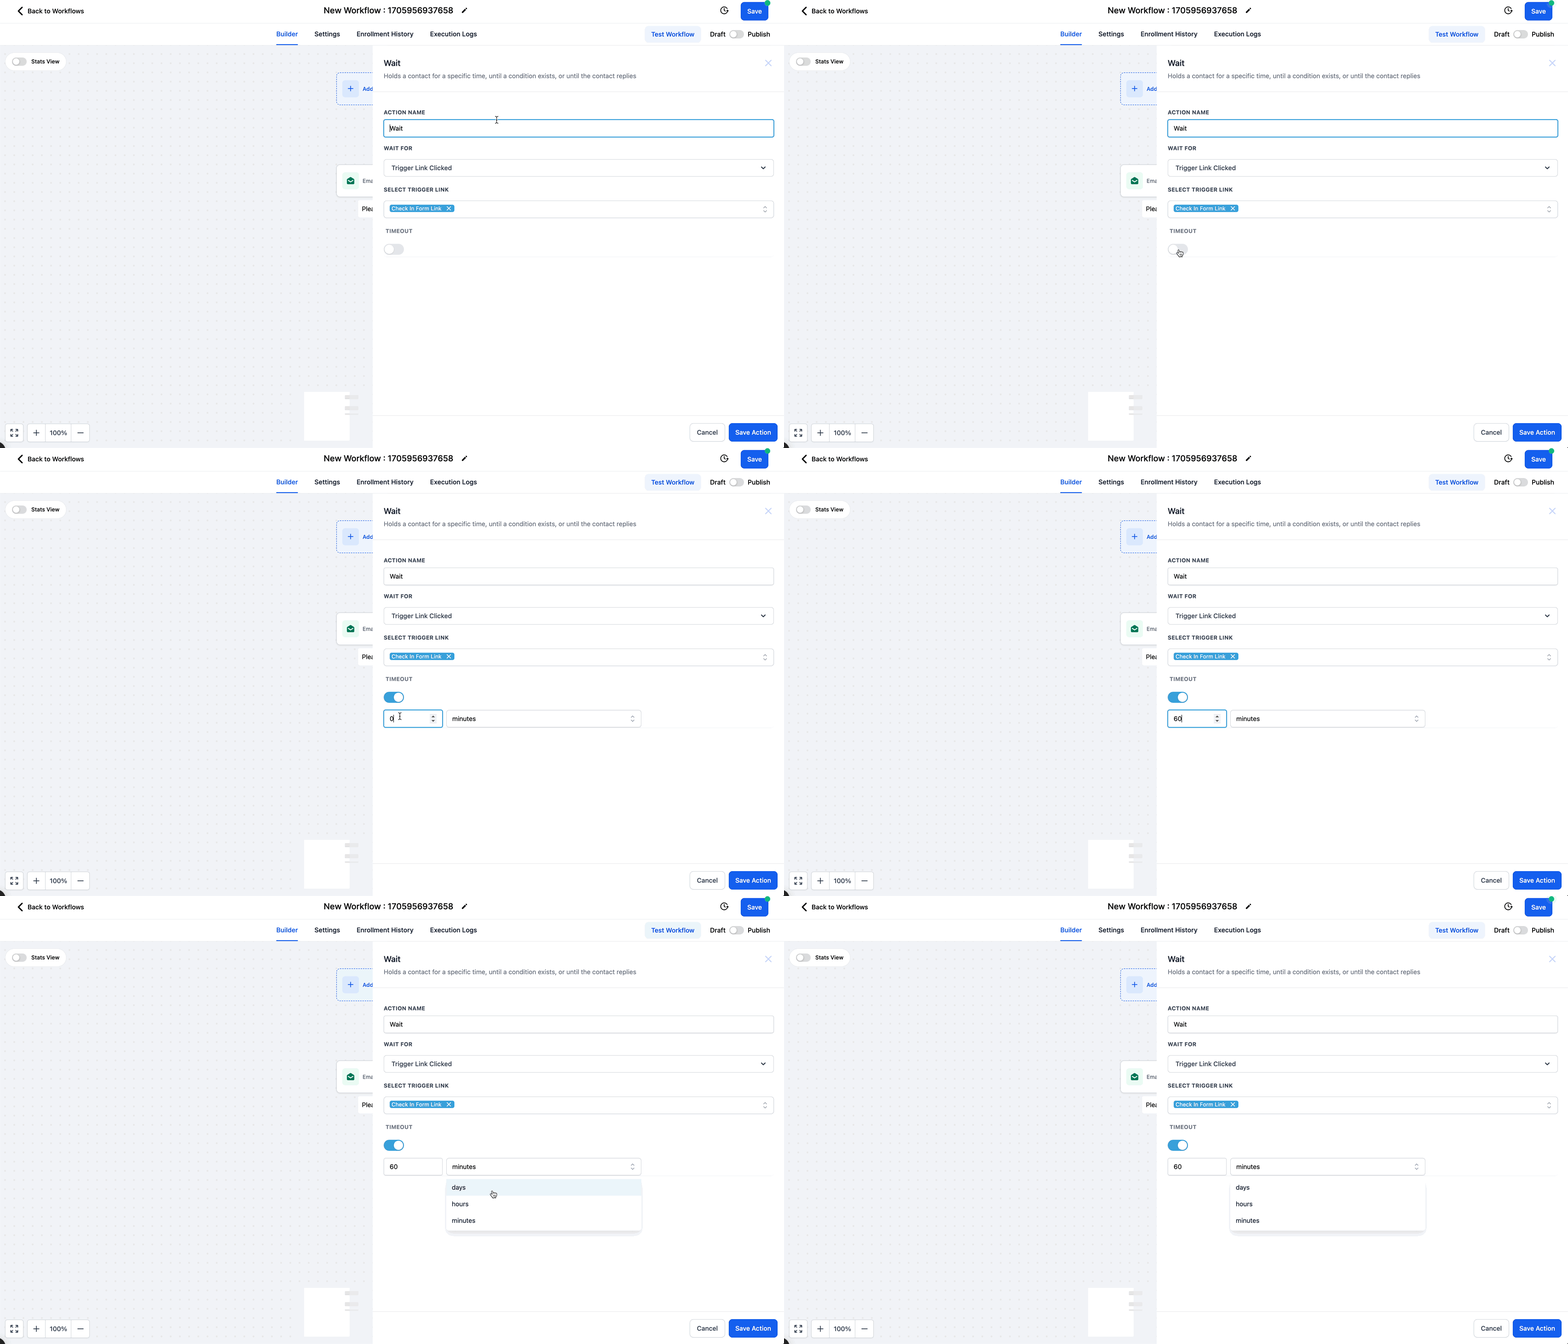
This video covers how to use a "wait" step action within a workflow to trigger the next step based on a trigger link click. This workflow can be found in your workflow library as "Recipe - Appointment Confirmation + Reminder + Survey + Review Request."
1. Add the Trigger Links in the Email or SMS on your Workflow
2. Create an If/Else Action then add Trigger Link
How to set up unsubscribe trigger links by communication channels (SMS, Email, GMB, FB/ IG DMs)
- Go to Marketing > Marketing Tools > Create Trigger Links > Add Link
- Input the name of your Trigger Link and the Link URL
3. Create a Workflow and use the Trigger Link in your If/Else Condition. If Clicked proceed to stop the sending of communications to lead.
Please Note:
By default the SMS carriers have prebuilt opt-out keywords like ['STOP', 'STOPALL', 'UNSUBSCRIBE', 'CANCEL', 'END', 'QUIT']. When these keywords are used the lead/ contact will automatically be unsubscribed.
To opt back-in the lead/ contact will need to respond "Start".
FAQs
Q: How do I find the contacts' activity timeline?
A: Click on contacts > Smartlist > search for the contact > Click on 'activity'
Q: What does the 'Timeout' toggle in the Wait Action do?
A: When enabled, the timeout function will skip the Wait Action (step) after the amount of time you define in the input box under the toggle (visible only when it is enabled).


