🏷️ Tags
Tags in DealTrail are a powerful feature used to organize, categorize, and track contacts, opportunities, and activities within your CRM. Tags provide flexibility and help segment your database for more targeted workflows, campaigns, and reports.
1. Tag Creation and Management
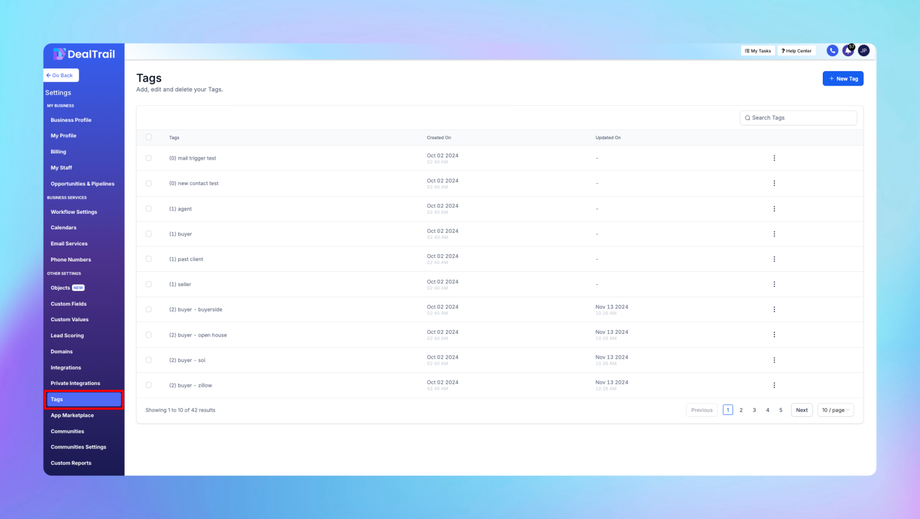
Tags can be created and managed in the Settings section of DealTrail.
Steps to Create Tags:
1. Navigate to Settings:
• Go to Settings > Tags.
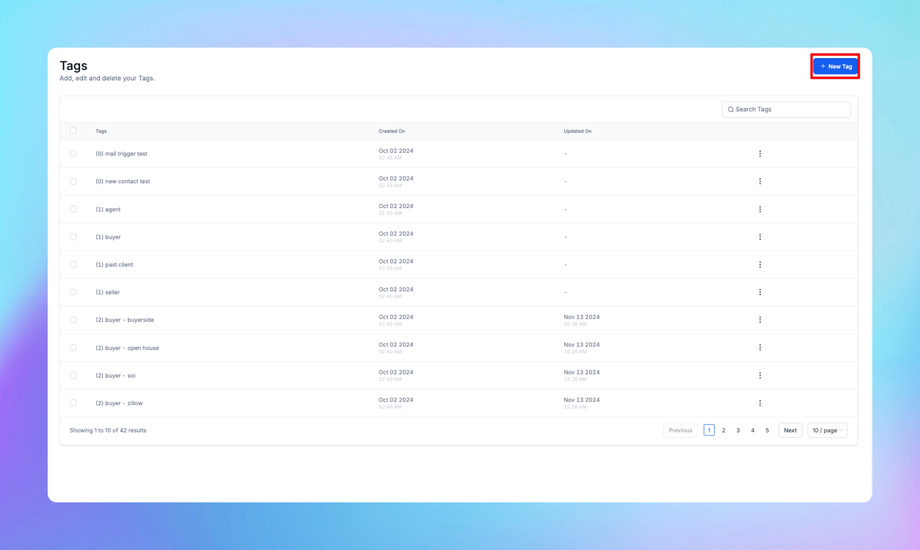
2. Add a New Tag:
• Click Create Tag.
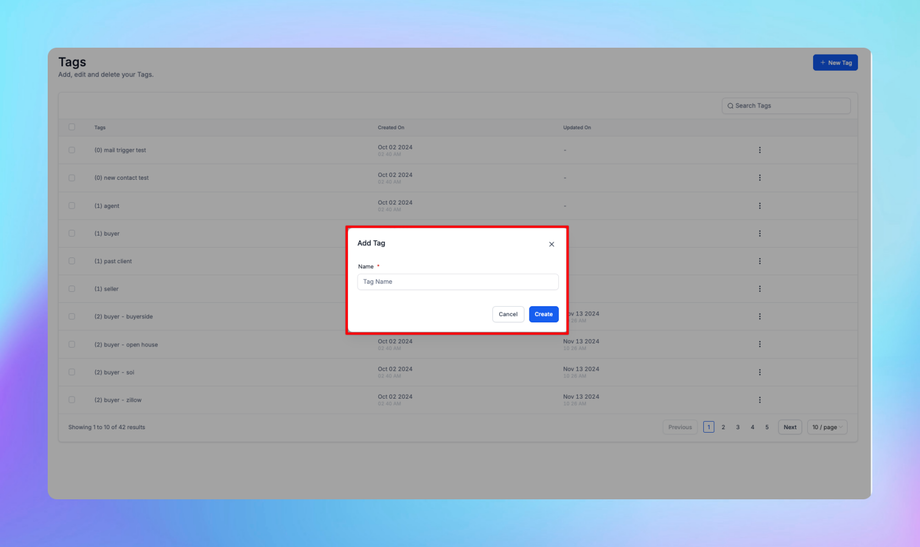
3. Name the Tag:
• Enter a name that clearly describes the purpose of the tag (e.g., “Webinar Attendee”, “VIP Customer”, “Expired Lead”).
• Use a naming convention that is consistent across your organization.
4. Save the Tag:
• Click Save to add the new tag to your account.
Steps to Edit or Delete Tags:
1. Go to Settings > Tags.
2. Find the tag you want to edit or delete.
3. Click the Edit (pencil icon) to modify the tag name.
4. Click the Delete (trash icon) to remove the tag.
Tip: Tags are global in DealTrail, meaning they are accessible across all locations within your account.
2. Tagging Contacts
Tags can be manually or automatically assigned to contacts.
Manually Tagging Contacts:
1. Open the Contact Profile:
• Go to Contacts > Select a contact.
2. Add Tag:
• Click on the Tag Field in the contact’s profile.
• Select from the existing tags or create a new one.
3. Save Changes:
• Once the tag is added, click Save.
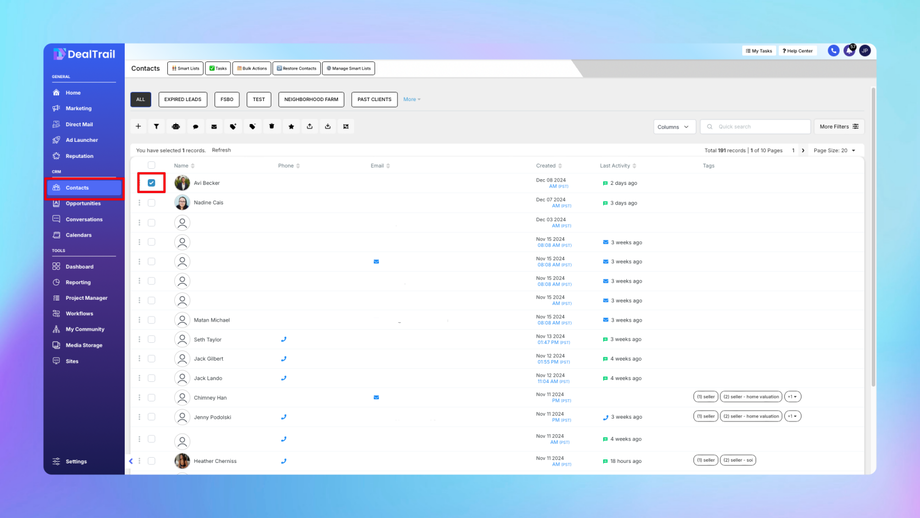
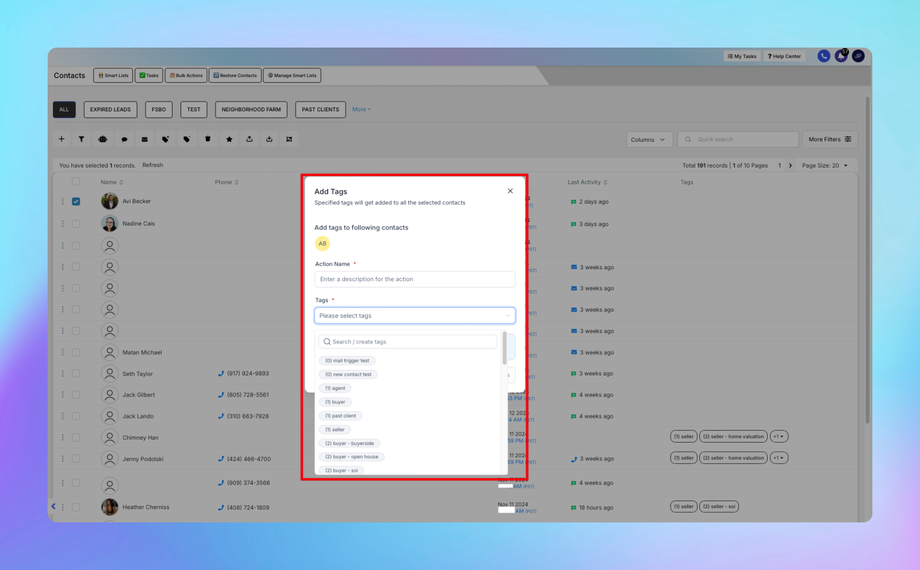
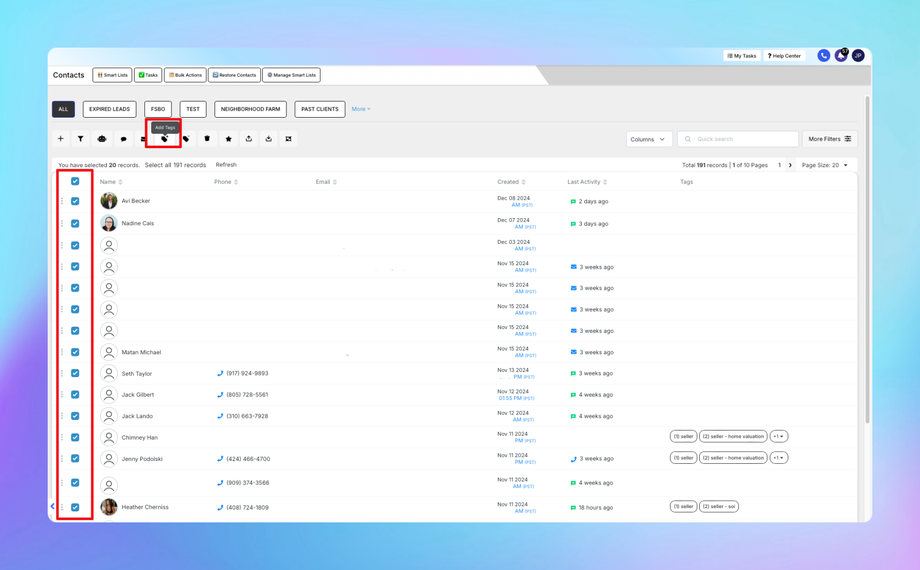
Bulk Tagging Contacts:
1. Go to Contacts.
2. Use filters or manually select multiple contacts.
3. Click Actions > Add Tags.
4. Select the desired tag(s) and confirm.
Tip: Bulk tagging is useful for quickly categorizing a large list of contacts based on campaigns, events, or import sources.
3. Automating Tag Assignments
Tags can be automatically assigned through workflows or triggers, saving time and ensuring accuracy.
Steps to Automate Tag Assignments:
1. Create a Workflow:
• Go to Automation > Workflows > Create Workflow.
2. Set a Trigger:
• Examples of triggers include:
• Form submission.
• Appointment booking.
• Contact added to a pipeline stage.
3. Add the Tag Action:
• After the trigger, add an action called Add Tag.
• Choose the tag you want to assign automatically.
4. Activate the Workflow:
• Save and activate the workflow to begin tagging contacts automatically.
Example: If a contact submits a “Free Trial Form,” the system can automatically add a tag like “Free Trial Lead.”
4. Using Tags in Workflows
Tags can also serve as triggers or conditions in workflows.
Workflow Use Cases with Tags:
1. Trigger Based on a Tag:
• Start a workflow whenever a tag is added to a contact.
• Example: When the tag “High Value Lead” is added, trigger a follow-up email sequence.
2. Conditional Logic with Tags:
• Use If/Else logic based on tags.
• Example:
• If a contact has the tag “VIP Customer”, send them a premium offer email.
• Else, send a standard offer email.
3. Remove Tags:
• Add an action in a workflow to remove tags when certain conditions are met (e.g., when a lead becomes a customer, remove the “Lead” tag).
5. Filtering and Segmentation with Tags
Tags allow for effective contact segmentation for reporting, campaigns, or list management.
How to Filter Contacts by Tags:
1. Navigate to Contacts:
• Go to Contacts.
2. Apply a Tag Filter:
• Use the Filter option and select Tags.
• Choose one or more tags to filter the contact list.
3. Save the Filtered List:
• Save the filtered list as a Smart List for quick access.
How to Use Tags for Segmentation in Campaigns:
1. Go to Marketing > Campaigns.
2. When selecting the audience for an email or SMS campaign, filter by tags.
3. Example:
• Send a “Thank You for Attending” email to contacts with the tag “Webinar Attendee.”
Tip: Combine tags with other filters (e.g., tags + location + last activity date) for advanced segmentation.
6. Best Practices for Tag Management
1. Use Consistent Naming Conventions:
• Example: Prefix tags with categories like “Lead-”, “Customer-”, or “Event-” to organize them.
• Use clear, descriptive names (e.g., “2024 Product Launch”, “Free Trial Lead”).
2. Regularly Audit Tags:
• Review and clean up unused or outdated tags to keep the system organized.
3. Limit Over-Tagging:
• Avoid using too many tags on a single contact to reduce confusion and clutter.
4. Leverage Tags for Reporting:
• Use tags to group contacts for reporting on specific campaigns or events.
5. Combine Tags with Automation:
• Automate tag application wherever possible to minimize manual work.
FAQs
Q: Can I delete a tag without affecting contacts?
A: Yes, deleting a tag only removes it from the system. It will no longer appear on tagged contacts, but the contact details remain unaffected.
Q: Can a contact have multiple tags?
A: Yes, contacts can have multiple tags, allowing for detailed categorization and segmentation.
Q: Can I export contacts with their tags?
A: Yes, when exporting contacts, tags will appear as a separate column in the exported CSV file.
Q: Can tags be location-specific?
A: No, tags are global across all locations within the account.
Q: Is there a limit to the number of tags I can create?
A: DealTrail does not impose a strict limit on the number of tags, but it’s best to keep tags organized for effective management.
Use Cases for Tags
1. Lead Nurturing:
• Tag leads based on their position in the sales funnel (e.g., “Top of Funnel”, “MQL”, “SQL”).
2. Event Tracking:
• Tag attendees of specific webinars or events (e.g., “2024 Conference Attendee”).
3. Customer Segmentation:
• Identify customers by type (e.g., “VIP Customer”, “Annual Plan Subscriber”).
4. Behavior-Based Tagging:
• Tag users based on actions (e.g., “Downloaded Ebook”, “Clicked Offer Link”).
5. Follow-Up Campaigns:
• Tag contacts who missed an appointment (e.g., “Missed Demo”) for re-engagement.


