📊 Getting Started with Opportunities
Step-by-Step Guide: Creating Pipelines
Step 1: Accessing the Pipelines Section
-
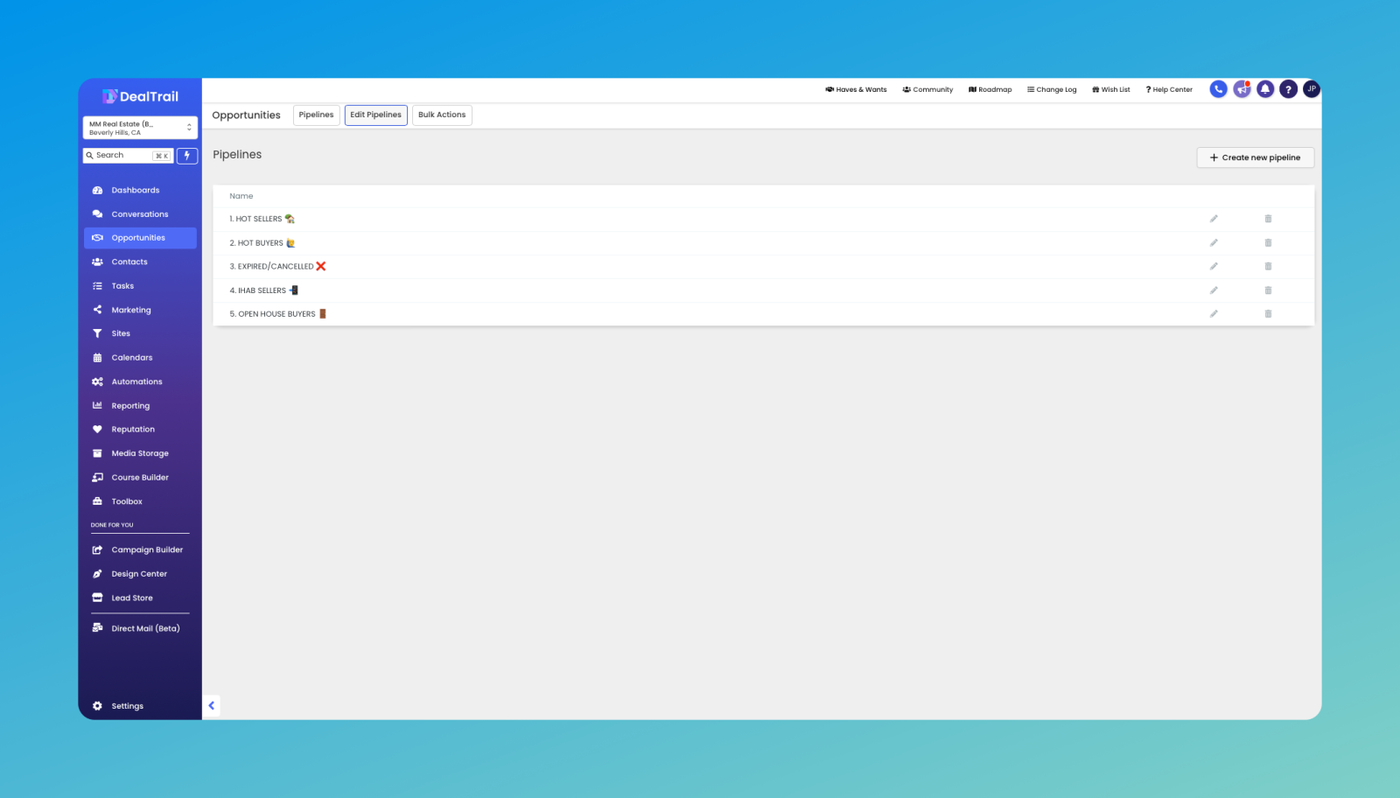
From the side menu, go to CRM > Opportunities.
- Click on the Pipelines tab.
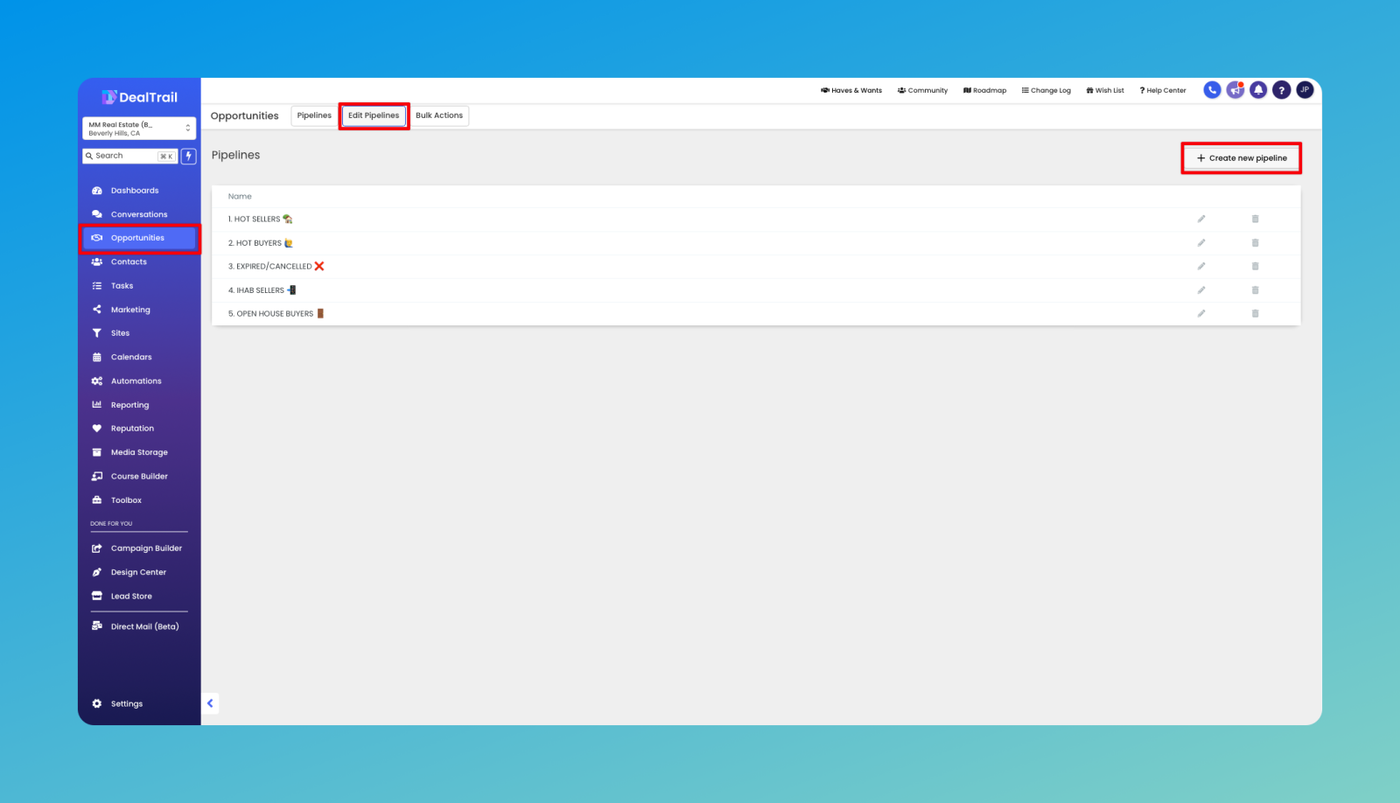
Step 2: Creating a new Pipeline
-
Once you're in the Pipelines section, click on the "Create Pipeline" button.
-
Give your pipeline a descriptive name that reflects its purpose or the stage of the customer journey it represents.
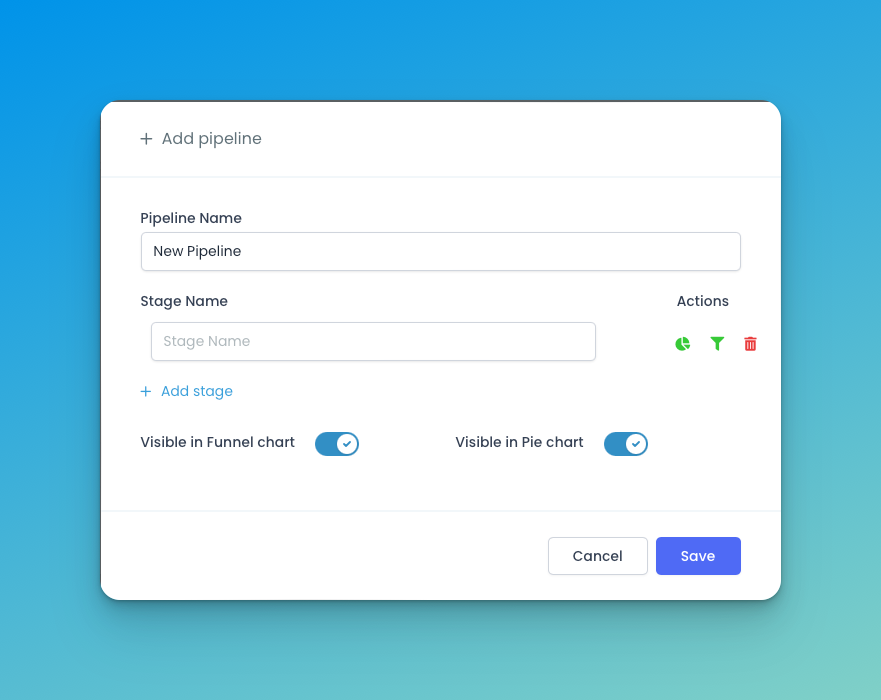
Pipeline names always need to be unique and adding or updating another pipeline with an identical name is not allowed.
Step 3: Adding Stages to Your Pipeline
-
With your new Pipeline created, you'll see an empty canvas where you can add stages.
-
Enter the name of the first stage of your pipeline
-
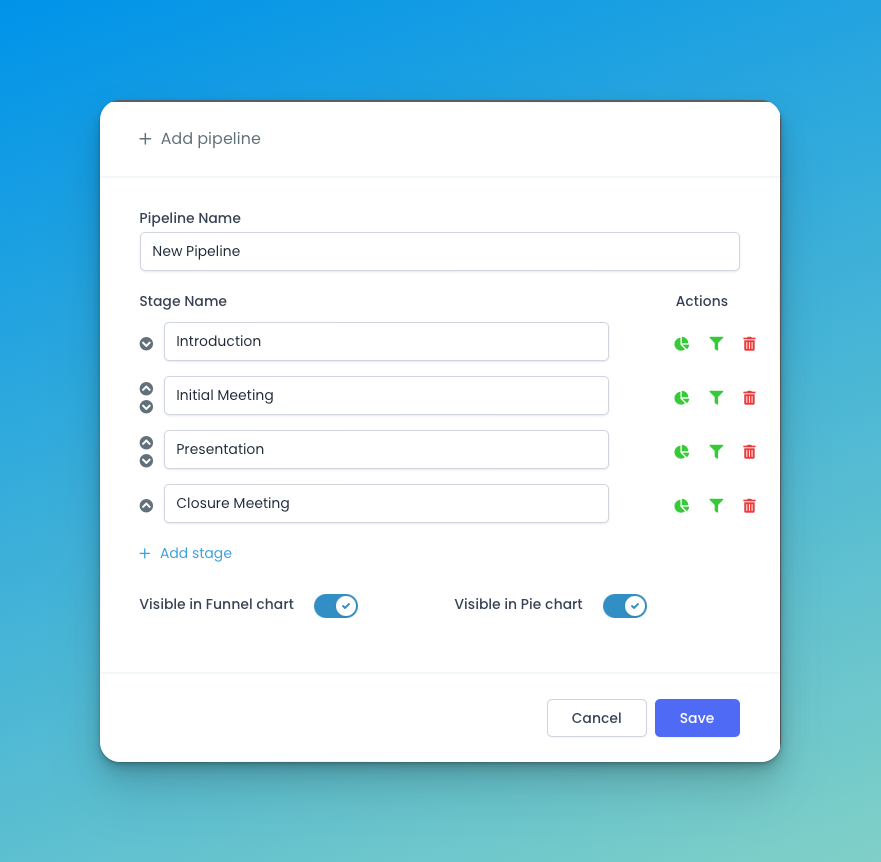
Click on the "Add Stage" button to create more stages
-
Repeat this process to add additional stages, defining the sequential flow of your pipeline.
-
You can also reorder the different pipeline stages using the up and down arrows on the left of the stage name.
- Note that you need not create stages for "Won" or "Lost". DealTrail creates those stages for every pipeline of yours by default.
Stage names always need to be unique and adding or updating another stage with an identical name is not allowed.
Step 4: Pipeline Actions and Dashboard configuration
-
The funnel and pie chart options allow you to decide whether the pipeline should be shown in the dashboard or not
-
You can also configure whether or not to show each stage in the dashboard funnel and pie charts by clicking on their icons at the right of the respective stage.
-
Learn more about dashboards for opportunities here.
Step-by-Step Guide: Creating Opportunities
Opportunities are pivotal in managing potential sales within DealTrail. This step-by-step guide will walk you through the process of creating opportunities, enabling you to efficiently track contacts through the sales pipeline.
Step 1: Accessing the Opportunities Section
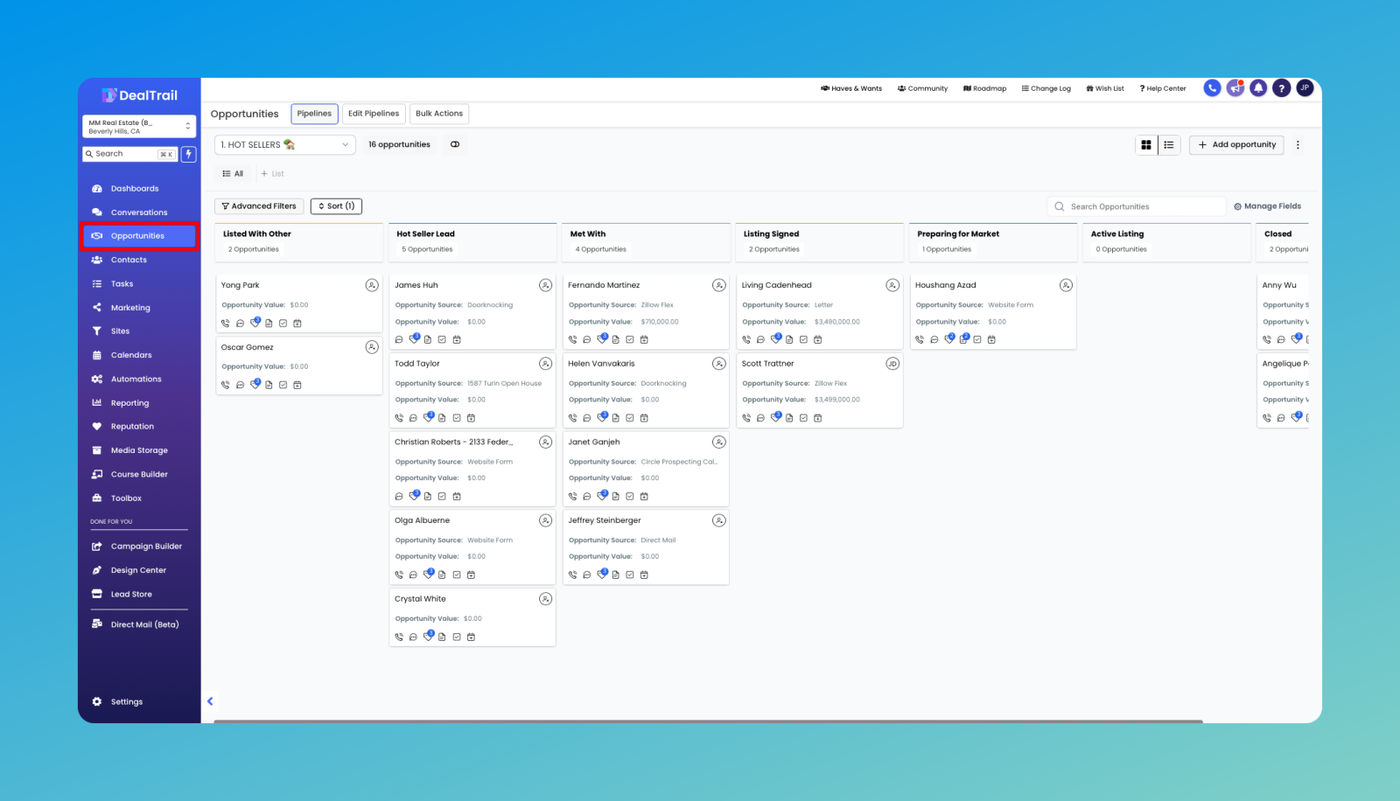
- Go to CRM > Opportunities from your side menu.
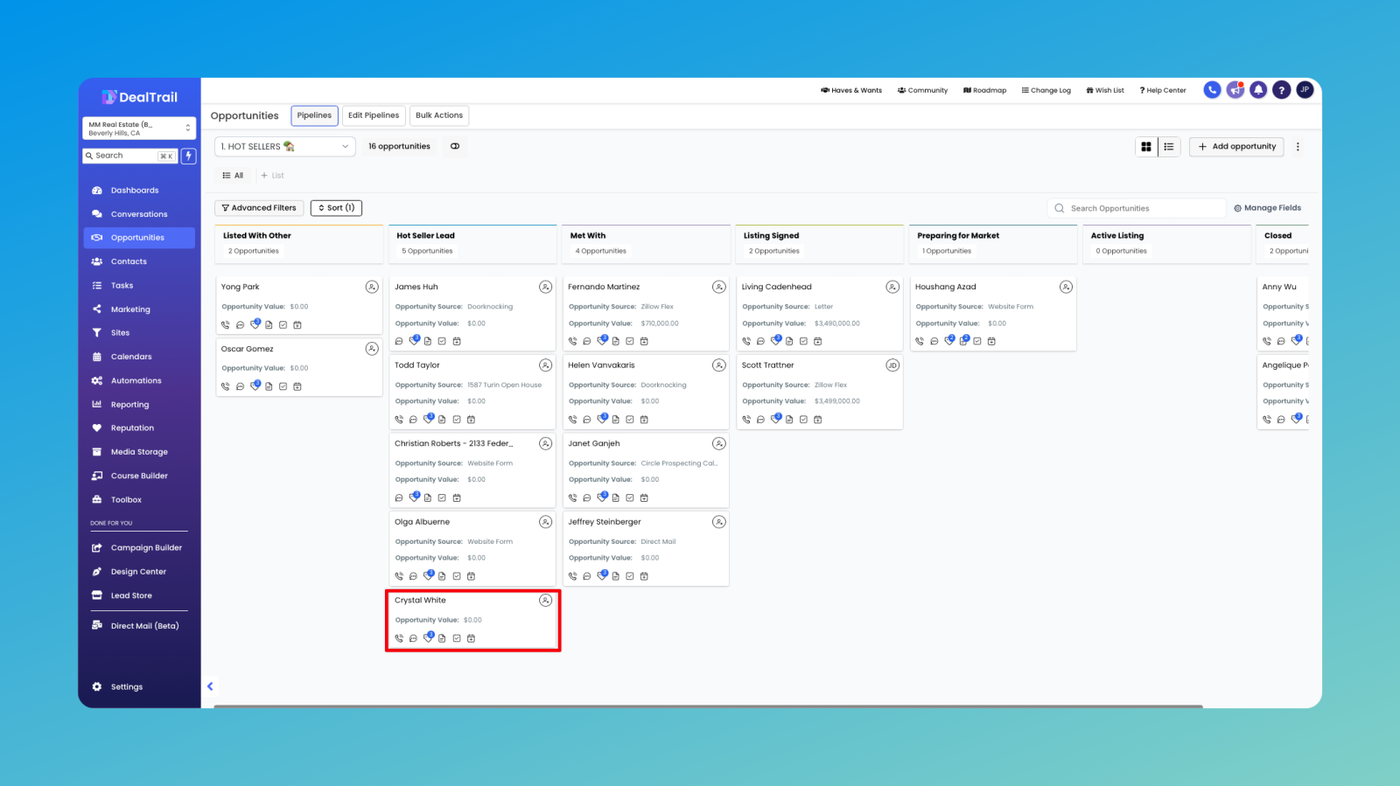
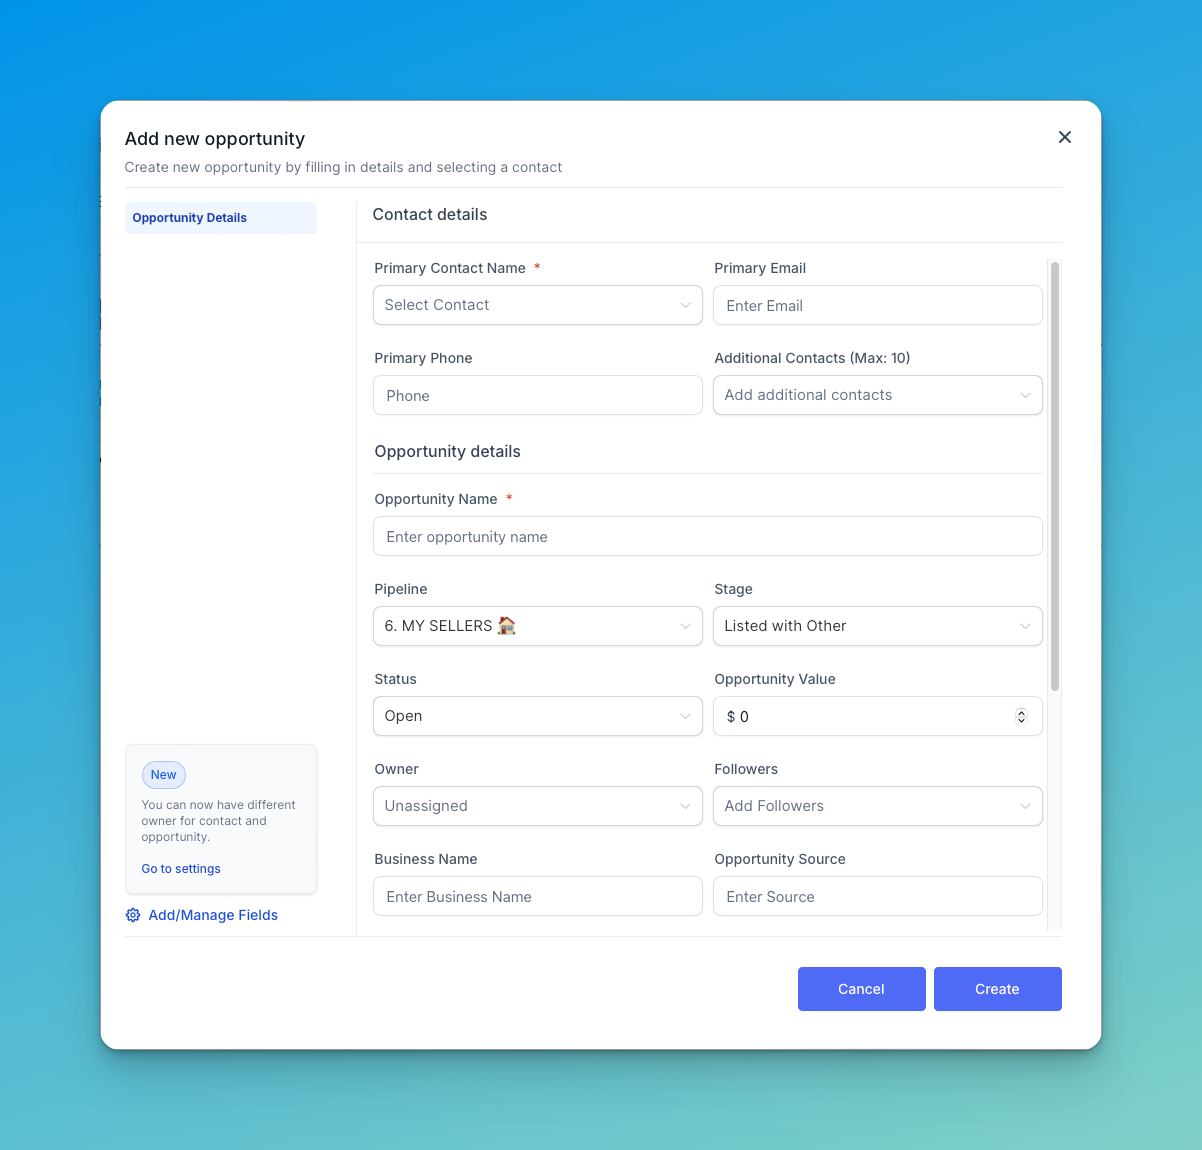
Step 2: Creating a New Opportunity
- Once you're in the Opportunities section, click on the "+ Opportunity" button on the top right.
- Fill in the relevant details for the opportunity, such as the contact name / information, pipeline details and opportunity value.
- Optionally, you can add other values to this opportunity or make the opportunity owner a specific user or team member responsible for managing it.
- Click on "Create" and the opportunity will be created and will start showing in the Opportunities dashboard.

Step 3: Adding Details and Notes
-
You can click on any opportunity to open its edit page.
- In the opportunity details page, you'll find fields to add additional information about the opportunity.
- Include any relevant notes or details about the contact's needs, preferences, or interactions.
- These notes and tasks will also start reflecting in the contact's information.
Editing Opportunities
Step 1: Locating the Opportunity to Edit
- From the Opportunities section, locate the opportunity you wish to edit.
- You can use search filters or browse through the list of opportunities to find the specific one you need to update.
-
Click on the name or title of the opportunity to open its details page.
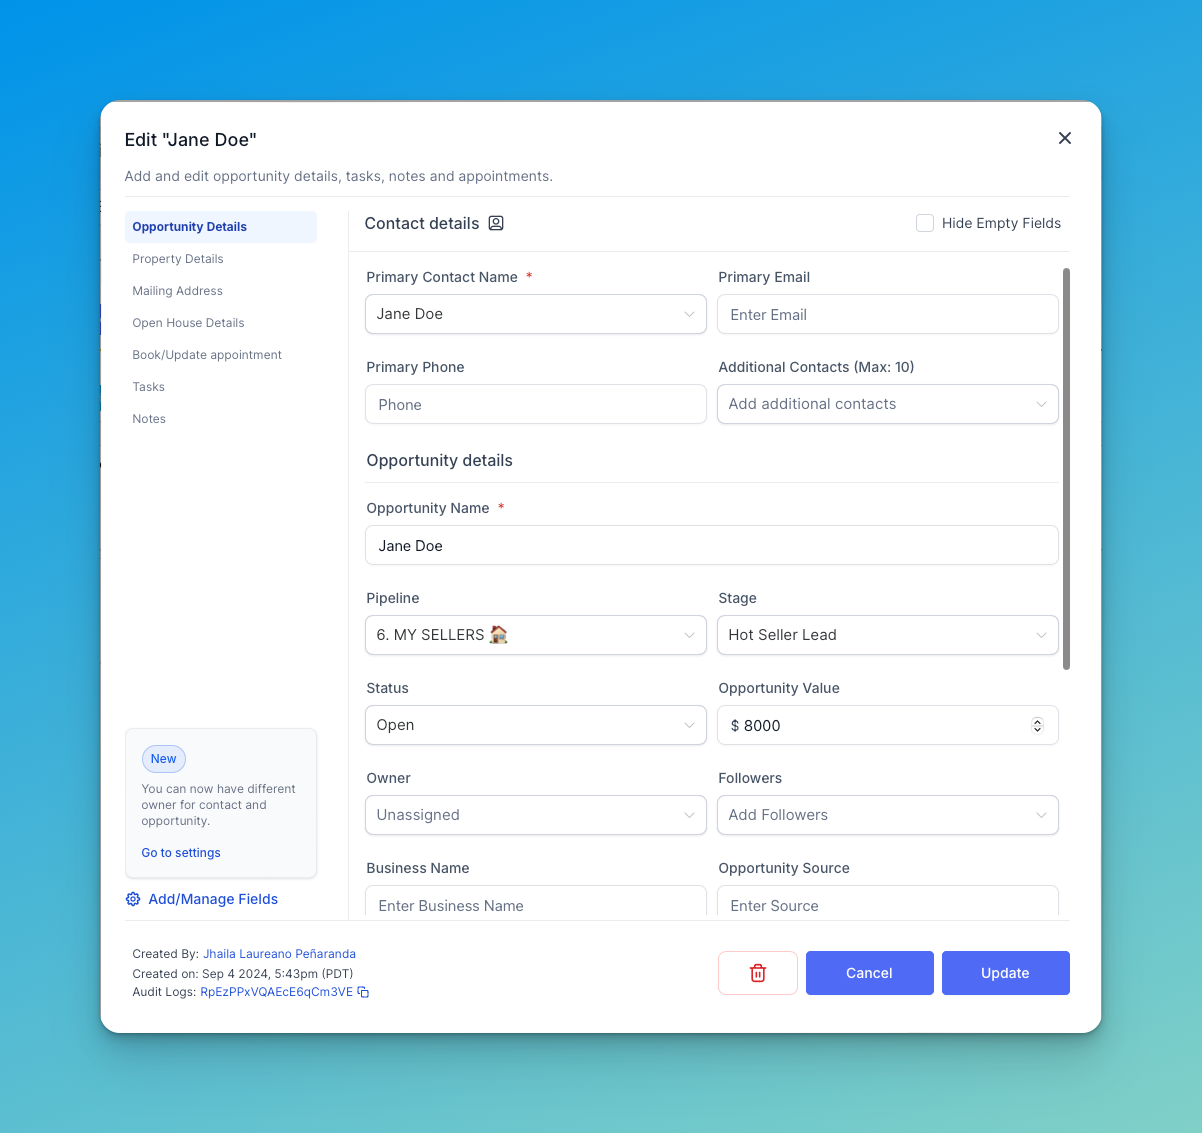
Step 2: Opening the Opportunity Details Page
- In the Opportunity details page, you'll find fields containing information about the opportunity.
- Update any relevant details such as the contact's name, contact information, opportunity value, and opportunity source.
- You can also modify pipeline stages, owners, tags, or any other custom fields associated with the opportunity.
Step 3: Adding Notes and Attachments
- If necessary, add new notes or additional information about the opportunity by clicking on the "Notes" option in the left sidebar.
- All notes added here will also reflect in the corresponding contact's notes also.

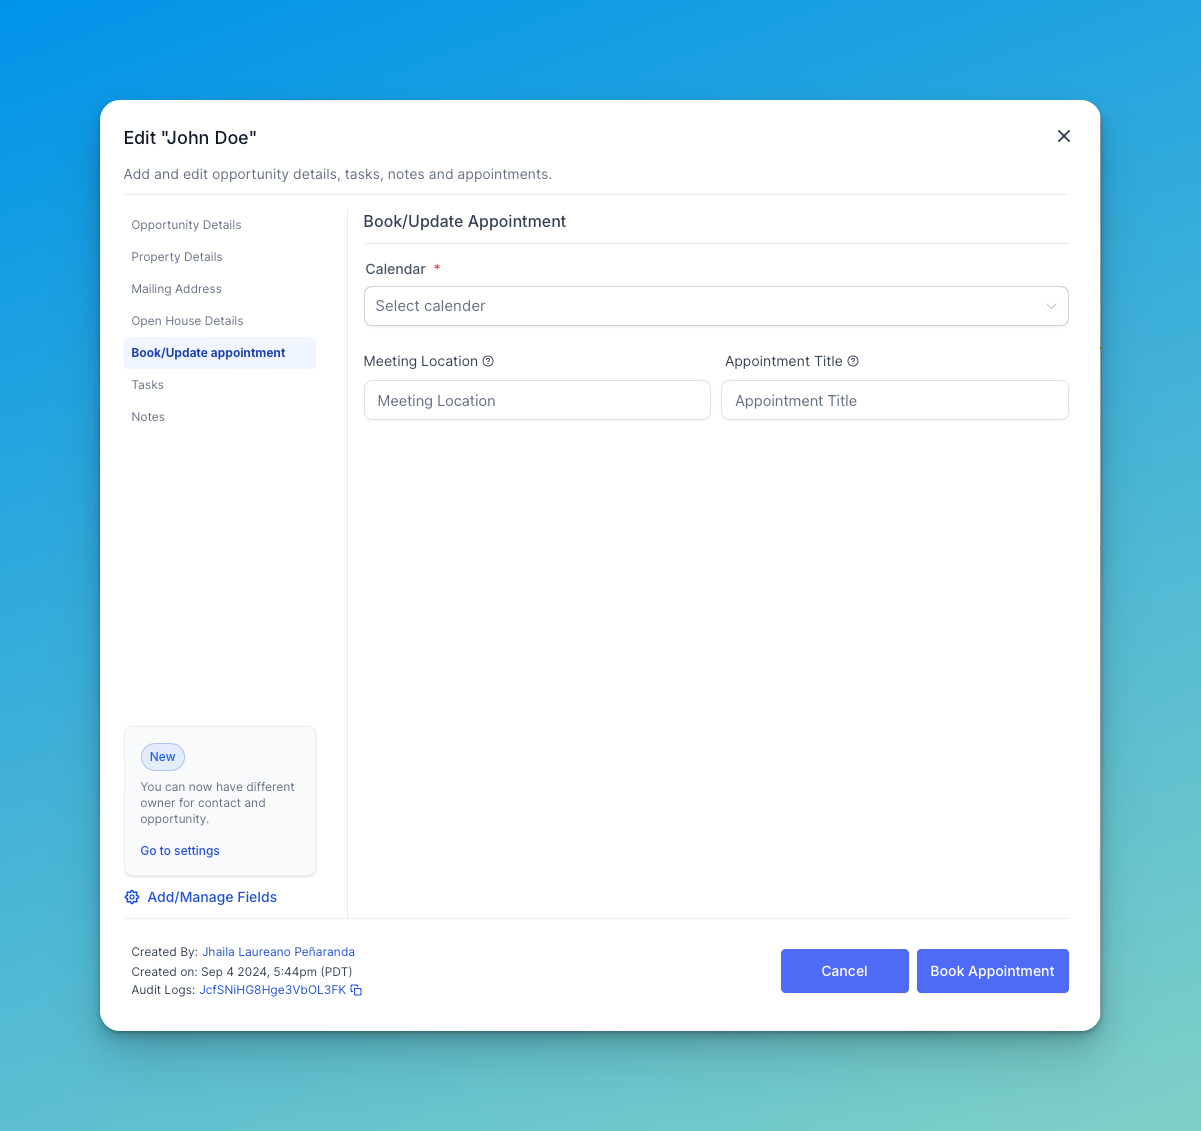
Step 4: Setting Tasks and Reminders
- If there are specific tasks or follow-up actions associated with the opportunity, set tasks and reminders as needed by opening it from the sidebar.
- Assign tasks to yourself or team members, specifying due dates and priority levels.
- Similarly, you can also add appointments in the same way.
- Tasks and appointments added this way will also reflect on the contact's end.

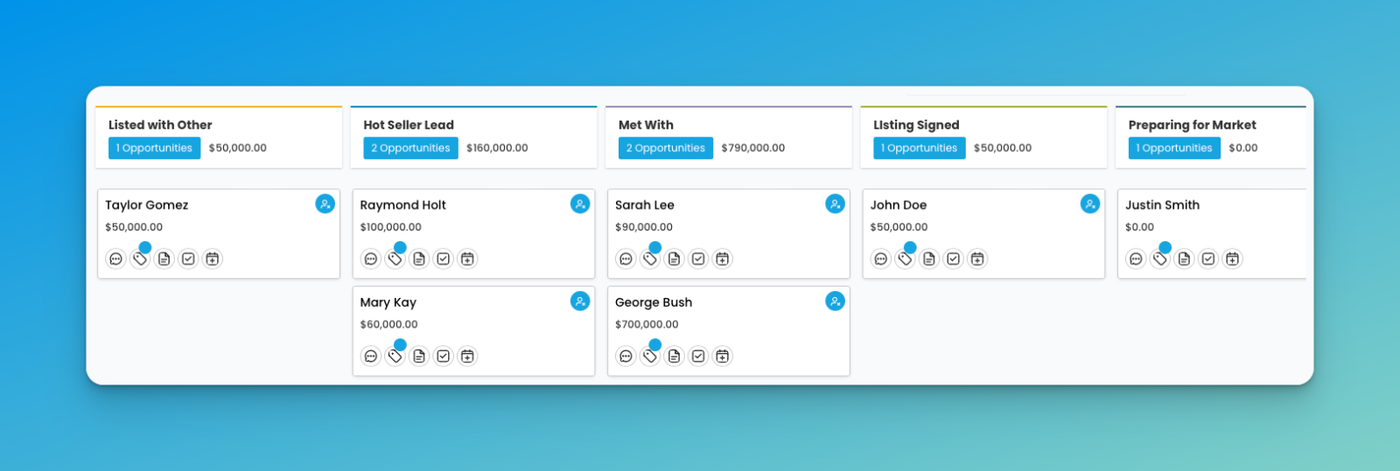
Step 5: Moving Opportunities Between Pipeline Stages
- Adjust the pipeline stage of the opportunity to reflect its current status in the sales process.
- Move the opportunity through different stages by dragging the cards as it progresses towards closure, updating its status accordingly.
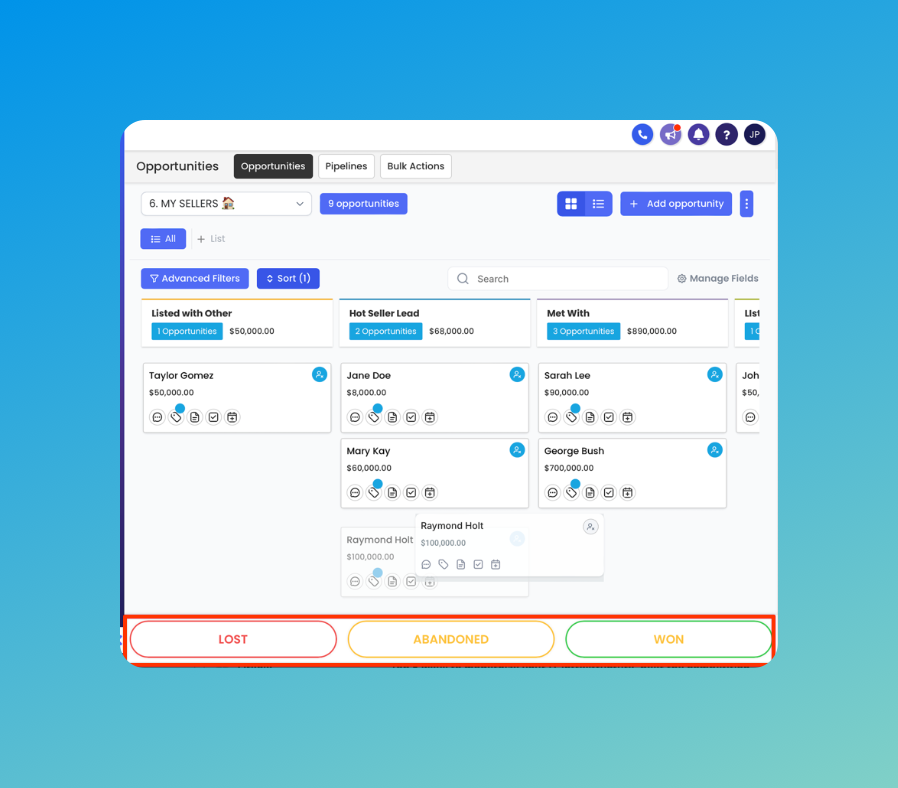
Step 6: Managing Opportunity Status
- Drag and drop the opportunity to any status as seen in the bottom to update it's status.
- Possible statuses for an opportunity are "Open", "Won", "Lost" and "Abandoned". Default status for a new opportunity is "Open".
- Marking an opportunity lost also allows you to add a lost reason for the same.
Editing Opportunities Status
Understanding the different opportunity statuses and how to update them empowers users to manage their sales workflow efficiently and maximize conversion rates. This comprehensive guide will walk you through the process of updating opportunity statuses in DealTrail while also covering the differences between the various statuses and how to leverage them effectively.
Understanding Opportunity Statuses
Open
-
Opportunities with the "Open" status are actively being pursued and are still in progress.
-
These opportunities represent potential deals that have not yet been won, lost, or abandoned and are still viable for conversion.
Won
-
The "Won" status indicates that the opportunity has been successfully converted into a sale or deal.
-
This status is applied when the lead has made a purchase or signed a contract, resulting in revenue generation for the business.
Lost
-
Opportunities with the "Lost" status represent deals that have been unsuccessfully concluded.
-
This status is applied when the lead decides not to move forward with the purchase or chooses a competitor's offering.
Abandoned
-
The "Abandoned" status indicates that the opportunity has been neglected or disregarded, either by the lead or by the sales team.
-
This status is applied when there is no further action or follow-up planned for the opportunity, and it is effectively removed from active consideration.
Opportunity status type and names cannot be changed or updated. You can only choose from the 4 opportunity status types.
Updating Opportunity Status
Option 1: Clicking directly into the opportunity and update the status
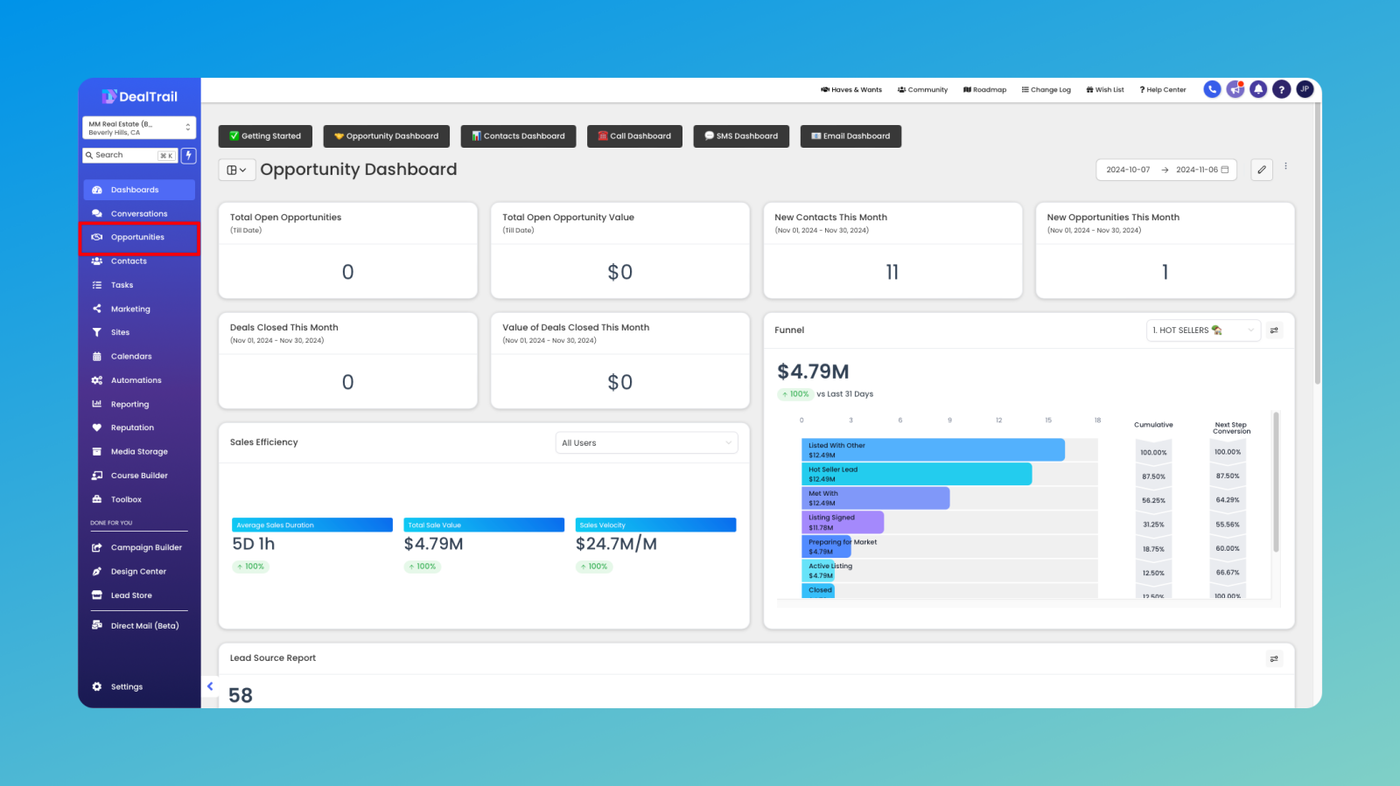
1. Navigate to the Opportunities Section
Go to CRM > Opportunities from your side menu.

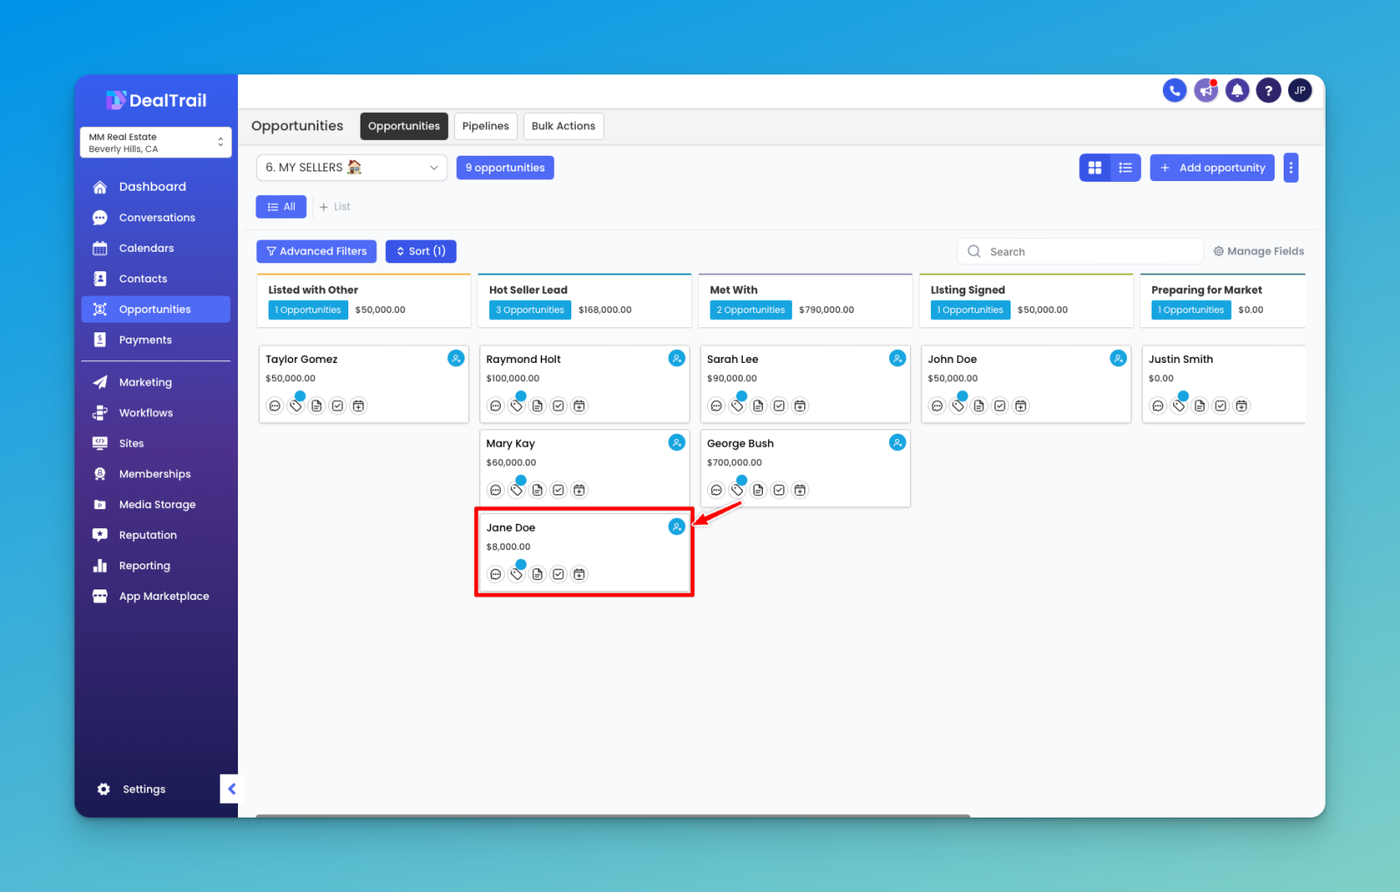
2. Locate and Open the Opportunity You Need to Edit
Once you're in the Opportunities section, locate the opportunity whose status you wish to update. You can use search filters or browse through the list of opportunities to find the specific one you need to modify.
Click on the opportunity card to open its details page. Alternatively, you can click on the "Edit" button next to the opportunity to access its details.
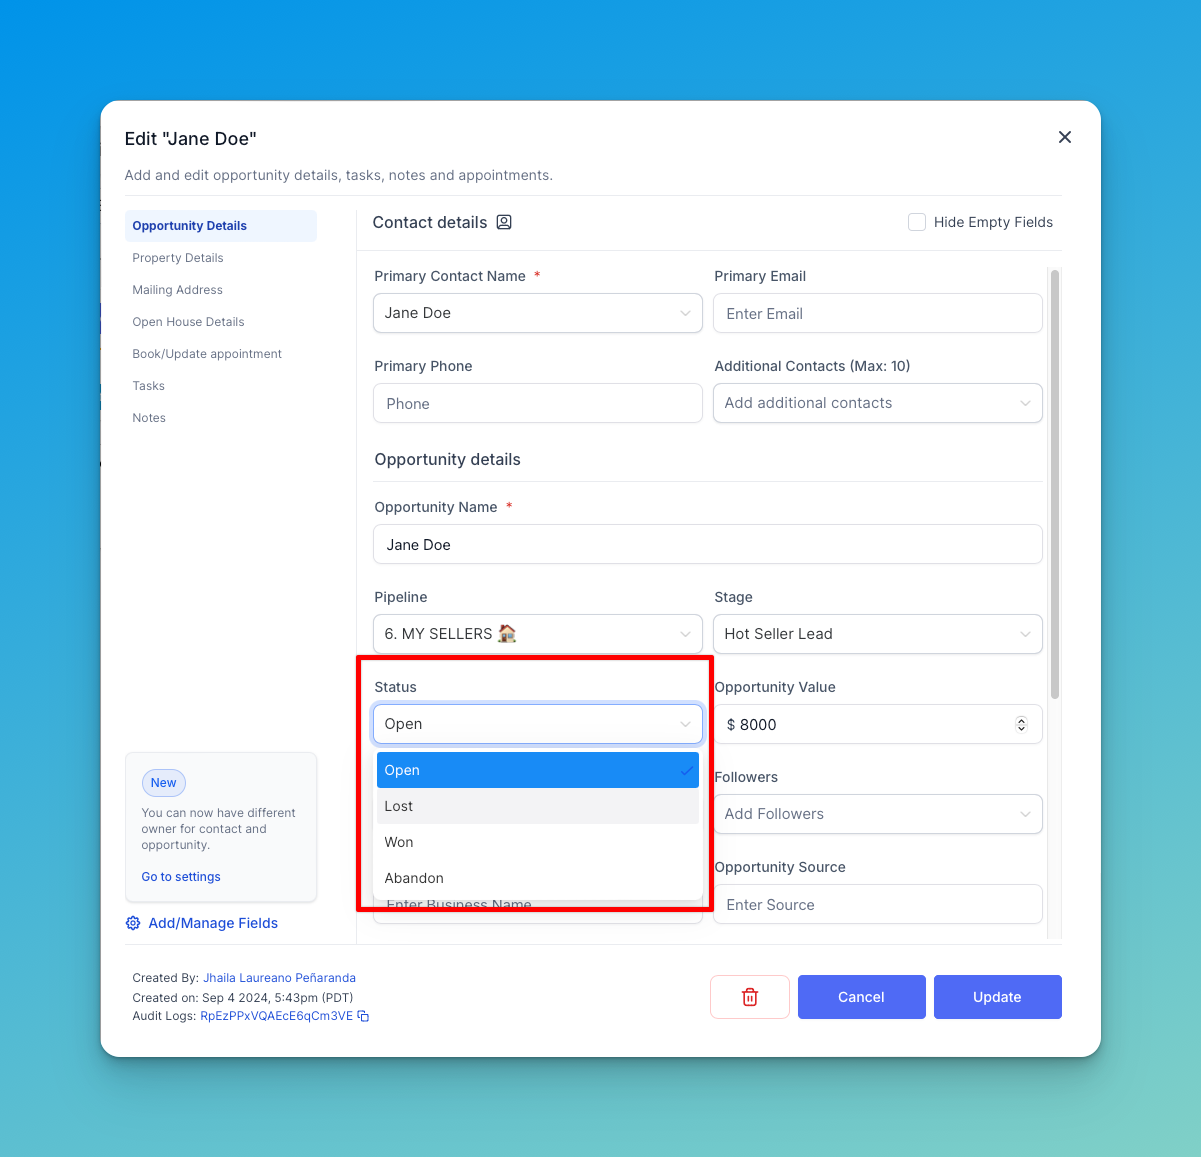
3. Update the Status Field in the Opportunity
In the Opportunity details page, locate the status field, which typically displays the current status of the opportunity. Click on the status field to open the dropdown menu and select the desired status from the available options (Open, Won, Lost, or Abandoned). Confirm the status change, and the opportunity will be updated accordingly in the sales pipeline.
Option 2: Dragging and dropping the opportunity into the proper status
1. Navigate to the Opportunities Section
Go to CRM > Opportunities from your side menu.
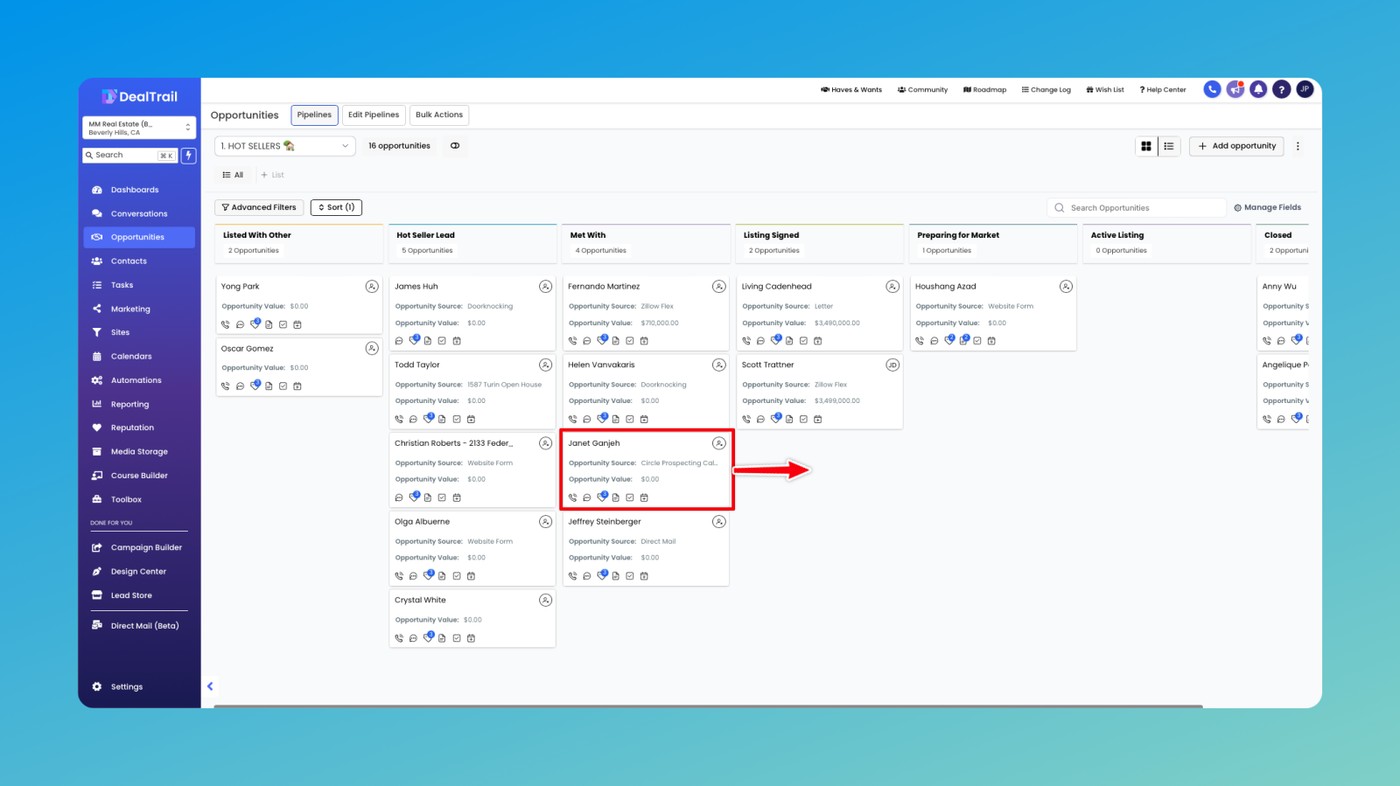
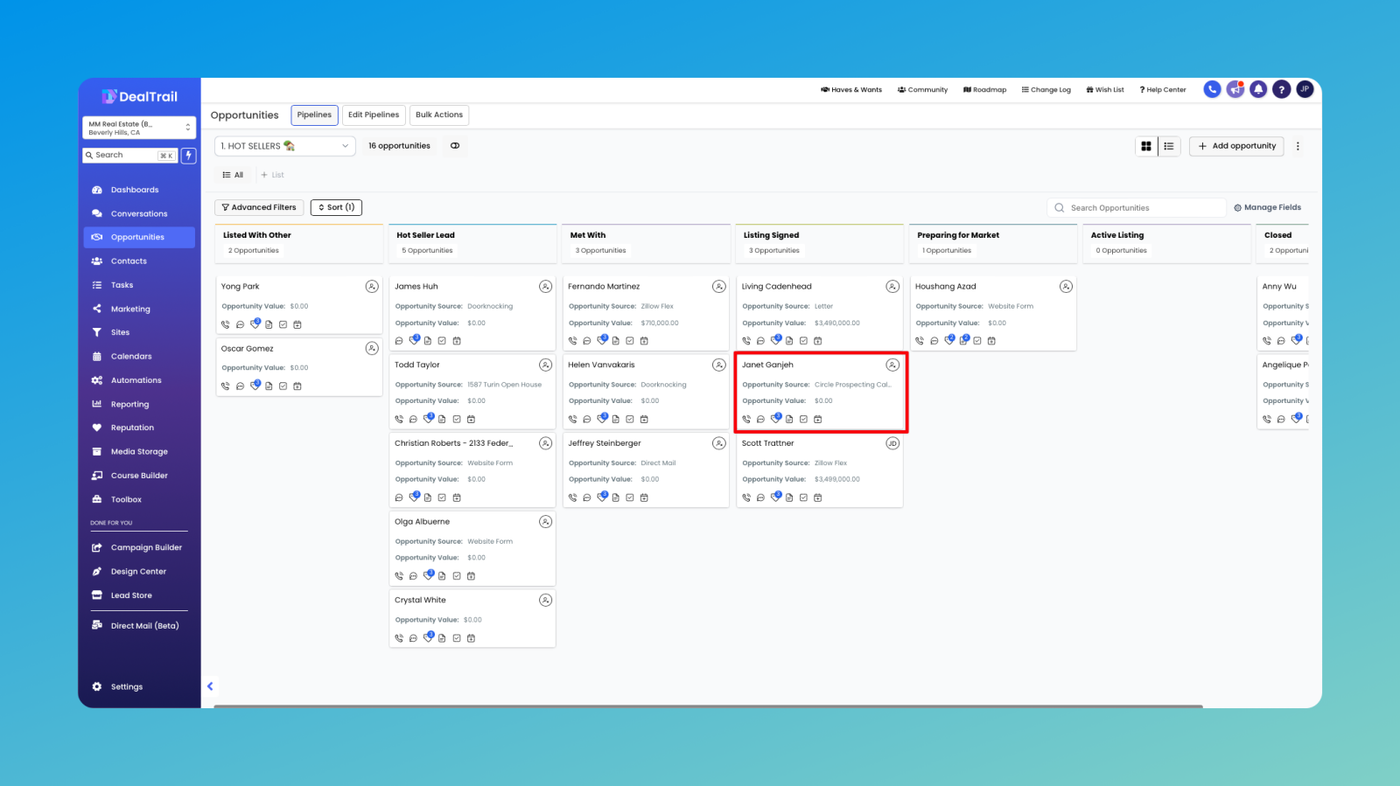
2. Locate the Opportunity You Need to Edit
Once you're in the Opportunities section, locate the opportunity whose status you wish to update. You can use search filters or browse through the list of opportunities to find the specific one you need to modify.
3. Drag and Drop Opportunity
Drag the opportunity card to the right status which appears as soon as the card is dragged. Drop it on the status which you want to update the card to. The status of the card will be updated and will reflect on the card.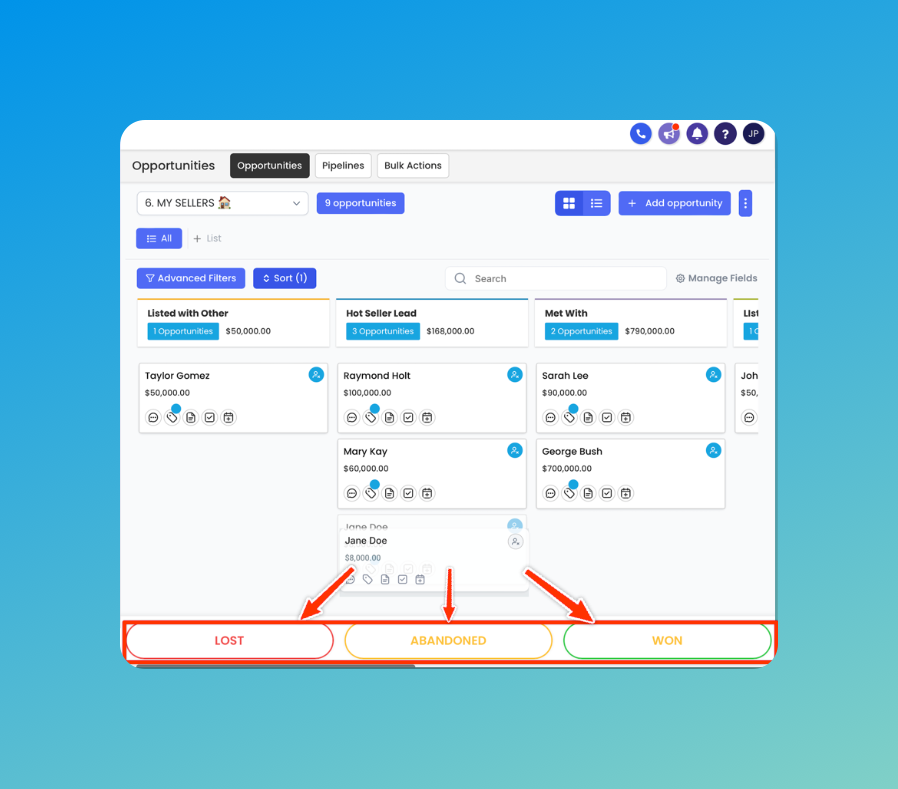
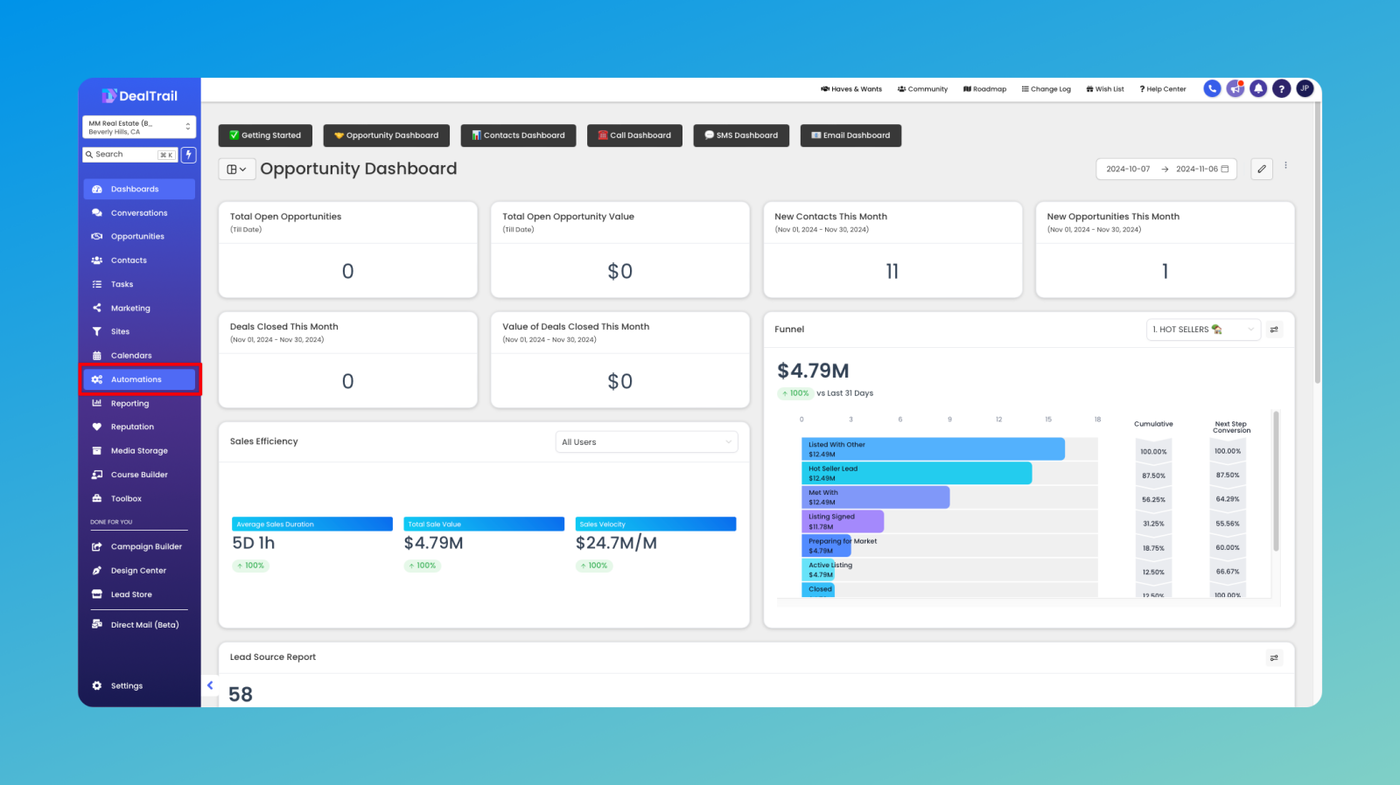
Option 3: Updating the status using workflows
1. Navigate to the Automation Section
Go to Agent Tools > Workflows from your side menu.
2. Create a new workflow
If you already have a workflow created for your opportunities, or a workflow that manages leads and contacts that you would like to use when updating the statuses of your opportunities, find that workflow and open it.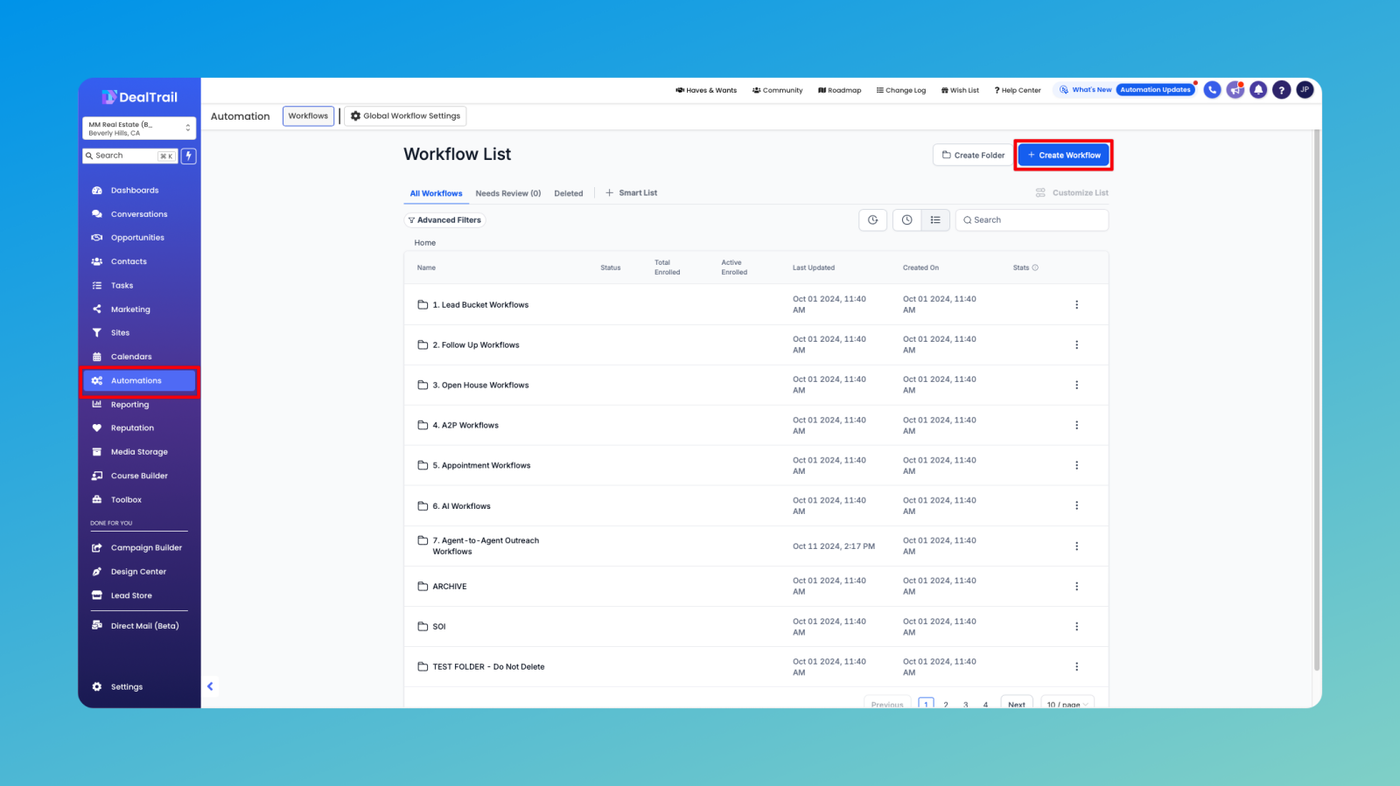
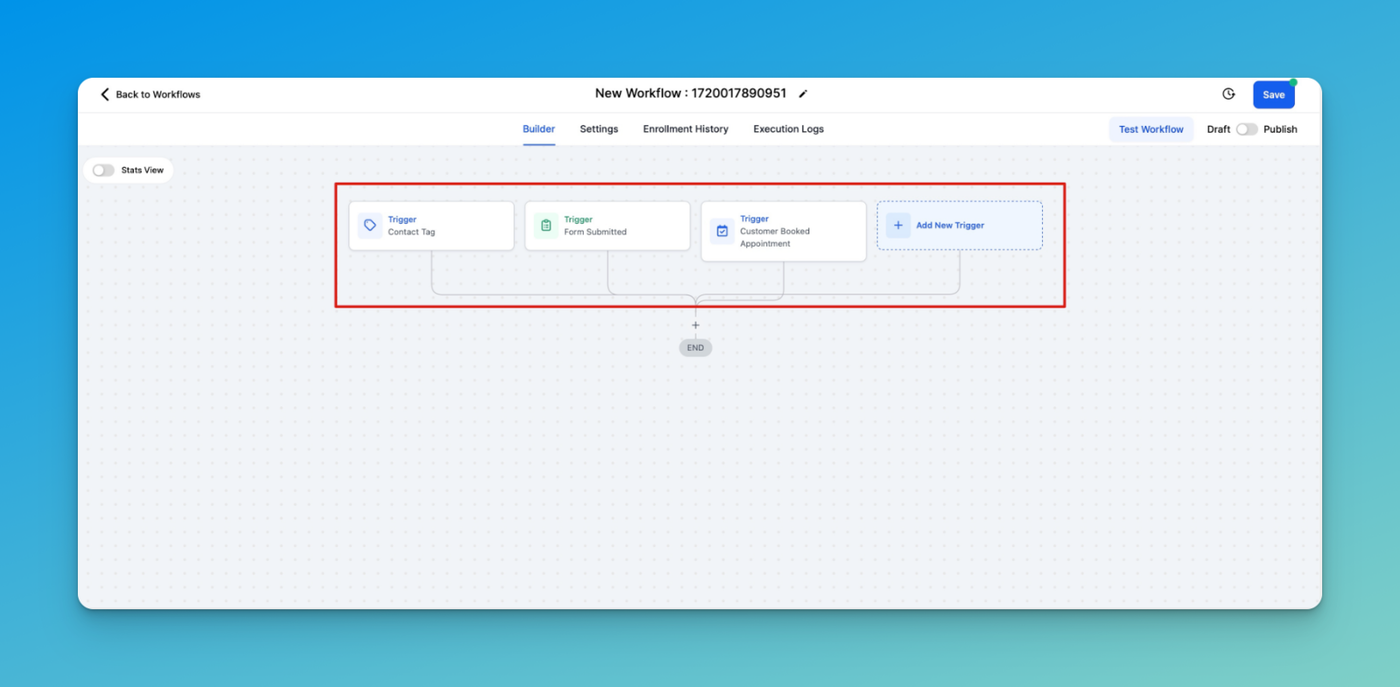
3. Create a workflow trigger
This can be anything you want it to be. The idea here is to perform a workflow action that updates the opportunity status after some sort of workflow trigger happens such as:
- Form submitted
- Contact Tag Added or Removed
- Appointment Booked
- Transaction was made
- Invoice was paid
- Contract was signed
- etc.
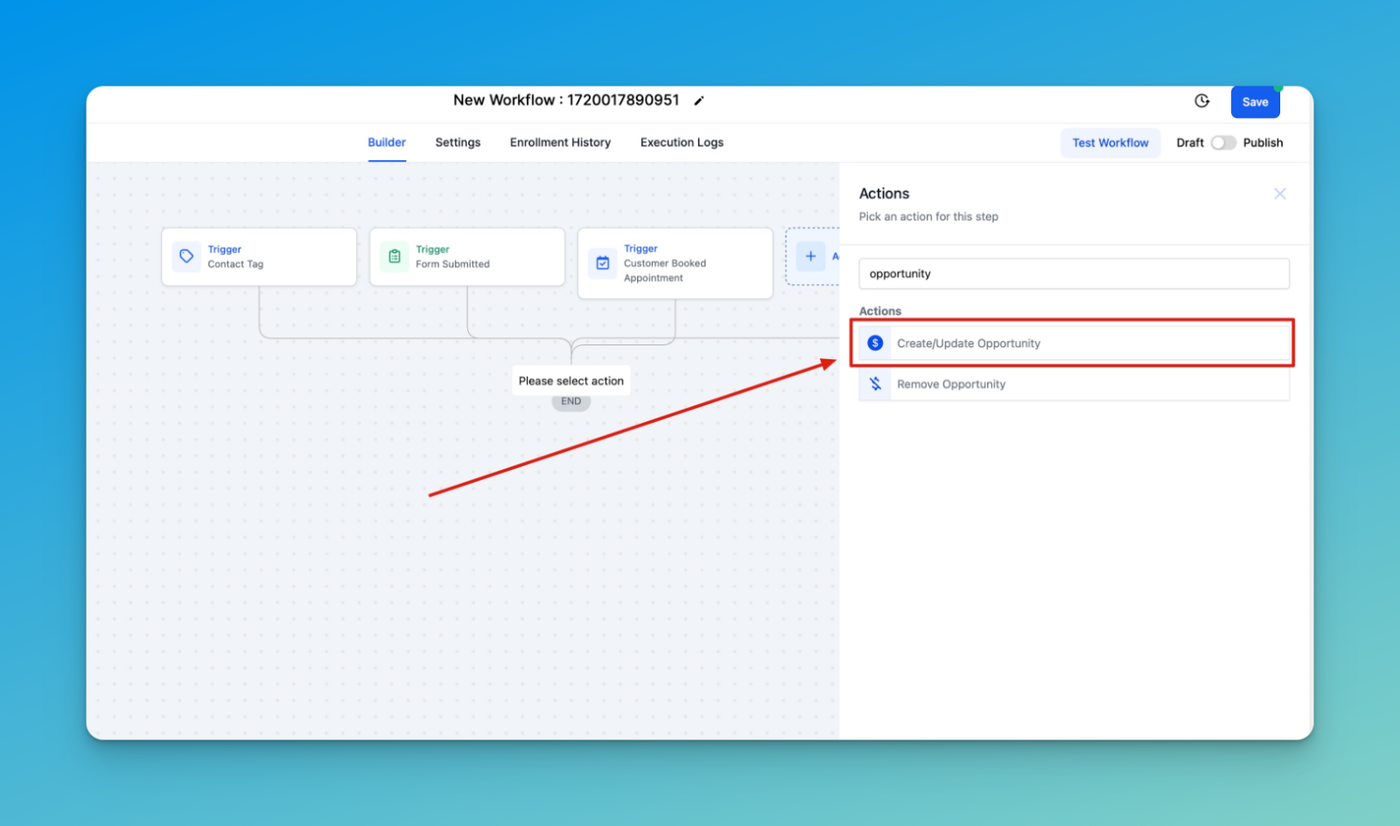
4. Add the "Create/Update Opportunity" Workflow Action
Once you create your trigger, add the "Create/Update Opportunity" workflow action. If you're having trouble finding this workflow action in the list of actions, you can use the search bar to find it by beginning to type the word "opportunity".
5. Edit Workflow Action
Next, you'll need to select the pipeline and pipeline stage you'd like to move your opportunity to. During this step you can change any information you need to about the opportunity like the name, source, lead value, and of course the status.
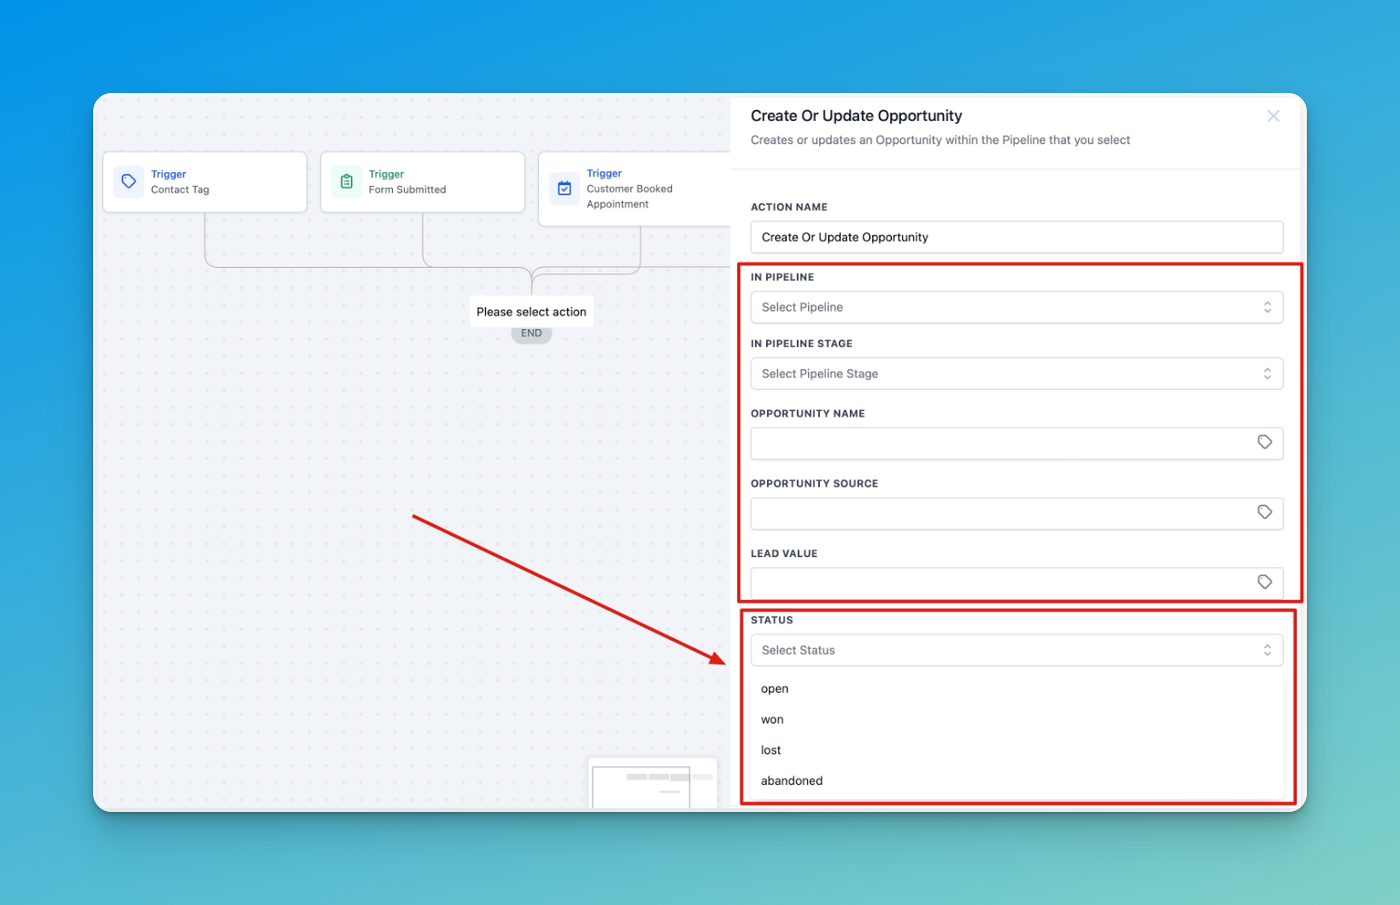
Once you update the opportunity status, make sure you save your new workflow action and save the entire workflow so you don't lose your previous work!
Deleting and Restoring Opportunities
Deleting an opportunity removes it from the active pipeline. Once an opportunity is deleted, it is no longer visible in the active opportunities list, but its data is retained in the system and can be restored if needed for up to 60 days. This allows users to declutter their pipeline by removing outdated or irrelevant opportunities while preserving the option to recover them later if necessary.
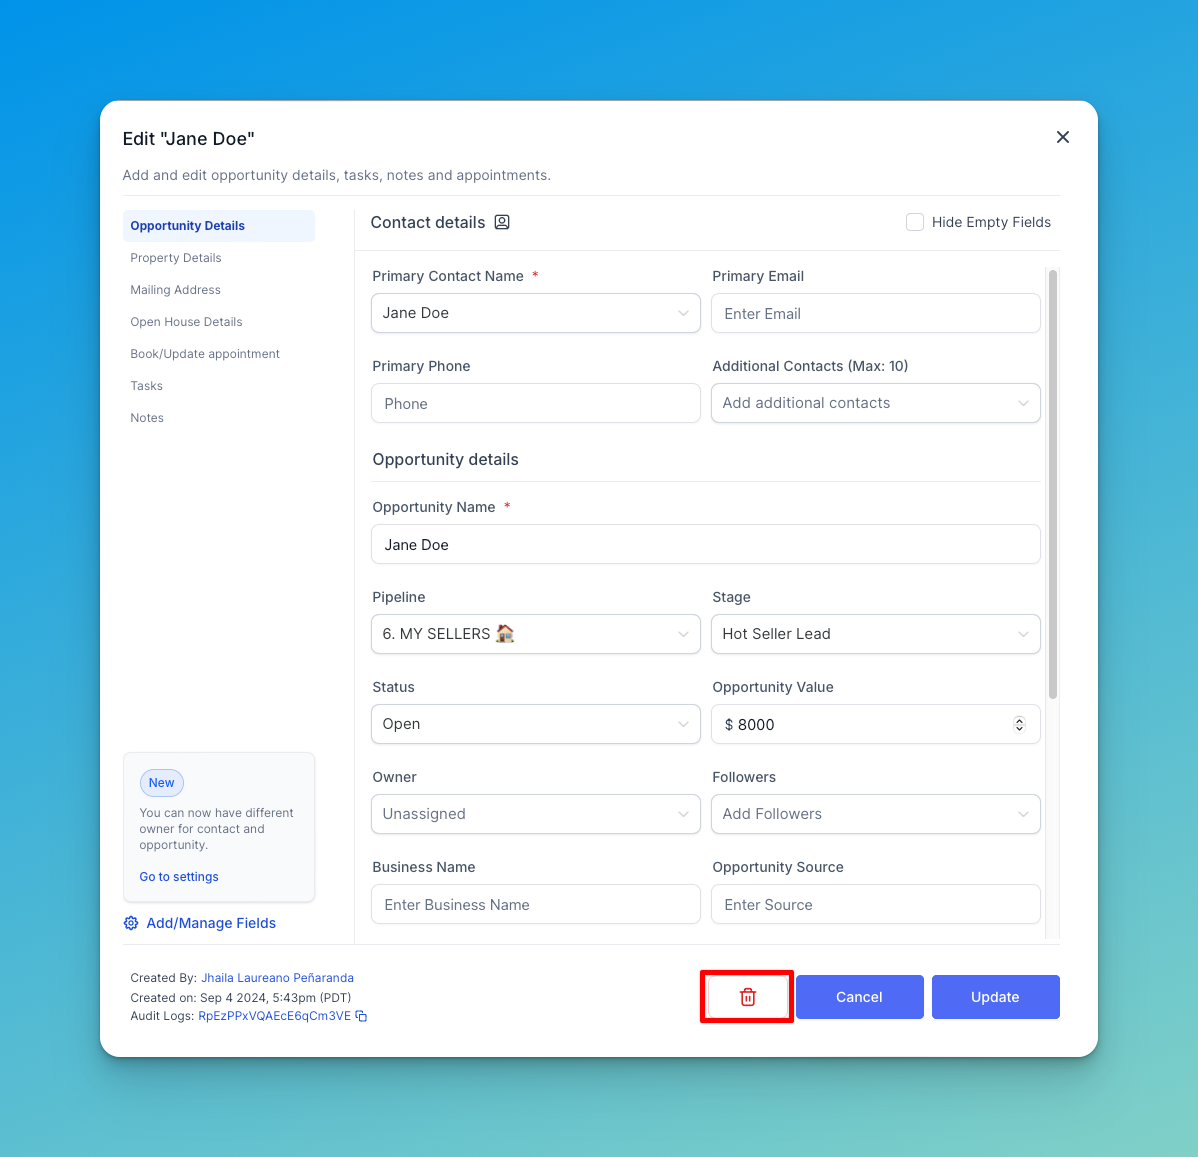
Step-by-Step Guide: Deleting Opportunities
- From your Opportunity page, locate the Opportunity you wish to delete.
- Click on the Opportunity to open its details page.
- Click on the Delete icon on the bottom row to delete the Opportunity.
- Confirm deletion operation to delete that Opportunity.
Step-by-Step Guide: Restoring Opportunities
Step 1: Accessing the Audit logs
- Select Settings on the sidebar menu
- Click on Audit Logs
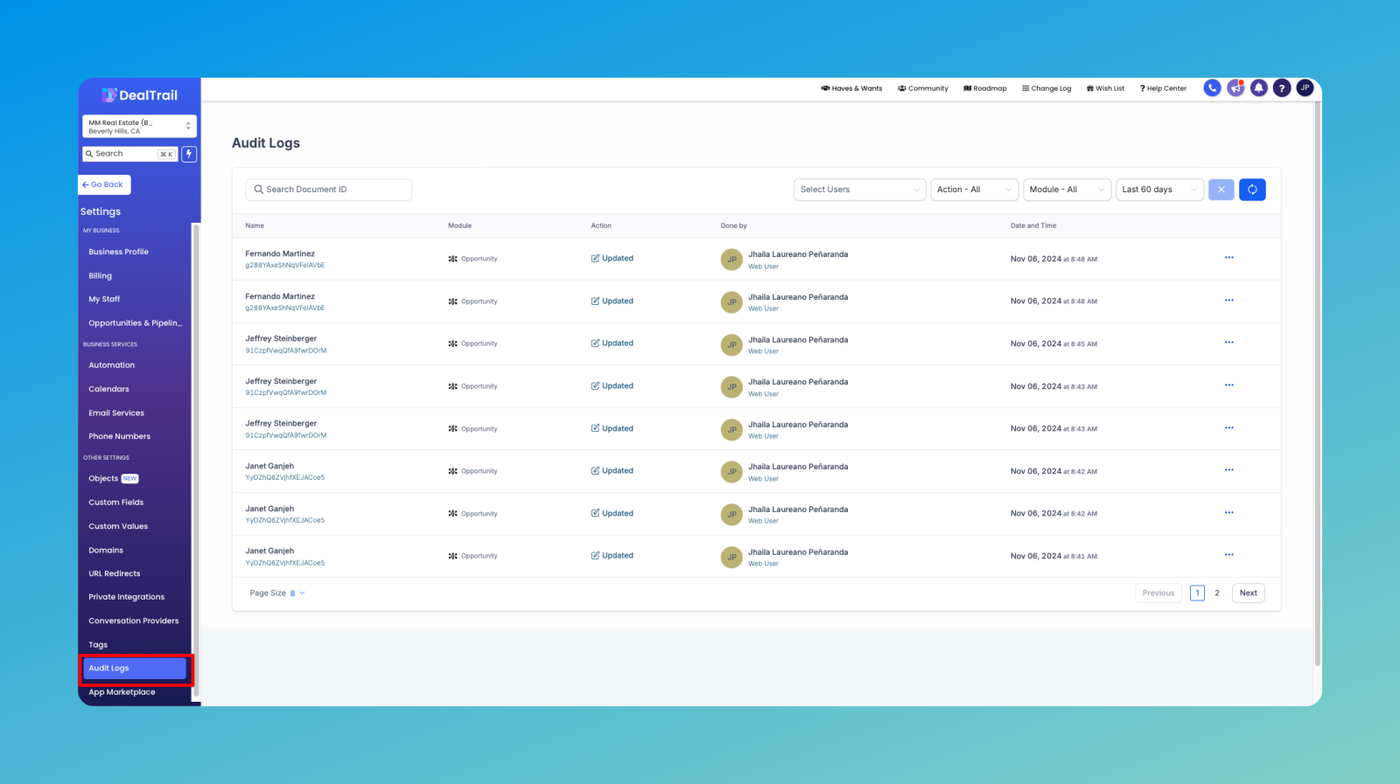
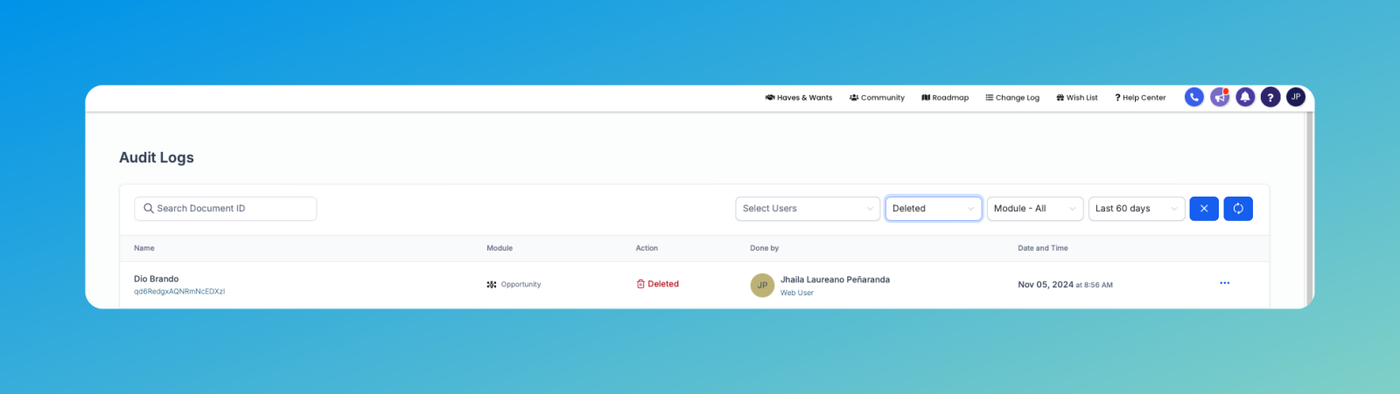
Step 2: Filter out Deleted opportunities
- Under action filter on the top right, select "Deleted"
- Under Module filter on the top right, select "Opportunities"
- This will show you all the Deleted opportunities in the last 60 days. You can also check how these opportunities were deleted in the same place.
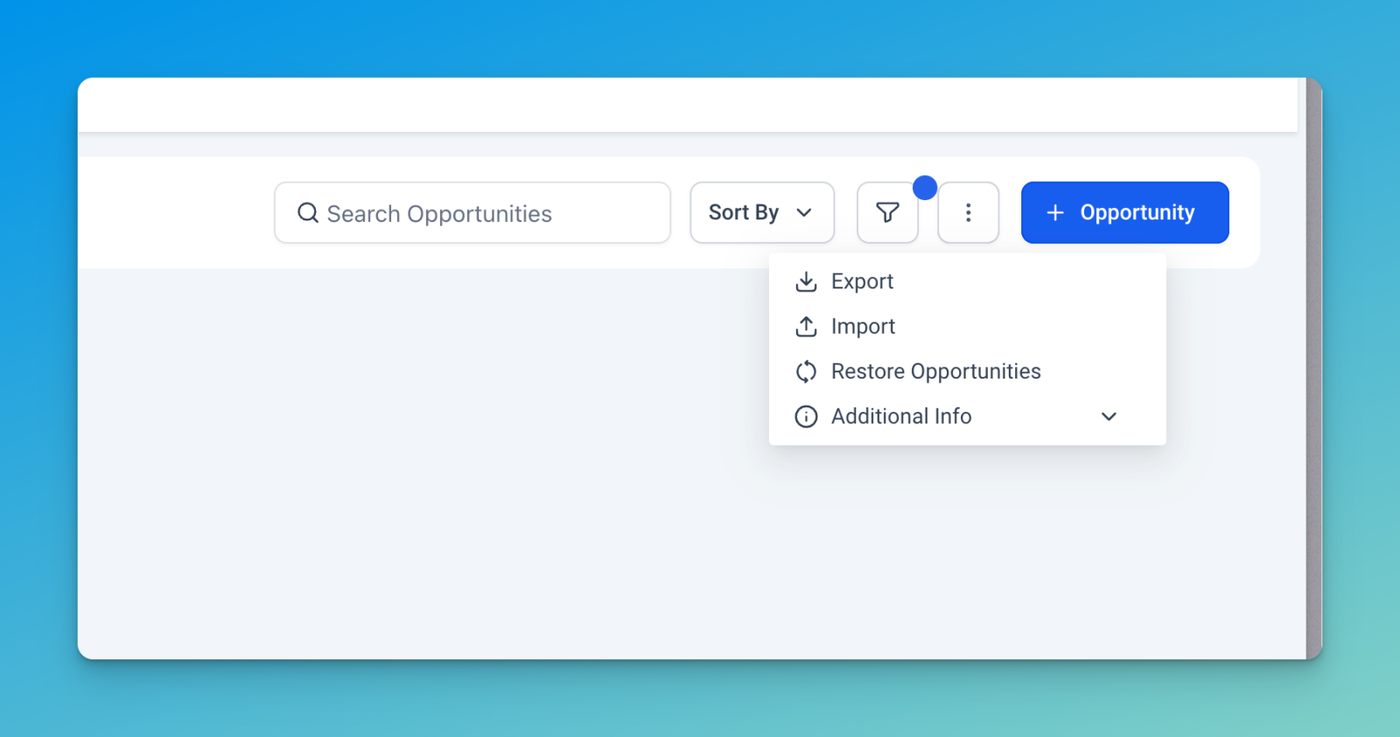
Alternatively, Click on "Restore Opportunities" through the Kebab menu in the top right of Opportunities page. It will redirect you to the Audit Logs.

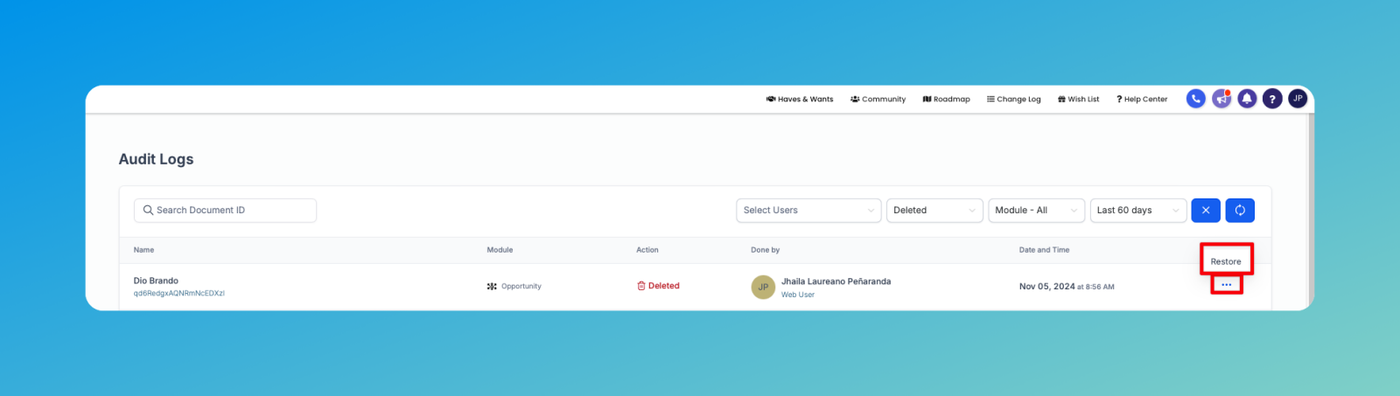
Step 3: Restore the deleted opportunity
- For the opportunity you'd want to restore, click on the 3 dots icon on the right.
- Select the option to Restore opportunity.
- The opportunity is now restored.
Importing Opportunities
Importing files into our system is straightforward if you follow the guidelines and steps outlined below. This document will help you ensure a smooth and successful import process.
Prepare Your Data
Supported File Types
- Ensure your file is in .csv format.
File Preparation Requirements
- Sheet: Only one
- Size: Smaller than 30 MB
- Headers: Include a header row with at least one column corresponding to a field in the system
Please note that Opportunity import is not a reversible action.
Mandatory Fields
1. For Creating Opportunities: Contact ID, Opportunity name and Pipeline ID/Pipeline name.
- Default values:
- If the Stage ID/stage name is absent, it defaults to the first stage under that pipeline.
- If the Opportunity Value is absent, it defaults to 0.
- If the Opportunity status is absent, it defaults to “Open”.
- If the Opportunity lost reason is added and is valid, the Opportunity Status will be updated to "Lost".
Opportunity ID, Pipeline ID/Pipeline name and Stage ID/Stage name can be fetched by exporting opportunities. Contact ID can be fetched by exporting contacts in the same sub-account.
2. For Updating Opportunities: Opportunity ID (can be fetched by exporting opportunities)
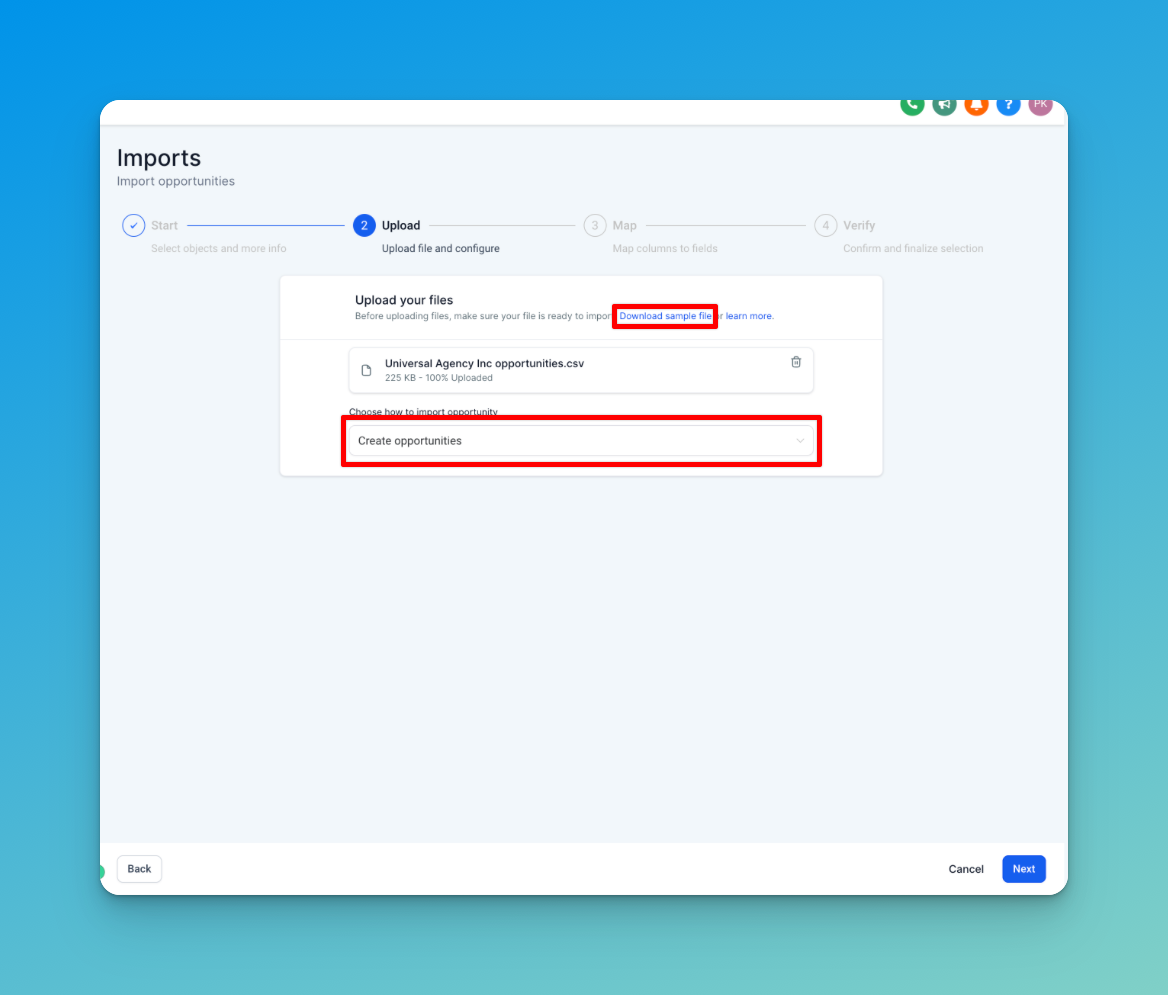
Understanding Import Options
When importing objects, you have three options to choose from:
- Create Opportunities: Use this option to upload only new records into the system.
- Update Opportunities: Select this option to update information for existing records.
- Create and Update Opportunities: Choose this option for a combination of adding new records and updating existing ones.
Structuring Your File
Field Formatting
- Date Picker:
- Acceptable formats: mm/dd/yyyy (e.g., 10/28/2020), yyyy/mm/dd (e.g., 2020/10/28), mm-dd-yyyy (e.g., 10-28-2020), yyyy-mm-dd (e.g., 2020-10-28).
- Acceptable formats: mm/dd/yyyy (e.g., 10/28/2020), yyyy/mm/dd (e.g., 2020/10/28), mm-dd-yyyy (e.g., 10-28-2020), yyyy-mm-dd (e.g., 2020-10-28).
- Multiple Options, Checkbox, Textbox List:
- Acceptable formats: Value 1, Value 2, Value 3 (e.g., Blue, Yellow, Green). You can also use ; or . as separators.
- Acceptable formats: Value 1, Value 2, Value 3 (e.g., Blue, Yellow, Green). You can also use ; or . as separators.
- Radio, Single Option:
- Acceptable formats: Value 1 (e.g., Blue).
- Acceptable formats: Value 1 (e.g., Blue).
- Opportunity Owner:
- Format: FirstName LastName (e.g., Logan Paul).
- Format: FirstName LastName (e.g., Logan Paul).
- Tags:
- Acceptable formats: Value 1, Value 2, Value 3 (e.g., Blue, Yellow, Green). You can also use ; or . as separators.
- Acceptable formats: Value 1, Value 2, Value 3 (e.g., Blue, Yellow, Green). You can also use ; or . as separators.
- Phone Number:
- Format in E.164 (e.g., +1 1234567890). For US numbers, formats like 123-456-7890 or (123) 456-7890 are also acceptable.
- Format in E.164 (e.g., +1 1234567890). For US numbers, formats like 123-456-7890 or (123) 456-7890 are also acceptable.
- Numerical:
- Acceptable formats: 1.23, 1234, .123.
- Acceptable formats: 1.23, 1234, .123.
- Monetary:
- Acceptable formats: 1234, 1,234,234.33.
- Acceptable formats: 1234, 1,234,234.33.
- Opportunity Followers:
- Acceptable format: FirstName LastName, FirstName2 LastName2 (e.g. Adam Smith, David Lee)
Importing Your File
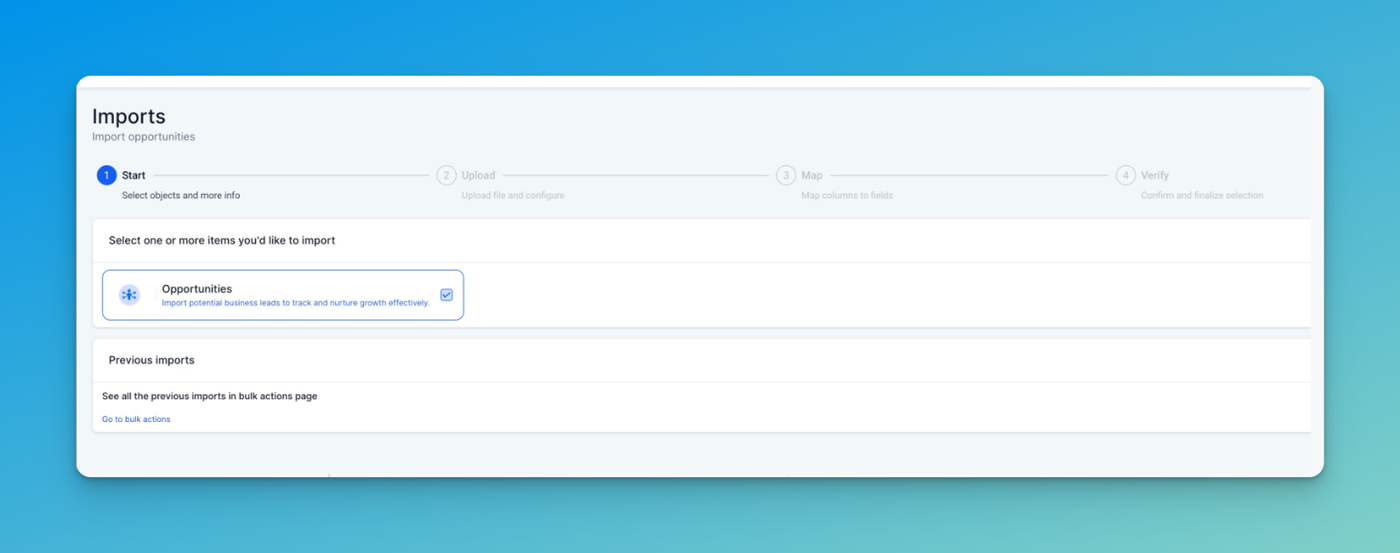
Steps to Import:
- Go to Opportunities
- On the top right under 3 dots, click on "Import Opportunities"
2. Upload Your File: Click the 'Import' button and upload your file. Also select whether you would like to "Create", "Update" or "Create and Update". You can also download sample file for your reference.
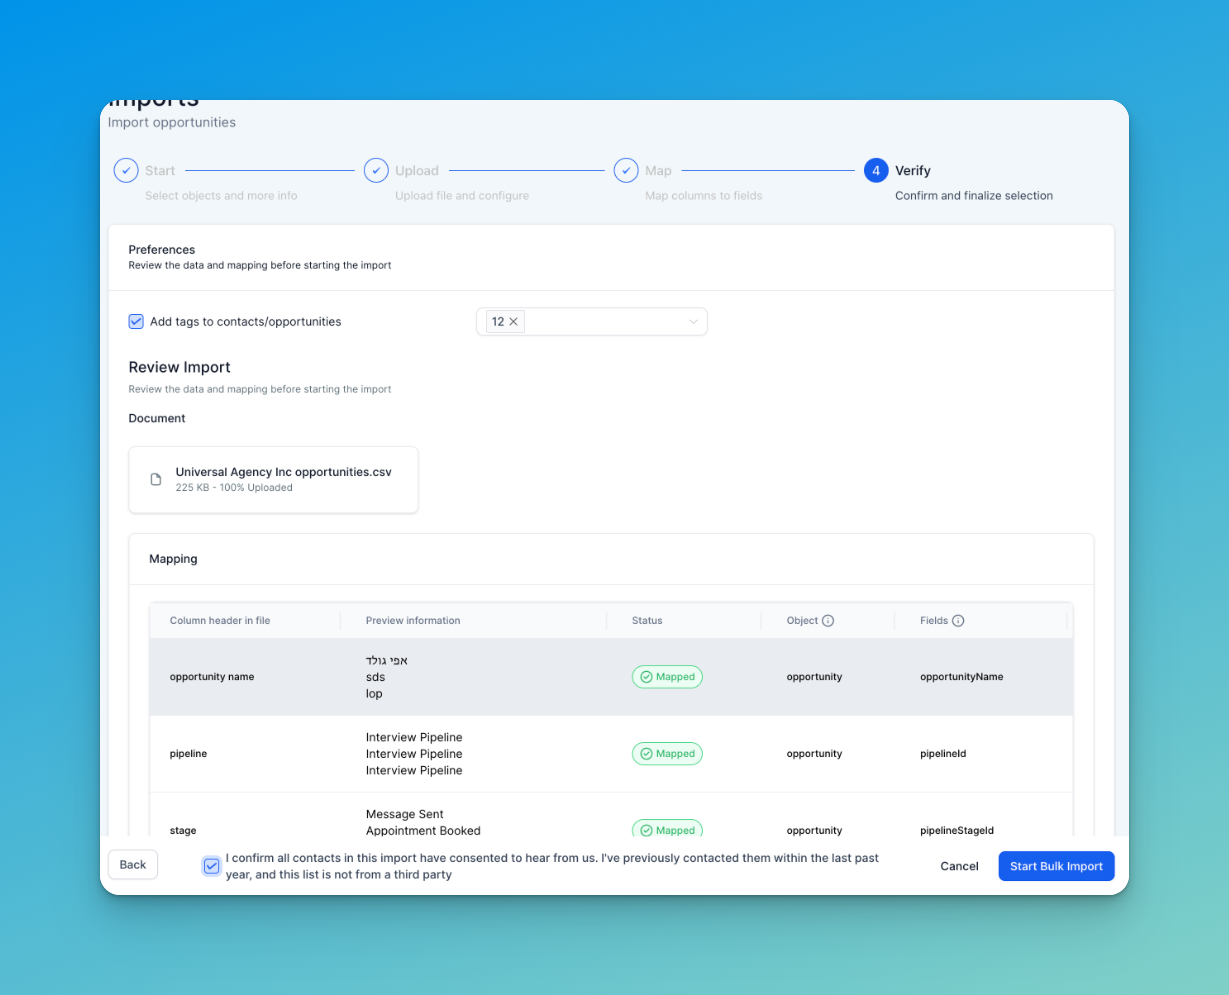
3. Map Your Fields: Ensure each column in your file is correctly mapped to the corresponding field in the system. Adjust the mappings if necessary.
A few things to note:
- Checking the "Don't update Empty Values" checkbox will not update any field if the imported file has empty values and the field does have some value for the opportunity
- If you decide to not import certain field, you can choose to keep it unmapped and check the box on the bottom to proceed. -"Please ensure all mandatory fields are mapped. To proceed, either map all fields or choose Don't import data for unmapped columns"

4. Review and Confirm: Review the data preview to ensure everything looks correct. Confirm the import to proceed.
Note that it is mandatory to check the box on the bottom and accept the disclaimer to start importing.
You can also add tags to the corresponding contacts for these opportunities on this screen.
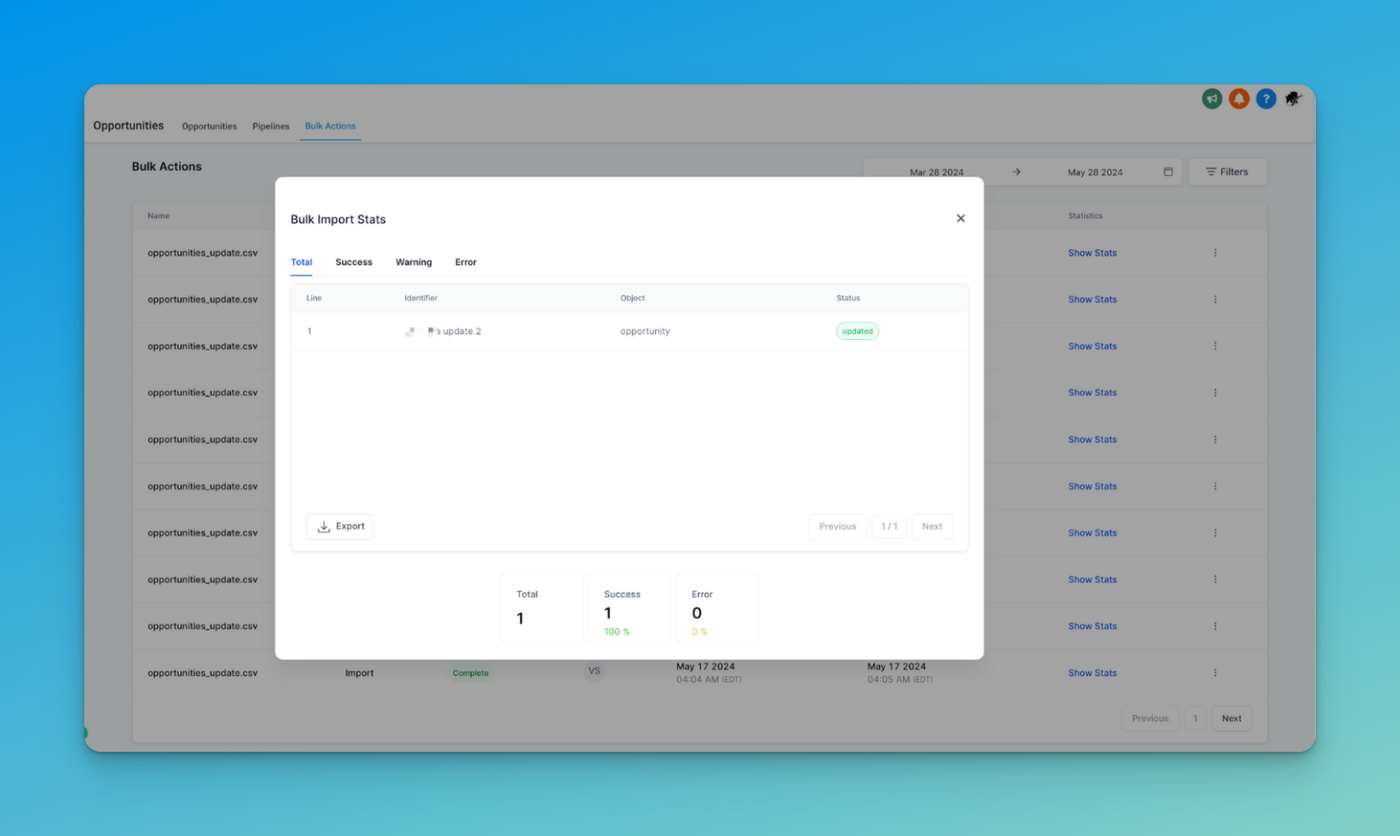
5. Monitor the Import: Check the import progress under Opportunities > Bulk Actions. If any errors occur, refer to the error messages provided for guidance on fixing them.
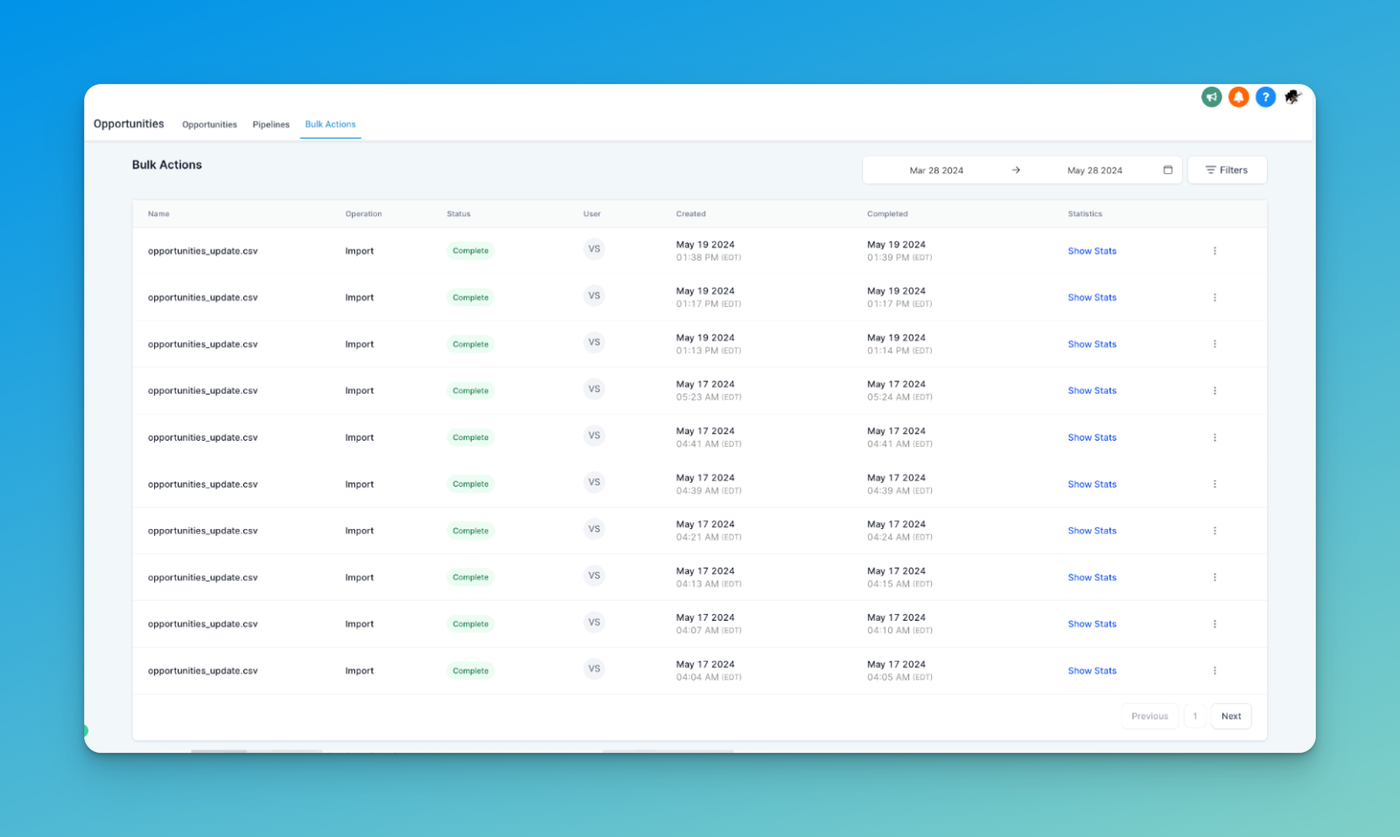
6. Monitor stats, errors and warnings by clicking on the "Show Stats" button for any import.
Troubleshooting Common Errors
- Error: Invalid option selected for multiselect or dropdown field
Solution: Check your import file for incorrect values in multiselect or dropdown fields by comparing them with the options in the system. Update the value in your file to match an existing option or add it as a custom option in the system. Then re-import the file. - Error: Invalid Contact ID
Solution: Verify that the Contact ID exists in the system or remove the ID if not updating an existing contact. - Error: Could Not Parse Date
Solution: Ensure date fields are in one of the acceptable formats: mm/dd/yyyy, yyyy/mm/dd, mm-dd-yyyy, yyyy-mm-dd. - Error: Duplicate Unique Property Value
Solution: Ensure there are no duplicate values in fields marked as unique, such as emails or IDs. - Error: File Not Found
Solution: Verify that your file is the correct type and format. Re-upload the file. - Error: Required Fields Missing
Solution: Ensure all mandatory fields (e.g., Opportunity Name for opportunities, Email/Phone/Name for contacts) are included and correctly formatted.
Opportunities in DealTrail represent potential sales or deals at various stages of the sales pipeline. They encapsulate leads or prospects showing interest in products/services, ripe for conversion into paying customers.
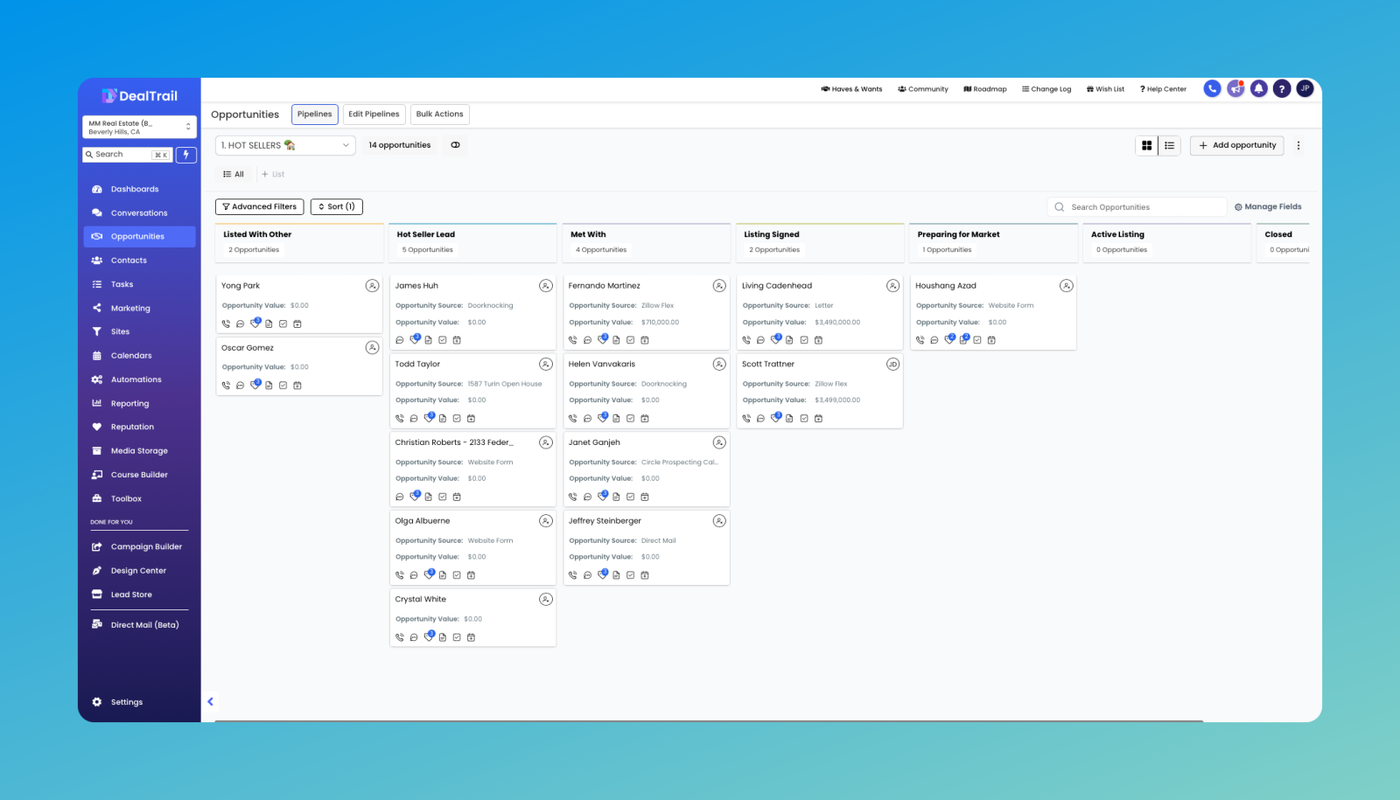
Pipeline Integration
- Opportunities are managed within pipelines which in turn are series of consecutive stages.
- Customizable pipelines align with unique sales processes and business goals.
Stage Progression
- Opportunities advance through pipeline stages, signifying their position in the sales cycle.
- Stages typically include "Prospecting," "Qualification," "Proposal," and "Negotiation"
Opportunity Status
- "Open", "Won", "Lost" and "Abandoned" are opportunity status which are present by default.
- An opportunity can be in one of the four statuses and we can use these to prepare filters for the same.
Understanding Opportunity Statuses:
-
Open:
-
Opportunities with the "Open" status are actively being pursued and are still in progress.
- These opportunities represent potential deals that have not yet been won, lost, or abandoned and are still viable for conversion.
-
-
Won:
- The "Won" status indicates that the opportunity has been successfully converted into a sale or deal.
- This status is applied when the lead has made a purchase or signed a contract, resulting in revenue generation for the business.
-
Lost:
- Opportunities with the "Lost" status represent deals that have been unsuccessfully concluded.
- This status is applied when the lead decides not to move forward with the purchase or chooses a competitor's offering.
-
Abandoned:
- The "Abandoned" status indicates that the opportunity has been neglected or disregarded, either by the lead or by the sales team.
- This status is applied when there is no further action or follow-up planned for the opportunity, and it is effectively removed from active consideration.
Data Management
- Robust data management within opportunities tracks opportunity source, contact details, opportunity value, and notes.
- Users can also streamline communication and task assignment under Opportunity - linked contacts, enhancing workflow efficiency and timely engagement.
Additional Tips
- Double-check your file before importing to avoid errors.
- If you encounter any issues during the import process, refer back to this guide or reach out to our support team for assistance.