🧑🧑🧒🧒 Communities and Communities Settings
The Communities feature in DealTrail allows users to create and manage online courses, client portals, and community groups. This powerful tool is perfect for delivering educational content, managing members, and fostering engagement in community settings.

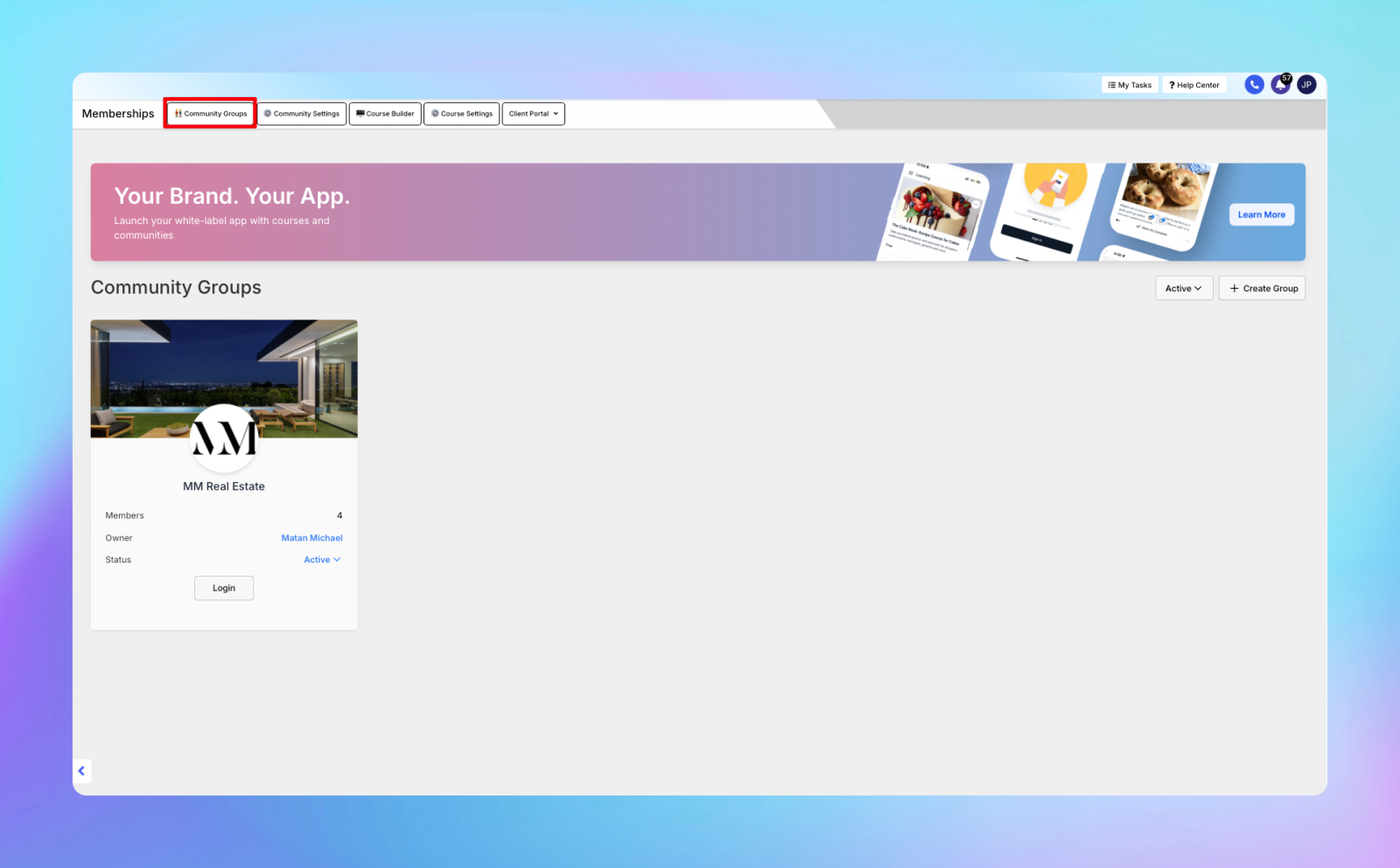
1. Community Groups
Community Groups provide a space for members to interact, collaborate, and engage in discussions around your courses or topics of interest.
Key Features:
• Enable discussion forums within your membership area.
• Facilitate peer-to-peer learning and engagement.
• Assign groups to specific courses or topics.
Steps to Create a Community Group:
1. Navigate to Communities:
• Go to Sites > Communities > Community Groups.
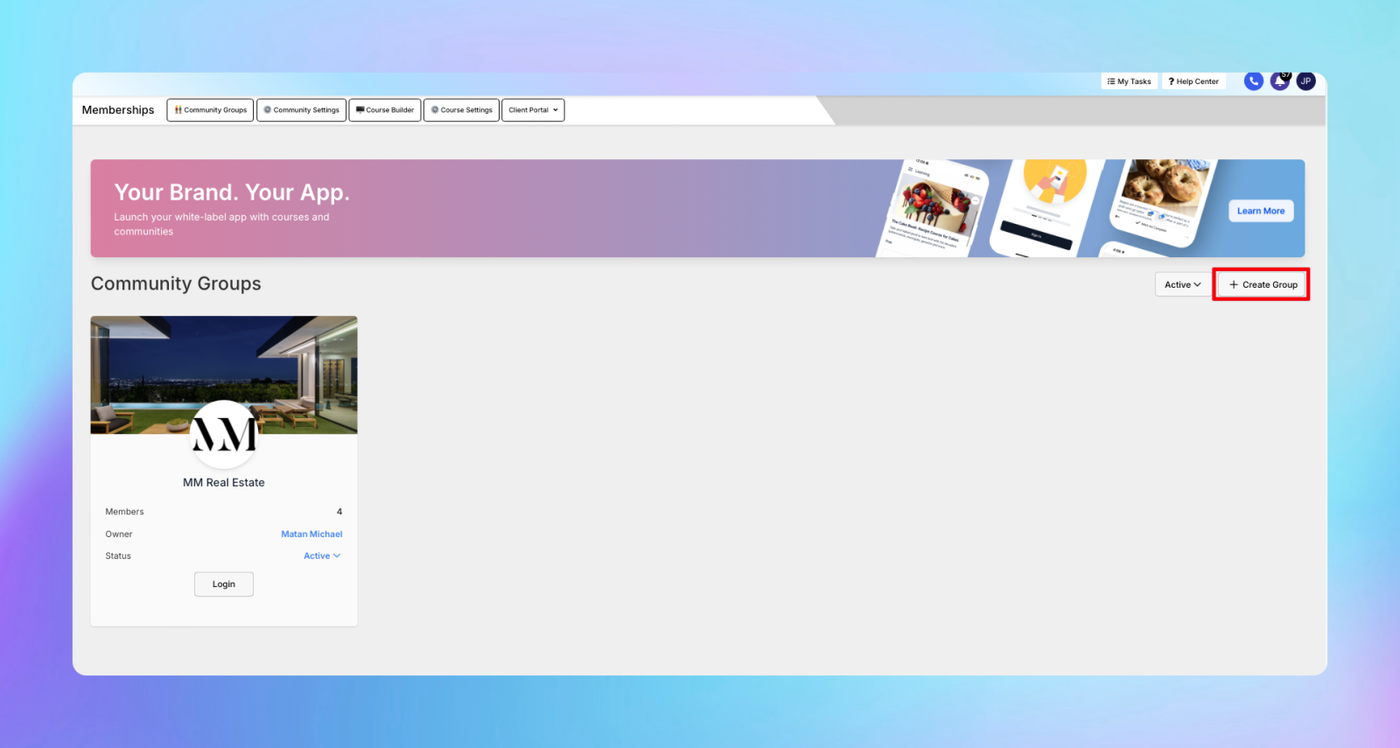
2. Create a New Group:
• Click Create Group.
3. Configure Group Details:
• Name the group (e.g., “Marketing Experts Forum”).
• Add a group description to explain its purpose.
• Set group access rules:
• Public: Accessible to all members.
• Private: Only accessible to enrolled members of specific courses.
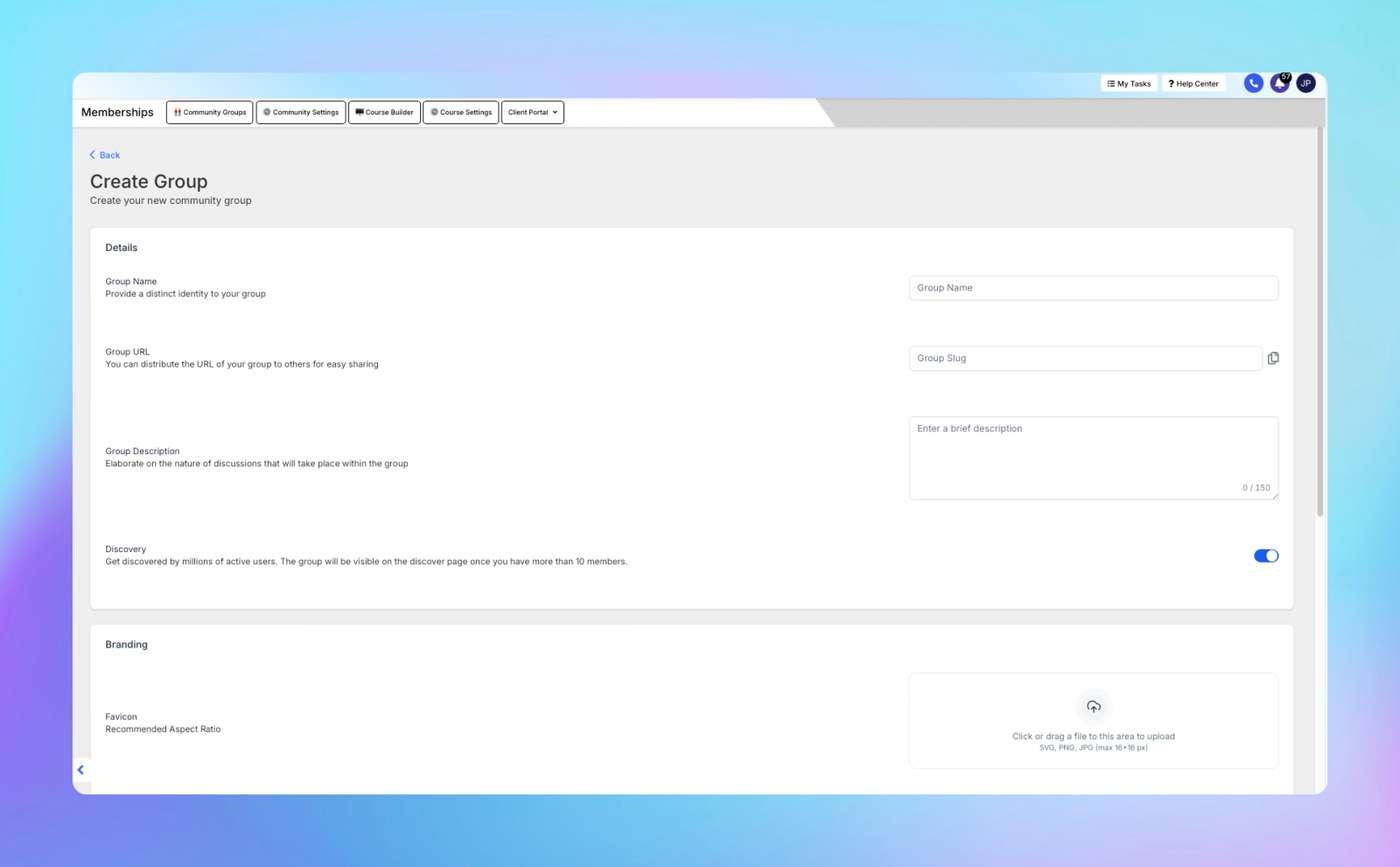
4. Save and Activate:
• Save the group and activate it for members to access.
Managing Community Groups:
• Post Announcements: Share updates or pinned messages.
• Approve or Remove Posts: Maintain community guidelines and ensure quality discussions.
• View Engagement Metrics: Monitor active members and participation rates.
2. Community Settings
The Community Settings section in DealTrail allows you to configure the domain for your community groups, ensuring a professional and branded experience for your members. Setting up a custom domain for your community improves credibility and aligns it with your brand identity.
Why Set Up a Custom Domain for Your Community?
1. Brand Consistency: Use your own domain (e.g., community.yourwebsite.com) instead of a generic DealTrail domain.
2. Professional Experience: Enhance trust by providing a seamless experience for members.
3. Improved SEO: Boost search engine visibility when your community is tied to your branded domain.
Steps to Set Up a Custom Domain for Your Community
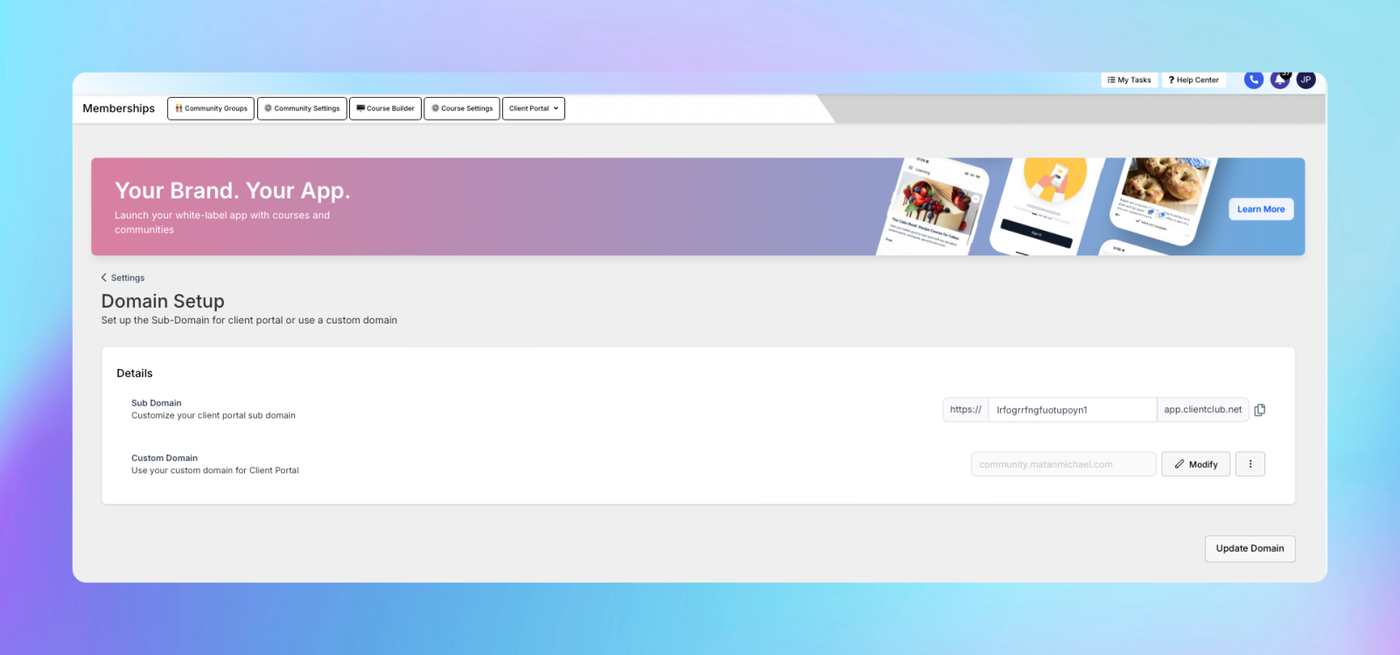
Step 1: Access Community Settings
1. Navigate to Sites > Communities > Community Settings.
2. Under Community Settings, locate the Domain Setup section.
Step 2: Choose Your Domain
You have two options for domain setup:
1. Subdomain: Recommended for communities (e.g., community.yourwebsite.com).
2. Root Domain: Use the main domain (e.g., yourwebsite.com) if the community is your primary website.
Step 3: Configure Your Domain in DealTrail
1. Add Your Domain:
• Click Add Domain and enter your desired domain (e.g., community.yourwebsite.com).
2. Get DNS Records:
• DealTrail will generate the DNS records required to connect your domain:
• CNAME Record: Points your subdomain (e.g., community) to DealTrail's hosting endpoint (target.clickfunnels.com or a similar address provided).
Step 4: Update Your DNS Settings
1. Log in to Your Domain Registrar:
• Access the domain settings in your registrar account (e.g., GoDaddy, Namecheap, or Cloudflare).
2. Add the Provided DNS Records:
• Create a CNAME Record:
• Name/Host: Enter the subdomain (e.g., community).
• Value/Points To: Paste the DealTrail-provided target URL (e.g., target.clickfunnels.com).
• If required, delete any existing conflicting DNS records for the subdomain.
3. Save Changes:
• Save your DNS configuration and wait for DNS propagation (this can take up to 24 hours).
Step 5: Verify Your Domain in DealTrail
1. Return to DealTrail's Community Settings > Domain Setup section.
2. Click Verify Domain.
• If the DNS records are correctly configured, the domain will be verified, and you’ll see a confirmation message.
• If verification fails, double-check your DNS records and try again.
Step 6: Enable SSL (Optional but Recommended)
1. Once the domain is verified, toggle Enable SSL to secure your domain.
• SSL ensures that all connections to your community are encrypted and secure.
2. Wait for SSL to activate (usually takes a few minutes).
Tips for Domain Setup
• Subdomain vs. Root Domain:
• Use a subdomain (e.g., community.yourwebsite.com) if you have other areas of your website, like a main website or blog, on the root domain.
• Use the root domain if the community is the primary focus of your online presence.
• DNS Propagation Time:
• Changes to DNS settings can take up to 24 hours to propagate globally. Be patient during this time.
• Troubleshooting Verification Issues:
• Ensure there are no typos in the DNS records.
• Remove conflicting CNAME or A records for the same subdomain.
• Use tools like DNS Checker to confirm the CNAME record is pointing correctly.
Benefits of Using a Custom Domain for Communities
1. Enhanced Member Trust: Custom domains look professional and increase credibility.
2. Improved Branding: Keeps your community aligned with your main brand identity.
3. Seamless Integration: Using a custom domain provides a smoother experience for users moving between your main website and community.
3. Course Builder
The Course Builder is the tool for creating, structuring, and organizing online courses.
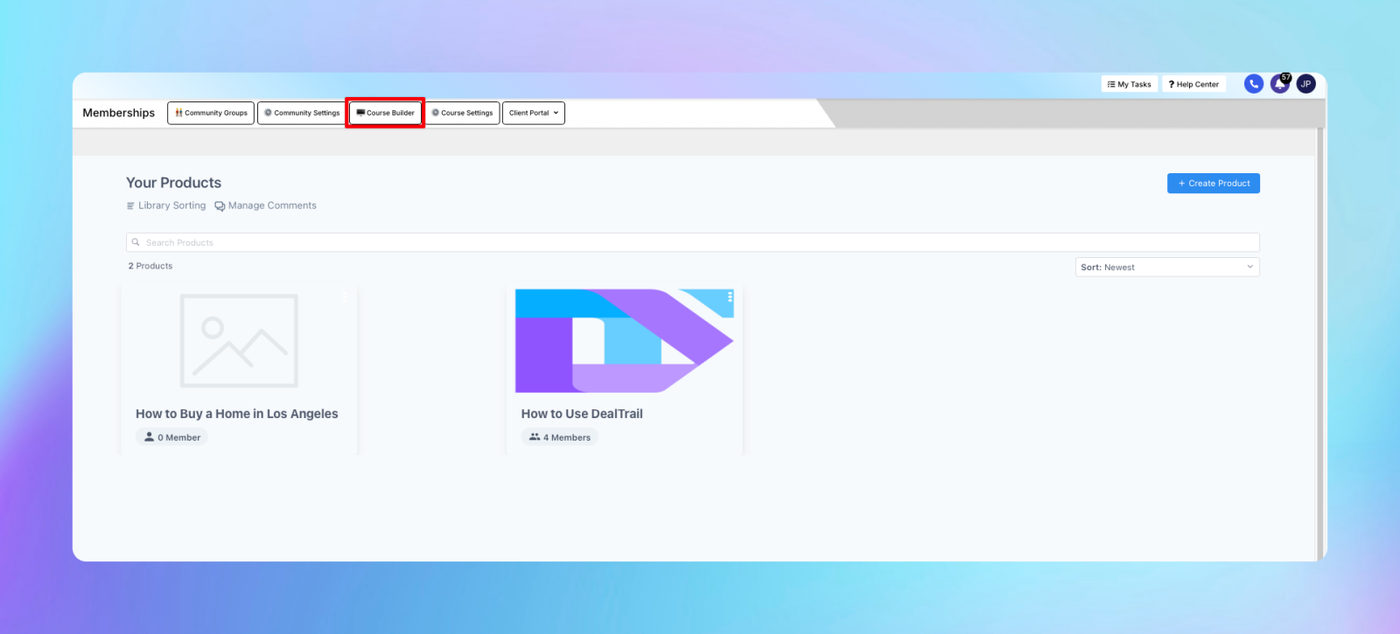
Steps to Build a Course:
1. Navigate to Course Builder:
• Go to Sites > Communities > Course Builder.
2. Create a New Course:
• Click Create Product and provide a course title, description, and thumbnail.
3. Add Modules and Lessons:
• Add modules (e.g., “Module 1: Basics of Marketing”).
• Within each module, add lessons:
• Video Lessons: Upload videos or embed from platforms like YouTube or Vimeo.
• Text Lessons: Add written content or downloadable PDFs.
• Quizzes: Create assessments to test member knowledge.
4. Set Drip Schedules (Optional):
• Release content gradually by setting drip schedules (e.g., unlock Module 2 a week after completing Module 1).
5. Preview the Course:
• Use the preview option to view the course as your members would.
6. Publish the Course:
• Save and publish the course for members to access.
Additional Features:
• Drag-and-Drop Editor: Rearrange modules and lessons effortlessly.
• Content Types: Use a variety of content formats, including text, video, audio, and quizzes.
4. Course Settings
The Course Settings section in DealTrail allows you to customize various aspects of your courses, including branding, domain setup, email communication, and mobile app configuration. These settings ensure that your courses align with your branding and offer a seamless experience for your members.
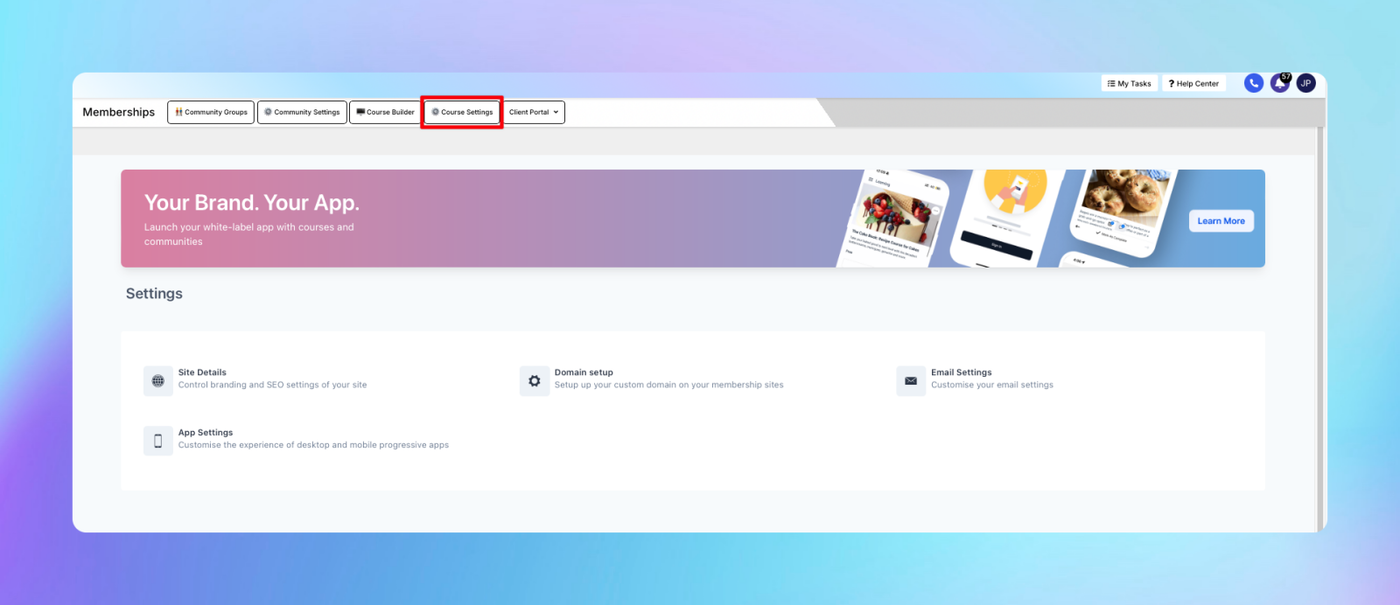
1. Site Details
The Site Details section is where you configure the branding and general settings for your course site.
Key Features:
• Set up your site name and branding.
• Customize logos and favicon for your course site.
• Add your business details.
Steps to Configure Site Details:
1. Navigate to Site Details:
• Go to Settings > Communities > Course Settings > Site Details.
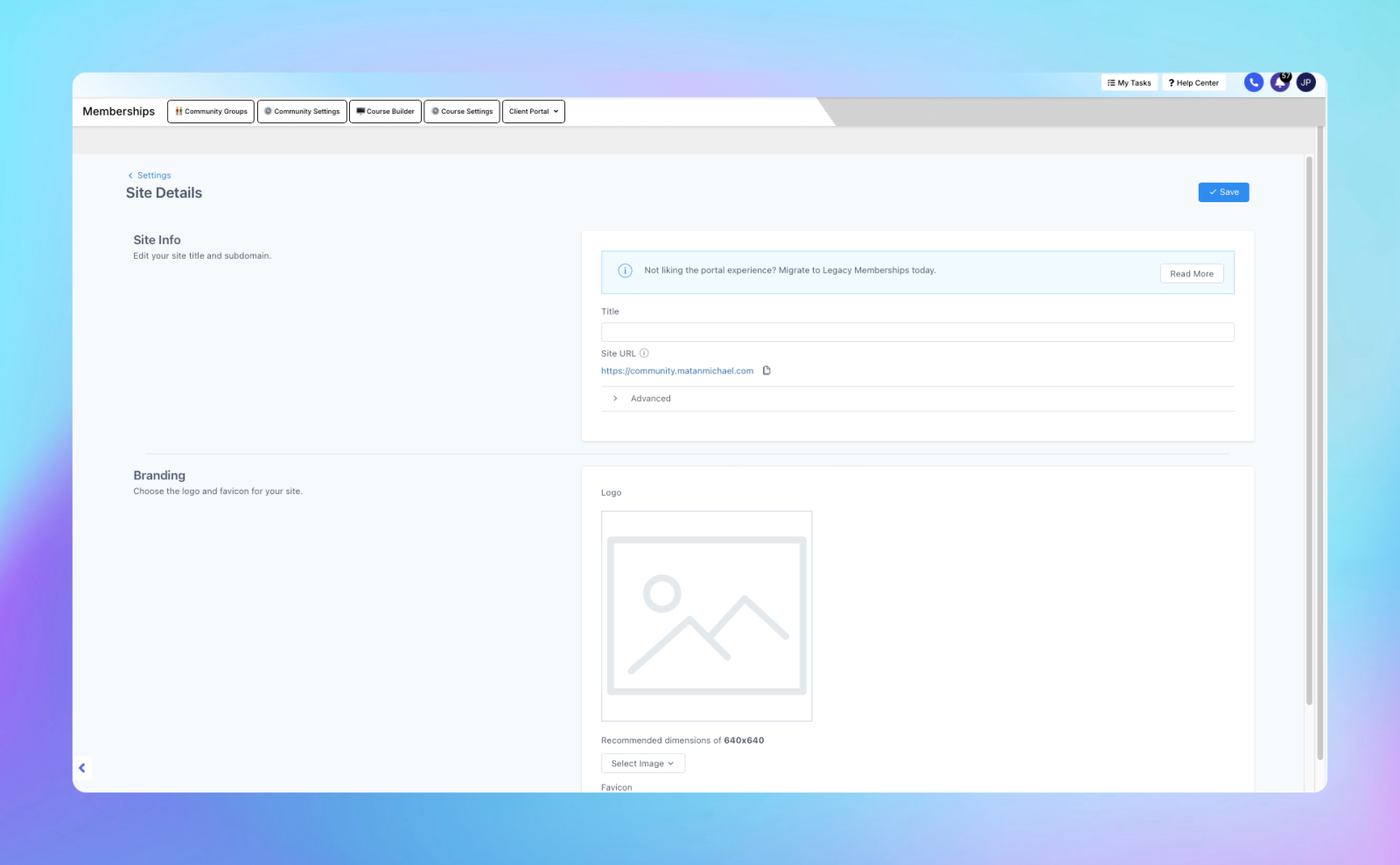
2. Configure General Settings:
• Site Name: Enter the name of your course site (e.g., “Your Business Academy”).
• Tagline (Optional): Add a short tagline to describe your site.
3. Upload Branding:
• Logo: Upload your site’s logo to appear on the course portal.
• Favicon: Upload a favicon (small icon that appears in browser tabs).
4. Save Changes:
• Click Save to apply the settings.
Tip: Keep branding consistent across your site to reinforce your identity and build trust with your audience.
2. Domain Setup
The Domain Setup section allows you to connect a custom domain to your course portal, ensuring a professional and branded experience.
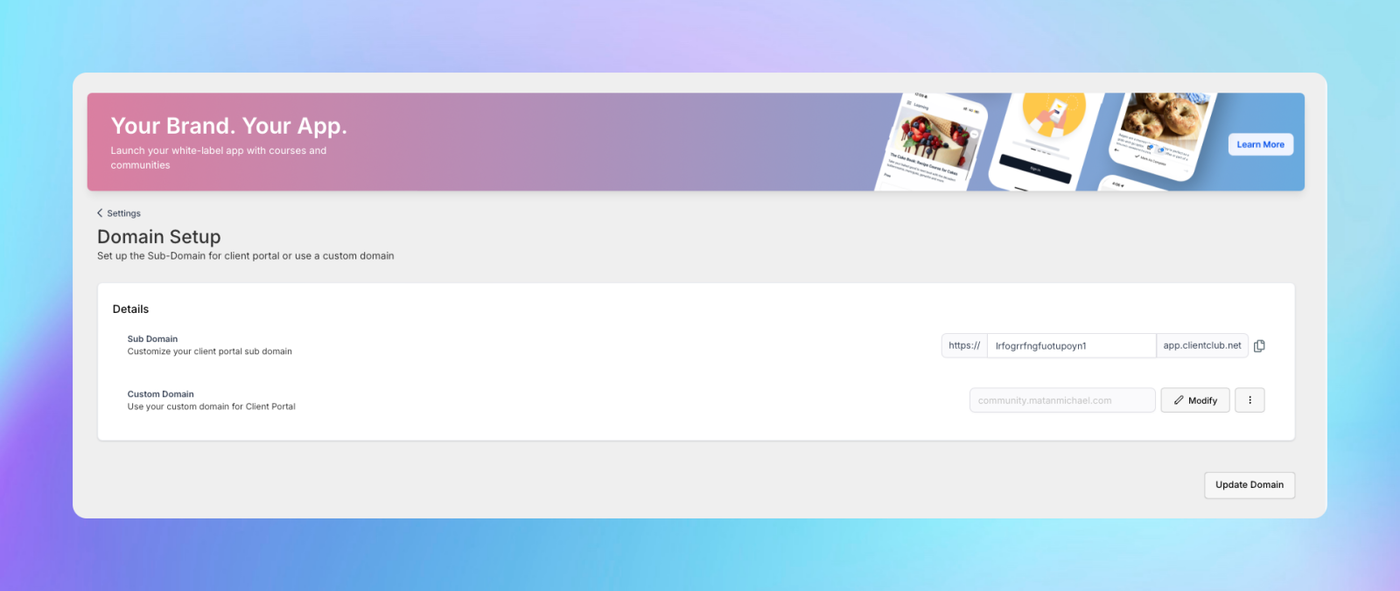
Steps to Set Up a Custom Domain:
1. Access Domain Setup:
• Go to Sites > Memberships > Course Settings > Domain Setup.
2. Add Your Domain:
• Enter your desired domain or subdomain (e.g., courses.yourwebsite.com).
3. Update DNS Records:
• Log in to your domain registrar (e.g., GoDaddy, Namecheap, or Cloudflare).
• Add the provided DNS records:
• CNAME Record: Point your subdomain (e.g., courses) to the target URL provided by DealTrail (e.g., target.clickfunnels.com).
4. Verify Domain:
• Return to DealTrail and click Verify Domain. Allow up to 24 hours for DNS propagation.
5. Enable SSL:
• After verification, toggle Enable SSL to secure your site with HTTPS.
6. Save Changes:
• Once SSL is enabled, your domain setup is complete.
3. Email Settings
The Email Settings section is used to configure automated emails sent to course members, such as welcome emails, reminders, and updates.
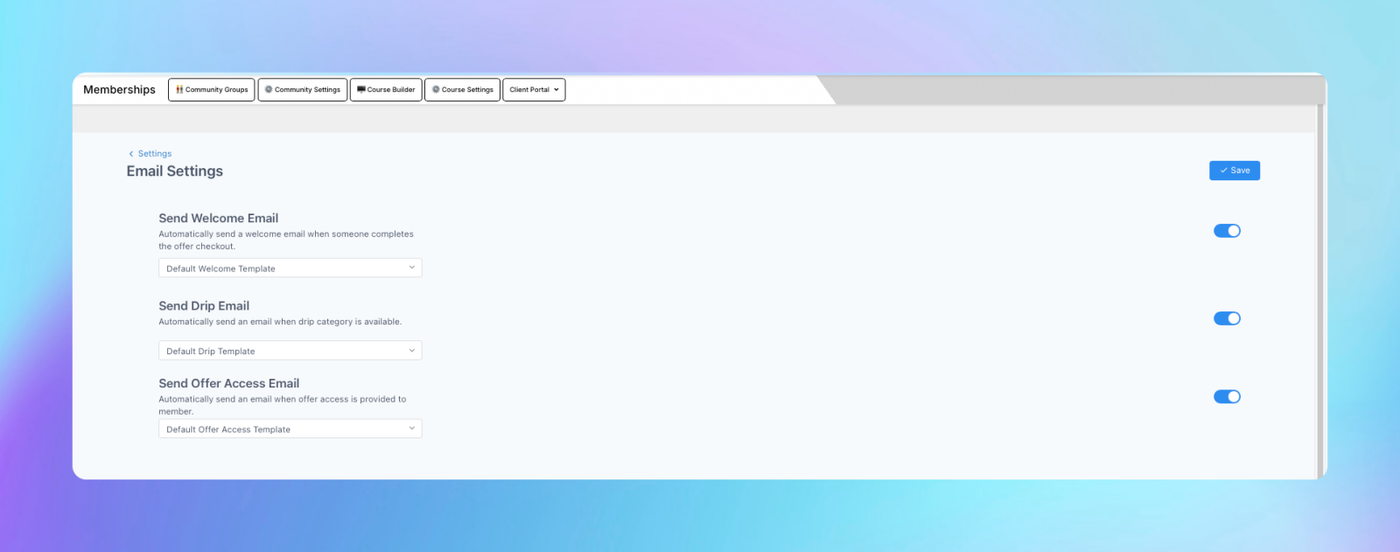
Steps to Configure Email Settings:
1. Access Email Settings:
• Go to Sites > Memberships > Course Settings > Email Settings.
2. Customize Email Templates:
• Welcome Email: Personalize the email members receive upon enrollment. Include a welcome message and login details.
• Drip Emails: Set up course progress reminders or event notifications.
• Offer Access Emails: Automatically send access instructions to members when they purchase a course or membership offer.
3. Save Changes:
• Click Save to update your email settings.
Tip: Ensure your emails align with your brand voice and provide clear instructions or next steps for members.
4. App Settings
The App Settings section allows you to customize how your courses are presented within the DealTrail Mobile App. This provides a convenient way for members to access courses on their phones.
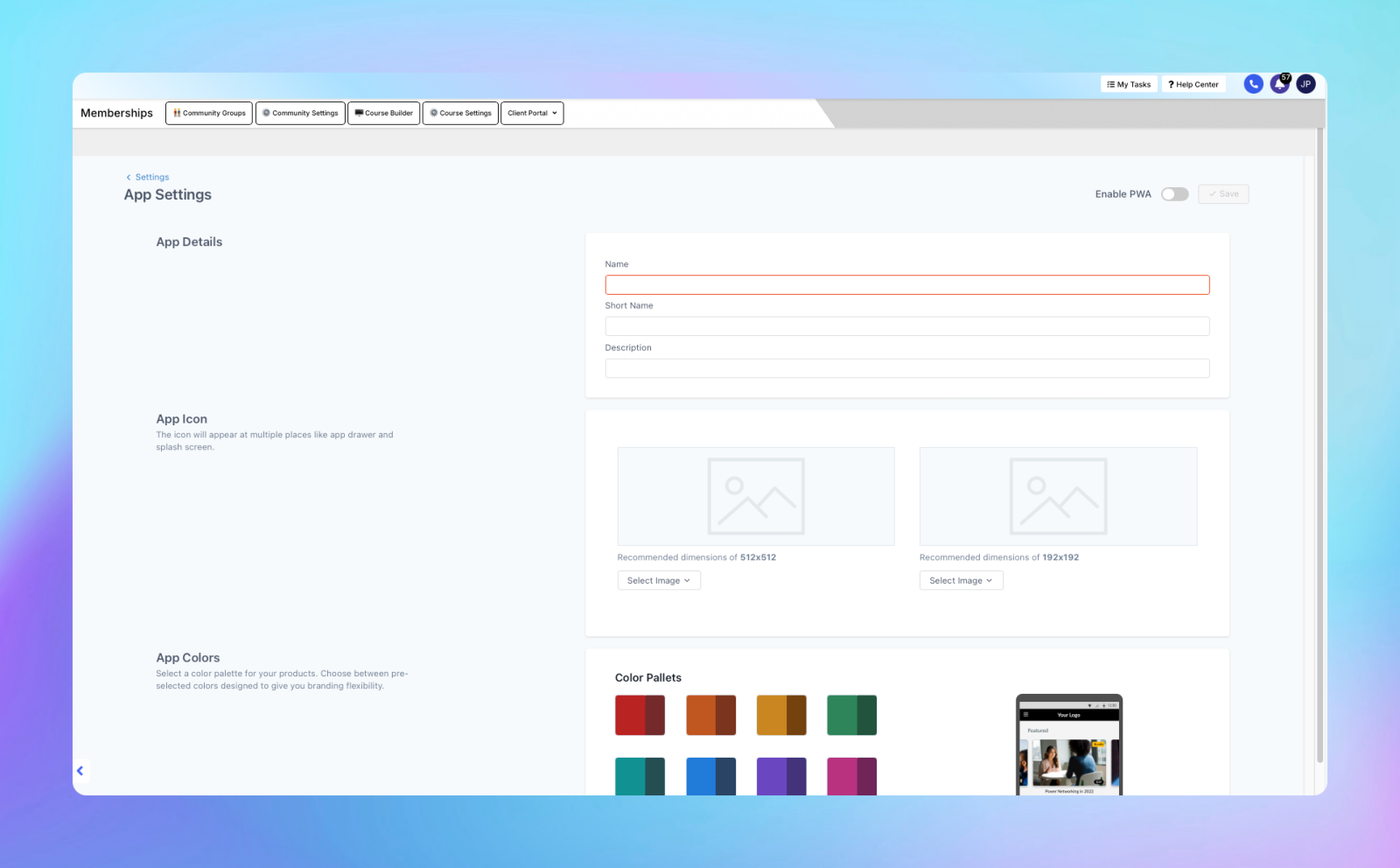
Key Features:
• Customize the app appearance for your brand.
• Provide access instructions for members to use the mobile app.
• Control app permissions and visibility.
Steps to Configure App Settings:
1. Access App Settings:
• Go to Sites > Memberships > Course Settings > App Settings.
2. Enable App Access:
• Toggle the option to allow members to access your courses via the DealTrail mobile app.
3. Customize Branding:
• Upload your logo and set the primary color for the app interface.
4. Save Changes:
• Click Save to apply the settings.
Note: The DealTrail mobile app is branded as “Lead Connector” unless you’ve purchased the White Label Mobile App feature.
5. Client Portal
The Client Portal in DealTrail is a centralized space where your clients or members can access courses, community groups, and resources. It provides a professional, branded environment for managing their learning journey or accessing services.
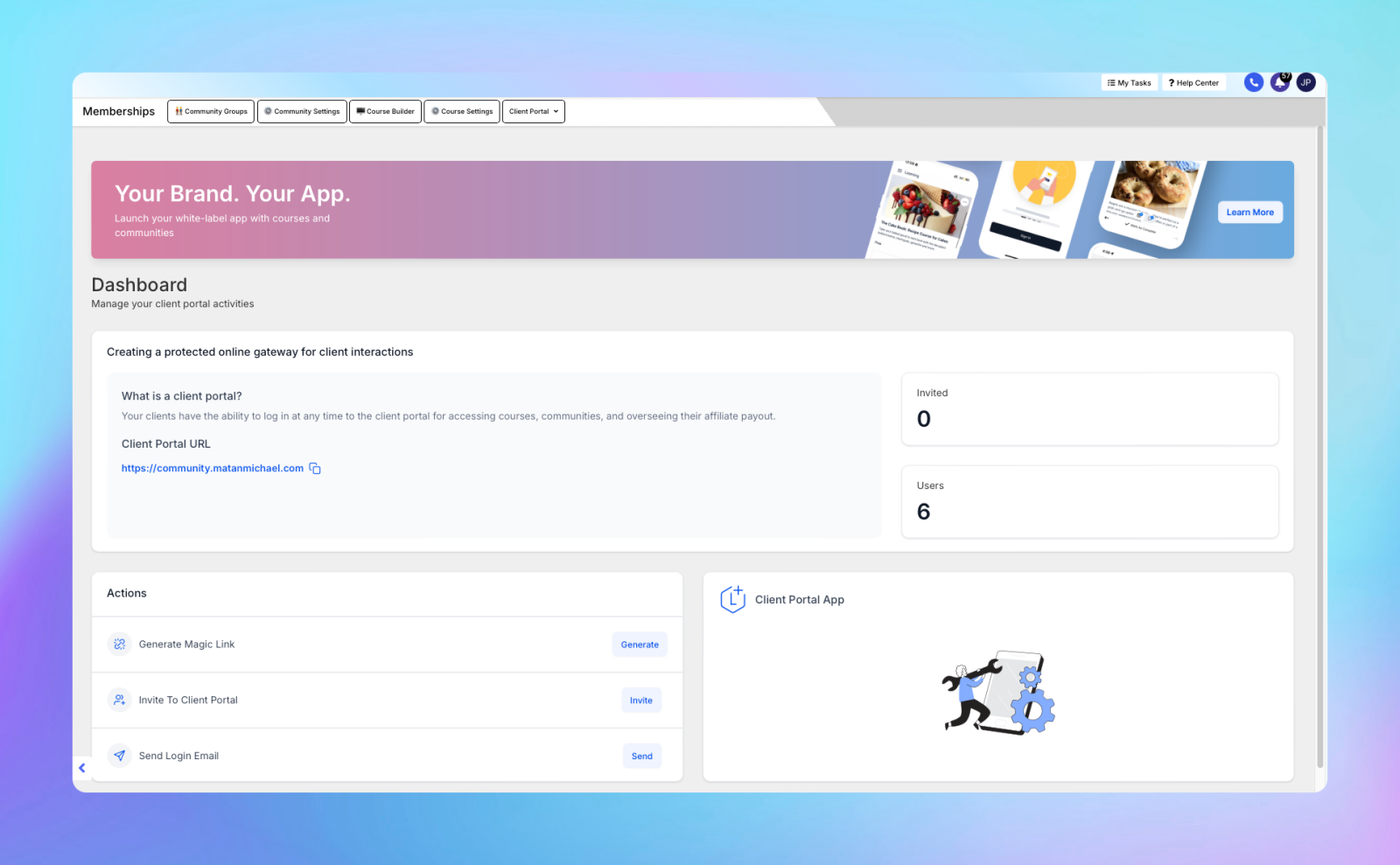
1. Dashboards
The Dashboards section provides an overview of client activity, progress, and engagement. This section is used to monitor and manage client interactions with your membership site.
Key Features:
• Member Activity Overview: Track member logins, course progress, and community engagement.
• Course Completion Data: View progress percentages and completed lessons or modules.
• Engagement Metrics: Identify active and inactive members to take targeted actions.
Steps to Access Dashboards:
1. Navigate to Sites > Memberships > Client Portal > Dashboards.
2. Review the following data:
• Active Members: See who is actively engaging with your content.
• Course Progress: View detailed progress for each course/module.
• Recent Activity: Track member logins, posts in community groups, and lesson completions.
3. Use Filters:
• Filter by date range, specific courses, or individual members for a more detailed view.
4. Export Reports:
• Click Export to download activity reports in CSV format for further analysis.
How to Use Dashboards:
• Identify Engaged Members: Focus your marketing and retention efforts on highly engaged members.
• Track At-Risk Members: Send re-engagement emails or offers to members with low activity.
• Measure Course Effectiveness: Use completion data to determine which courses or modules are most engaging.
2. Branded Mobile App
The Branded Mobile App allows you to offer a mobile-friendly experience to your members, providing access to courses, community groups, and progress tracking directly from their phones. If you’ve purchased the White Label Mobile App, this section allows you to customize the app with your branding.
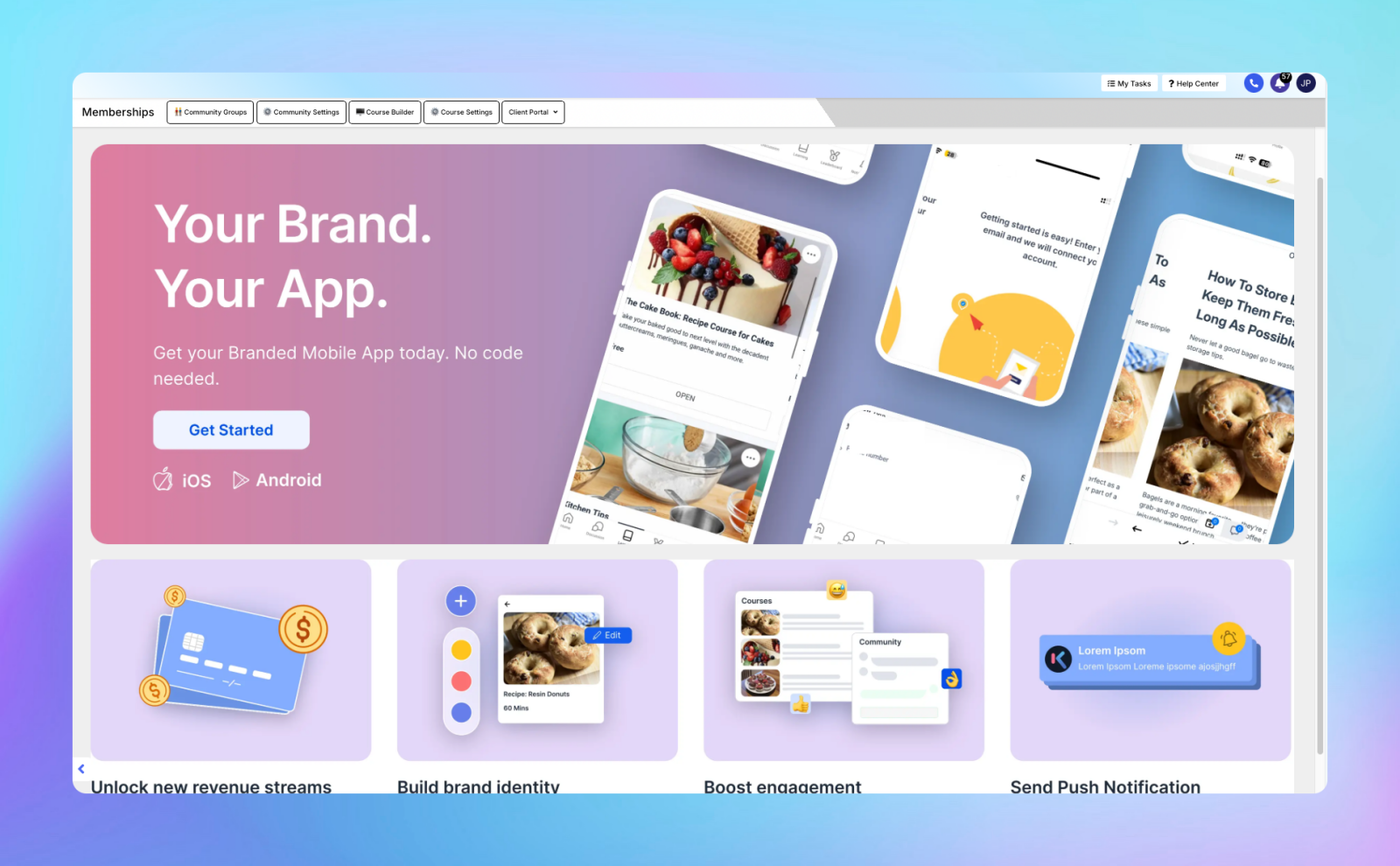
Key Features:
• Custom Branding: Add your logo, colors, and app icon to the mobile app.
• Push Notifications: Engage members with timely updates and notifications.
• Seamless Member Access: Members can log in to view courses, community groups, and progress.
Steps to Configure Branded Mobile App:
1. Navigate to Sites > Memberships > Client Portal > Branded Mobile App.
2. Customize Branding:
• App Icon: Upload an app icon (recommended size: 1024x1024 pixels).
• App Name: Enter the name of your app (e.g., “Your Business Academy”).
• Primary Colors: Select colors for the app’s interface to match your brand.
4. Configure Push Notifications:
• Set up notifications for course updates, announcements, or member progress.
• Example: “You’ve unlocked a new lesson in [Course Name]!”
5. Submit for Review:
• DealTrail will submit the app to the App Store (iOS) and Google Play Store (Android) on your behalf.
• Review and approval typically take 7-14 business days.